
Today I’m going to walk you through creating a simple Web Thing using an inexpensive off-the-shelf ESP8266 board.

The power of web things comes from their ability to connect the digital world of web pages with the physical world of things. We recently released the Things Framework, a collection of software intended to make it easy to create new web things. The relevant library for this example is the webthing-esp8266 library, which makes easy it to connect Arduino-programmed ESP8266 boards with the Web of Things. We hope that this lowers the barrier to creating compelling experiences with our gateway and the Web Thing API.
The first step in our journey is to install the Arduino IDE and its ESP8266 board support. Visit Adafruit’s ESP8266 documentation for a very detailed walkthrough of setting up. At the end of setup, you should have an Arduino IDE installed that has the ESP8266WiFi, ESP8266mDNS, and ESP8266WebServer libraries available.

Next, let’s install the ArduinoJson and webthing-esp8266 libraries. To install ArduinoJson, go to Sketch > IncludeLibrary > Manage Libraries, search for ArduinoJson, and click the install button.

The process of downloading webthing-esp8266 is a bit more involved. Download a zip of the library from the GitHub releases page and add it using your Arduino IDE’s Sketch > Include Library > Add ZIP Library option.

If you prefer PlatformIO over the Arduino IDE, you can instead install webthing-esp8266 from the PlatformIO registry.
Now that we have all the prerequisites out of the way, let’s get to the fun part. The webthing-esp8266 library works by assembling a collection of components that come together to expose the Web Thing API. The main coordinator is the WebThingAdapter which keeps track of a ThingDevice that in turn has an assortment of ThingProperties.
The WebThingAdapter knows how to speak the Web of Things API with our Gateway and handles all the translation necessary for the Gateway to discover and interact with the ThingDevice. The ThingDevice represents the physical object we want to put on the web. In a simple case, this may be a few LEDs. Once we get more complex, this could be a quadcopter, an OLED display, or even a Tesla coil. Before we get ahead of ourselves, let’s step through a basic example which exposes the ESP8266’s built-in LED.
To start, create a new sketch in the Arduino IDE. Now that we have a place to write code, we need to include all the libraries this sketch uses. These are ESP8266WiFi and WiFiClient for connecting to our WiFi network, Thing for creating Web-of-Things-compatible objects, and WebThingAdapter for translating these objects into a web server.
#include <ESP8266WiFi.h>
#include <WiFiClient.h>
#include <Thing.h>
#include <WebThingAdapter.h>
The next step is to configure the constants we’re using. These are ssid for our WiFi network’s name, password for its password, and lampPin for the pin of the LED we want to control.
const char* ssid = "......";
const char* password = "..........";

const int lampPin = LED_BUILTIN;
Now we get to specify what kind of web thing we’re creating. First, we create the adapter, which sets the name of the board. If you want to have multiple ESP8266 boards on the same network, you’ll need to make sure their names are unique.
WebThingAdapter adapter("esp8266");
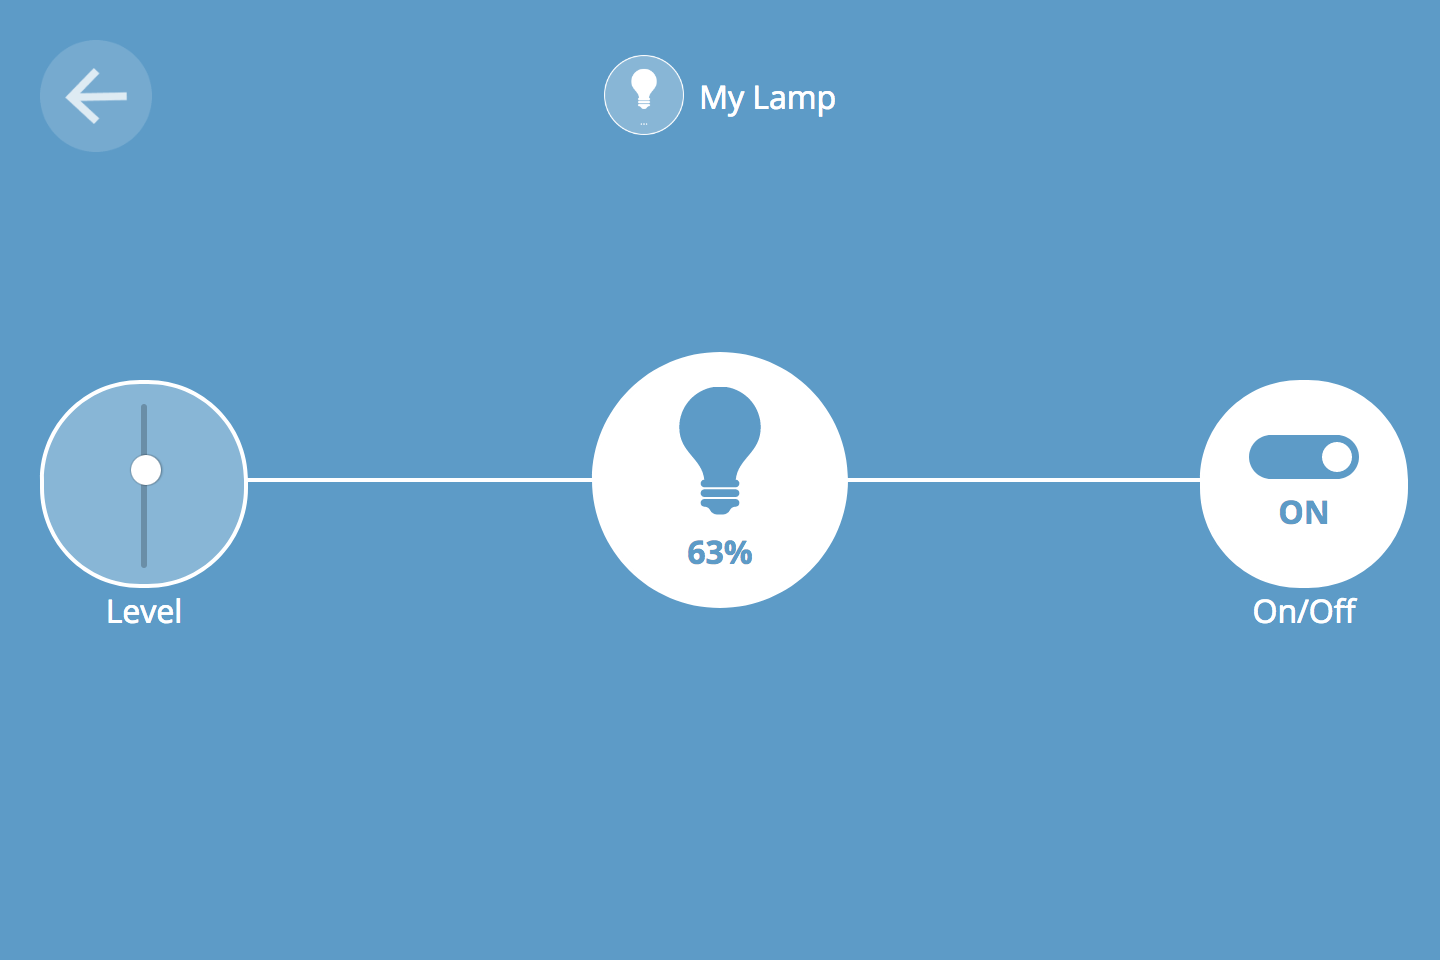
Then we need to specify the ThingDevice we want to have on our gateway. In this case, we want to expose the LED as a dimmableLight called “My Lamp” which will allow us to turn it on and control its brightness from the gateway.
ThingDevice lamp("lamp", "My Lamp", "dimmableLight");
Next we define the properties we want the ThingDevice to have. A dimmableLight needs two properties: “on” and “level”.
ThingProperty lampOn("on", "Whether the lamp is turned on", BOOLEAN);
ThingProperty lampLevel("level", "The level of light from 0-100", NUMBER);
In the start of our setup function we initialize the LED, connect to our WiFi network, and turn on the Serial port for debugging.
void setup() {
  pinMode(lampPin, OUTPUT);
  digitalWrite(lampPin, HIGH);
  analogWriteRange(255);

  Serial.begin(115200);
  WiFi.mode(WIFI_STA);
  WiFi.begin(ssid, password);
  Serial.println("");

  // Wait for connection
  while (WiFi.status() != WL_CONNECTED) {
    delay(500);
    Serial.print(".");
  }

  Serial.println("");
  Serial.print("Connected to ");
  Serial.println(ssid);
  Serial.print("IP address: ");
  Serial.println(WiFi.localIP());
With that boilerplate out of the way, we can tie together our ThingProperties, ThingDevice, and WebThingAdapter. The lamp needs to know that it owns the lampOn and lampLevel properties, while the adapter needs to know that the lamp exists.
  lamp.addProperty(&lampOn);
  lamp.addProperty(&lampLevel);
  adapter.addDevice(&lamp);
  adapter.begin();
  Serial.println("HTTP server started");
}
In our continuously running loop function we first update the adapter so it can handle talking to the gateway or any other Web of Things clients. Next, we update the light based on the property values. Note that we take the 0-100 brightness level and map it from 255-0 because the brightness of the ESP8266’s built-in LED is inverted.
void loop() {
  adapter.update();
  if (lampOn.getValue().boolean) {
    int level = map(lampLevel.getValue().number, 0, 100, 255, 0);
    analogWrite(lampPin, level);
  } else {
    analogWrite(lampPin, 255);
  }
}
Our sketch is done! If you upload this to your ESP8266 you should be able to see the “My Lamp” thing in your gateway’s Add Things list. You can then click to turn the LED on and off, or click on the “splat” icon to control its brightness level.


You can also control your web thing directly by issuing HTTP requests to http://esp8266.local/. For example, you can use this curl command to turn the LED on from the terminal.
curl -X PUT http://esp8266.local/things/lamp/properties/on -H 'Content-Type: application/json' -d '{"on":true}'
This is just the beginning of what you can do with the Web Thing API. If you’d prefer working in a higher-level language, check out our other web thing examples. If you think on/off and level aren’t cool enough on their own, we also support string properties!
About James Hobin
Level 25 Computer Wizard on a quest to keep the Internet of Things free and open.
3 comments