
How to polish your app and prepare it for market
In previous sections of this step-by-step series (Part 1, Part 2, and Part 3) we’ve created an app that loads multiple school plans from the server.
What we have so far is functional, but still has a number of issues, including two which are major: no offline mode and a hard-coded configuration. In this closing post, we’ll work on all of these issues.
If you haven’t built up the examples from the previous parts, use stage7 app and stage7 server as a starting point. To get started, follow the instructions on how to load any stage in this tutorial.
Refactoring
First, let’s do some refactoring. We’ll add a User object type to make it easier to choose which user’s plan to display. This will allow us to remove some more code from the app’s main logic flow, making the code cleaner and more modular. This object will load data from the server to create the plan UI. At the moment, rendering is done in app.onDeviceReady and app.renderData methods. Our new onDeviceReady method creates an app.user object and runs the methods needed to get and render plans. Replace the existing onDeviceReady method with the following:
onDeviceReady: function() {
    app.user = new User('johndoe');
    app.user.getPlans();

    app.activateFingerSwipe();
},
Next, delete the app.renderData method completely. We will store this functionality inside our new User object instead, as you’ll see below.
Next, at the beginning of the index.js file (before the definition of Plan), add the following code to define the User object:
function User(userid) {
    this.id = userid;
    this.plans = [];
}

User.prototype.getPlans = function() {
    var self = this;
    var request = new XMLHttpRequest({
        mozAnon: true,
        mozSystem: true});
    request.onload = function() {
        var plans = JSON.parse(this.responseText);
        for (var i = 0; i < plans.length; i++) {
            self.plans.push(new Plan(plans[i]));
        }
        self.displayPlans();
    };
    request.open("get", app.getPlansURL + this.id, true);
    request.send();
};

User.prototype.displayPlans = function() {
    var self = this;
    navigator.globalization.getDateNames(function(dayOfWeek){
        var deck = document.getElementById('plan-group');
        var tabbar = document.getElementById('plan-group-menu');
        for (var i = 0; i < self.plans.length; i++) {
            self.plans[i].createUI(deck, tabbar, dayOfWeek);
        }
    }, function() {}, {type: 'narrow', item: 'days'});
};
This contains functionality previously found in renderData and onDeviceReady. After the plan’s JSON is loaded from the server we iterate over the list and create a list of Plan objects in user.plans. We then call user.displayPlans, which creates the required DOM environment and invokes plan.createUI for each element of user.plans.
You may notice that the above code uses app.getPlansURL to allow the XHR call to find the JSON. Previously the URL was hardcoded into request.open("get", "http://127.0.0.1:8080/plans/johndoe", true);. Since it’s better to keep settings in one place we’ll add this as a parameter of the app object instead.
Add the following into your code:
var app = {
    <strong>getPlansURL: "http://127.0.0.1:8080/plans/",</strong>
    // ....
}
Now try preparing your app again with the cordova prepare terminal command, starting your server, and reloading the app in WebIDE (as we’ve done in previous articles). The app should work as before.
Offline mode
Let’s turn our attention to making the app work offline.
There are several technologies available to store data on the device. I’ve decided to use the localStorage API, as the data we need to store is basically just simple strings and doesn’t need any complex structuring. As this is a key/value store, objects need to be stringified (represented as a string). I will use only two functions — setItem() and getItem(). For example, storing a user id would require you to call localStorage.setItem('user_id', user.id);.
There are two values we definitely need to store in the phone memory — the ids of the current user and the plans. To make the app fully open and allow users to use servers not provided by the app creators we also need to store the server address. We’ll start by storing the plans. The user id and server will be still hardcoded. Let’s add a new method — User.loadPlans — and call that from app.onDeviceReady, instead of calling both user.getPlans() and app.user.displayPlans. We will decide if the plans need to be loaded from the server and then display the plans by calling User.displayPlans() from User.loadPlans.
First update onDeviceReady again, to this:
onDeviceReady: function() {
    app.user = new User('johndoe');
    app.user.loadPlans();
    app.activateFingerSwipe();
},
Now add in the following definition for the loadPlans method, up near your other User object-defining code:
User.prototype.loadPlans = function() {
    var plans = localStorage.getItem('plans');
    if (plans === null) {
        return this.getPlans();
    }
    console.log('DEBUG: plans loaded from device');
    this.initiatePlans(plans);
    this.displayPlans();
};
The above method calls another new method — initiatePlans. This parses the JSON representation of the plans and initiates Plan objects inside the User.plans array. In the future we would like to be able to reload the plans from the server, but the existing code always adds new plans instead of replacing them.
Add the following definition just below where you added the loadPlans code:
User.prototype.initiatePlans = function(plansString) {
    var plans = JSON.parse(plansString);
    for (var i = 0; i < plans.length; i++) {
        this.plans.push(new Plan(plans[i]));
    }
}
We also need to store the plans on the client. The best point to do this is right after the plans have been loaded from the server. We will call localStorage.setItem('plans', this.responseText) inside the success response function of getPlans. We must also remember to call the initiatePlans method.
Update your getPlans definition to the following:
User.prototype.getPlans = function() {
    var self = this;
    var request = new XMLHttpRequest({
        mozAnon: true,
        mozSystem: true});
    request.onload = function() {
        console.log('DEBUG: plans loaded from server');
        self.initiatePlans(this.responseText);
        localStorage.setItem('plans', this.responseText);
        self.displayPlans();
    };
    request.onerror = function(error) {
        console.log('DEBUG: Failed to get plans from ``' + app.getPlansURL + '``', error);
    };
    request.open("get", app.getPlansURL + this.id, true);
    request.send();
};
At this moment, successful loading of the user’s plans happens only once. Since school plans change occasionally (usually twice a year) you should be able to reload the plans from the server any time you want. We can use User.getPlans to return updated plans, but first we need to remove existing plans from the UI, otherwise multiple copies will be displayed.
Let’s create User.reloadPlans — add the code below your existing User object-defining code:
User.prototype.reloadPlans = function() {
    // remove UI from plans
    for (var i = 0; i < this.plans.length; i++) {
        this.plans[i].removeUI();
    }
    // clean this.plans
    this.plans = [];
    // clean device storage
    localStorage.setItem('plans', '[]');
    // load plans from server
    this.getPlans();
};
There is a new method to add to the Plan object too — Plan.removeUI — which simply calls Element.remove() on a plan’s card and tab. Add this below your previous Plan object-defining code:
Plan.prototype.removeUI = function() {
    this.card.remove();
    this.tab.remove();
};
This is a good time to test if the code has really reloaded. Run cordova prepare again on your code, and reload it in WebIDE.
We’ve got two console.log statements inside loadPlans and getPlans to let us know if the plans are loaded from device’s storage or the server. To initiate a reload run this code in Console:
app.user.reloadPlans()Note: Brick reports an error at this point, as the link between each tab and card has been lost inside the internal system. Please ignore this error. Once again, our app still works.
Let’s make the reload functional by adding a UI element to reload the plans. In index.html, wrap a div#topbar around the brick-tabbar. First, add a reload button:
<div id="reload-button"></div>
<div id="topbar">
    <brick-tabbar id="plan-group-menu">
    </brick-tabbar>
</div>
Now we’ll make the button float to the left and use calc to set the size of the div#topbar. This makes Brick’s tabbar calculate the size when layout is changed (portrait or horizontal). In css/index.css, add the following at the bottom of the file:
#topbar {
	width: calc(100% - 45px);
}

#reload-button {
	float: left;
	/* height of the tabbar */
	width: 45px;
	height: 45px;
	background-image: url('../img/reload.svg');
	background-size: 25px 25px;
	background-repeat: no-repeat;
	background-position: center center;
}
We will download some Gaia icons to use within the application. At this stage, you should save the reload.svg file inside your img folder.
Last detail: Listen to the touchstart event on the #reload-button and call app.user.reloadPlans. Let’s add an app.assignButtons method:
assignButtons: function(){
    var reloadButton = document.getElementById('reload-button');
    reloadButton.addEventListener('touchstart', function() {
        app.user.reloadPlans();
    }, false);
},
We need to call it from app.deviceReady before or after app.activateFingerSwipe().
onDeviceReady: function() {
    // ...
    app.activateFingerSwipe();
    app.assignButtons();
},
At this point, save your code, prepare your cordova app, and reload it in WebIDE. You should see something like this:
Here you can find current code for app and server.
Settings page
Currently all of the identity information (the address of the server and user id) is hardcoded in the app. If the app is to be used with others, we provide functionality for users to set this data without editing the code. We will implement a settings page, using Brick’s flipbox component to change from content to settings and vice versa.
First we must tell the app to load the component. Let’s change index.html to load the flipbox widget by adding the following line into the HTML <head> section:
<link rel="import" href="app/bower_components/brick-flipbox/dist/brick-flipbox.html">Some changes must happen inside the HTML <body> as well. brick-topbar and brick-deck need to be placed inside switchable sections of the same flipbox, and the reload button also moves to inside the settings. Replace everything you’ve got in your <body> so far with the following (although you need to leave the <script> elements in place at the bottom):
<brick-flipbox>
    <section id="plans">
        <div id="settings-button"></div>
        <div id="topbar">
            <brick-tabbar id="plan-group-menu">
            </brick-tabbar>
        </div>
        <brick-deck id="plan-group">
        </brick-deck>
    </section>
    <section id="settings">
        <div id="settings-off-button"></div>
        <h2>Settings</h2>
    </section>
</brick-flipbox>
The idea is to switch to the “settings” view on pressing a settings-button, and then back to the “plans” view with the settings-off-button.
Here’s how to wire up this new functionality. First up, inside your app definition code add a toggleSettings() function, just before the definition of assignButtons():
toggleSettings: function() {
    app.flipbox.toggle();
},
Update assignButtons() itself to the following (we are leaving the reloadButton code here, as we’ll need it again soon enough):
assignButtons: function() {
    app.flipbox = document.querySelector('brick-flipbox');
    var settingsButton = document.getElementById('settings-button');
    var settingsOffButton = document.getElementById('settings-off-button');
    settingsButton.addEventListener('click', app.toggleSettings);
    settingsOffButton.addEventListener('click', app.toggleSettings);

    var reloadButton = document.getElementById('reload-button');
    reloadButton.addEventListener('touchstart', function() {
        app.user.reloadPlans();
    }, false);
},
Next: we need to retrieve some more icons for the app. Save the settings.svg and back.svg files inside your img folder.
Let’s update our css/index.css file too, to add the additional icons in and style our new features. Add the following at the bottom of that file:
#form-settings {
    font-size: 1.4rem;
    padding: 1rem;
}
#settings-button, #settings-off-button {
    float: left;
    width: 45px;
    height: 45px;
    background-size: 25px 25px;
    background-repeat: no-repeat;
    background-position: center center;
}
#settings-button {
    background-image: url('../img/settings.svg');
}
#settings-off-button {
    background-image: url('../img/back.svg');
    border-right: 1px solid #ccc;
    margin-right: 15px;
}
brick-flipbox {
    width: 100%;
    height: 100%;
}
If you now prepare your cordova app again with cordova prepare, and reload the app inside WebIDE, you should see something like this:
Adding a settings form
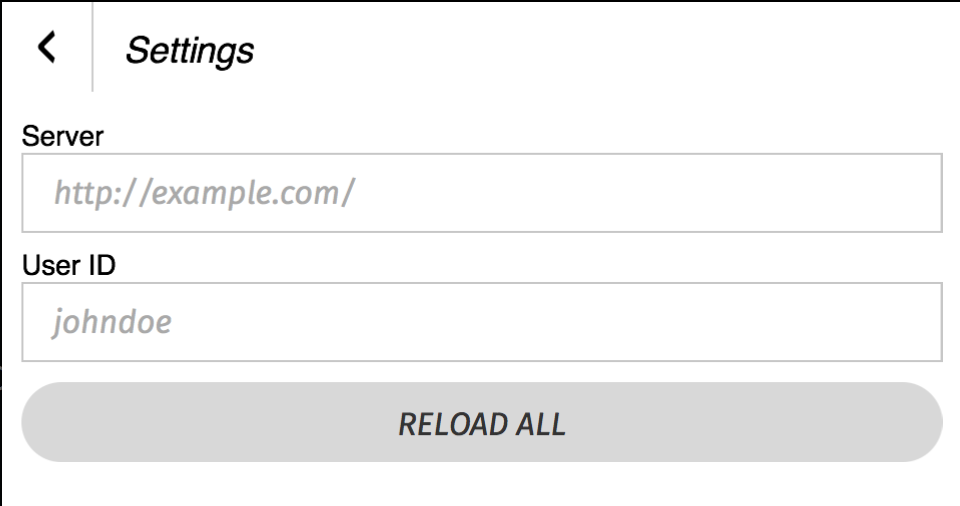
To add a form and some data, replace your current <section id="settings"></section> element with the following:
<section id="settings">
    <div id="settings-off-button"></div>
    <h2>Settings</h2>
    <form id="form-settings">
        <p><label for="input-server">Server</label></p>
        <p><input type="text" id="input-server" placeholder="http://example.com/"/></p>
        <p><label for="input-user" id="label-user">User ID</label></p>
        <p><input type="text" id="input-user" placeholder="johndoe"/></p>
        <p><button id="reload-button">RELOAD ALL</button></p>
    </form>
</section>
Making it look good is easy! We’ll use some ready-made CSS available in Firefox OS Building Blocks. Download input_areas.css and buttons.css and save them in your www/css directory.
Then add the following to your HTML <head>, to apply the new CSS to your markup.
<link rel="stylesheet" type="text/css" href="css/input_areas.css">
<link rel="stylesheet" type="text/css" href="css/buttons.css">
Go into the css/index.css file and delete the #reload-button { ... } rule to make the “RELOAD ALL” button display correctly.
Run cordova prepare again and reload the app in WebIDE, and you should see something like this:
We’ve got the view — now to support it. When the app first installs there will be no setting, so the app will have no idea how to load the data. Instead of showing empty plans we immediately toggle the view to the settings. Update your onDeviceReady function as shown:
onDeviceReady: function() {
    app.plansServer = localStorage.getItem('plansServer');
    app.userID = localStorage.getItem('userID');
    app.activateFingerSwipe();
    app.assignButtons();

    if (app.plansServer && app.userID) {
        app.user = new User(app.userID);
        app.user.loadPlans();
    } else {
        app.toggleSettings();
    }
},
The app needs to read the data from our form inputs, so save them into the phone’s storage, and reload after the change. Let’s add this functionality at the end of the app.assignButtons function. First we will stop the form from submitting (otherwise our app would just reload the index.html instead of redrawing the content). Add the following code to the end of the assignButtons function, just before the closing },:
document.getElementById('form-settings').addEventListener('submit', function(e) {
    e.preventDefault();
}, false)
We will read and set the input value for the server. I’ve decided to read the input value on the blur event. It is dispatched when the user touches any other DOM Element on the page. When this happens, the server value is stored in the device’s storage. If app.plansServer exists on app launch, we set the default input value. The same has to happen for the userID, but there is a special step. Either we change the app.user or create a new one if none exists. Add the following just above the previous block of code you added:
var serverInput = document.getElementById('input-server');
serverInput.addEventListener('blur', function() {
    app.plansServer = serverInput.value || null;
    localStorage.setItem('plansServer', app.plansServer);
});
if (app.plansServer) {
    serverInput.value = app.plansServer;
}

var userInput = document.getElementById('input-user');
userInput.addEventListener('blur', function() {
    app.userID = userInput.value || null;
    if (app.userID) {
        if (app.user) {
            app.user.id = app.userID;
        } else {
            app.user = new User('app.userID');
        }
        localStorage.setItem('userID', app.userID);
    }
});
if (app.userID) {
    userInput.value = app.userID;
}
After preparing your app and reloading it in WebIDE, you should now see the settings working as expected. The settings screen appears automatically if no plans are found in the localstorage, allowing you to enter your server and userID details.
Test it with the following settings:
- Server:
http://127.0.0.1:8080 - User ID:
johndoe
The only inconvenience is that you need to switch back to the plans view manually once Settings are loaded. In addition, you might get an error if you don’t blur out of both form fields.
Improving the settings UX
In fact, switching back to the plans view should be done automatically after plans are successfully loaded. We can implement this by adding a callback to the User.getPlans function, and including it in the call made from User.reloadPlans:
First, update your getPlans() function definition to the following:
User.prototype.getPlans = function(callback) {
    var self = this;
    var url = app.plansServer + '/plans/' + this.id;
    var request = new XMLHttpRequest({
        mozAnon: true,
        mozSystem: true});
    request.onload = function() {
        console.log('DEBUG: plans loaded from server');
        self.initiatePlans(this.responseText);
        localStorage.setItem('plans', this.responseText);
        self.displayPlans();
        if (callback) {
            callback();
        }
    };
    request.open("get", url, true);
    request.send();
};
Next, in User.reloadPlans add the callback function as an argument of the this.getPlans call:
this.getPlans(app.toggleSettings);Again, try saving, preparing, and reloading your new code. You should now see that the app displays the plans view automatically when correct server and user information is entered and available. (It switches to the Settings view only if there is no error in self.initiatePlans(this.responseText).).

Where do we go from here
Congratulations! You’ve reached the end of this 4-part tutorial, and you should now have your own working prototype of a fun school plan application.
There is still plenty to do to improve the app. Here are some ideas to explore:
- Writing JSON files is not a comfortable task. It would be better to add new functionality that lets you edit plans on the server. Assigning them to the user on the server opens new possibilities, and this would just require an action to sync the user account on both server and client.
- Displaying hours would also be nice.
- It would be cool to implement a reminder alarm for some school activities.
Try implementing these yourself, or build out other improvements for your own school scheduling app. Let us know how it goes.
About Piotr Zalewa
Piotr Zalewa is a Senior Web Developer at Mozilla's Dev Ecosystem team. Working on web apps. He is the creator of JSFiddle.
More articles by Piotr Zalewa…
About Chris Mills
Chris Mills is a senior tech writer at Mozilla, where he writes docs and demos about open web apps, HTML/CSS/JavaScript, A11y, WebAssembly, and more. He loves tinkering around with web technologies, and gives occasional tech talks at conferences and universities. He used to work for Opera and W3C, and enjoys playing heavy metal drums and drinking good beer. He lives near Manchester, UK, with his good lady and three beautiful children.