
Or: Making our simple app work for others
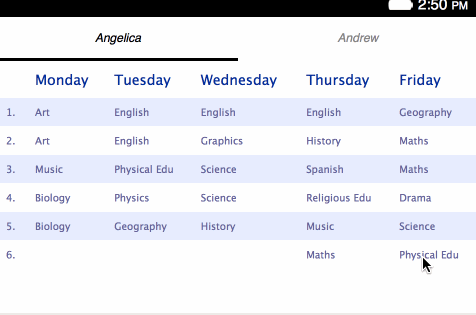
In the first part of this series, which began late last year, we worked through the process of developing a school planner app. At this point (see the final code from Part 1) we’ve got multiple school plans displayed at once, and we’ve got Web, iOS and Android support via Cordova.
Let’s imagine that others have seen the benefits and would like to use our app as well. Creating an app tailored to them should be possible by simply replacing one file (let’s name it www/app_data/plans.json) with their family’s data and making a few other tweaks. This is where we will focus in the beginning of this part.
Our eventual goal is to create an app to display data (school plans) stored on a server, so every user can view their own data from any computer. In this tutorial, the server part will be minimized to avoid distraction from the main goal — the database of plans is going to be written into a JSON file. If you wish to extend it into SaaS please do so, and let us know in the comments section below.
What will be built
A mobile application which will:
- Display school plan(s).
- Work offline.
- Work on many platforms.
- Use school plans stored on a server/in a JSON file (our goal for next parts of the series).
Prerequisites
If you haven’t worked through the first article then we suggest you do so now. You should at least go through the part 1 prerequisites and make sure you are familiar with them.
Then follow the steps below, updating your code example from the previous article. If you don’t have this code example, (i.e., if you’ve not gone through the previous article), follow the instructions on how to load any stage in this tutorial. Use stage4 as a starting point.
You should also make sure you have NodeJS installed.
Adding an icon
In Part 1, I omitted the icon, so Cordova added a default one. Let’s make the app look more professional with a custom icon. I’ve downloaded a backpack icon from findicon.com resized it and copied to www/img. In the app directory (school-plan/ — created after running cordova create) — edit the config.xml file and add the following:
<icon src="www/img/backpack-128.png" />If you wish you can add more specific information – for example, more image sizes for each desired platform. You can find more information in Cordova docs. Here is the special definition for Firefox OS:
<platform name="firefoxos">
	<icon width="128" height="128" src="www/img/backpack-128.png" />
	<icon width="64" height="64" src="www/img/backpack-64.png" />
	<icon width="32" height="32" src="www/img/backpack-32.png" />
</platform>
Due to an error in the Firefox OS part of Cordova, please also create the www/icon directory using the following command.
mkdir www/iconModifying the data code
In this stage we will modify the school plan app to work with data instead of plain HTML (see finished stage 5 code on GitHub.)
Before we had all school plan’s data hard coded into index.html. Now we will separate the data from its visual representation. To do so, we will remove the old data from www/index.html, leaving only the minimal structure behind.
Empty both the <brick-tabbar> and <brick-deck> elements in your index.html file, so they are left looking like so:
<brick-tabbar id="plan-group-menu" selected-index="0">
</brick-tabbar>
<brick-deck id="plan-group" selected-index="0">
</brick-deck>
The most common data structure used in JavaScript projects is JSON; we will therefore add our data in this format. For now it’s OK to distribute the school plan together with the app (later on we will probably serve it from a server instead, for greater flexibility). Our JSON contains an Array of plans. Plan is an Object containing title, id, optional active field and week. The latter is itself an Array of lesson plans.
Note: use jsHint to check the quality of your code.
[
    {
      "title": "Name of the plan",
      "id": "id-of-the-plan",
      "active": 1,  // should the plan be active now?
      "week": [
        [
          "first hour of Monday",
          "second hour",
          "third",
          // ... and so on
        [],  // no activities on Tuesday
        ], [
          "",
          "",
          "Wednesday is starting on third hour",
          "fourth"
        ]
    }
]
You can find a sample file on Github. Copy this into your project at www/app_data/plans.json.
Now we need to read this JSON file from the app’s directory.
As the cards and tabs do not exist at the moment of loading the JavaScript file we should now remove the part where these were linked together from www/js/index.js. Go to this file, find the assignTabs() function, and remove it completely, along with the call to it just below.
The application will show nothing without the data. Data needs to be loaded just after the app is ready — find the onDeviceReady method and just inside it at the top enter the following lines of code:
var request = new XMLHttpRequest();
request.onload = app.renderData;
request.open("get", "app_data/plans.json", true);
request.send();
Note: Previously I planned to use Cordova’s FileSystem plugin, but it only made the code more complicated.
After the request successfully returns our JSON, it is passed to app.renderData (seen below). It parses the text in JSON format to JavaScript and sends data to app.createUI so the necessary DOM elements will be created to form the UI.
Add the following code block below the onDeviceReady method:
renderData: function() {
    var plans = JSON.parse(this.responseText);
    app.createUI(plans);
},
To create the UI we will need weekday names. The best option is to use Cordova’s Globalization plugin. To add this plugin to the application simply run the following command in your terminal, making sure you are inside your root school-plan directory:
cordova plugin add org.apache.cordova.globalization
Next, add the createUI() method we referenced earlier underneath the renderData() method. It looks like so:
createUI: function(plans) {
    var deck = document.getElementById('plan-group');
    var tabbar = document.getElementById('plan-group-menu');
    navigator.globalization.getDateNames(function(dayOfWeek) {
        // render UI in the callback
    }, function() {}, {type: 'narrow', item: 'days'});
},
Week days are retrieved using the navigator.globalization.getDateNames method. dayOfWeek will hold an Array of week day names, for example (Polish in my case) — ['Pn', 'Wt', 'Śr', 'Cz', 'Pt', 'So', 'Nd']. If you’d like to use full day names, just change type: 'narrow' to type: 'wide'.
Now we need to create DOM elements for individual plans. This time brick-tabbar-tab and brick-card elements are created using JavaScript. Tab refers to the corresponding card using its target parameter. It has the same value as the card’s id in each case. Brick will parse this value and create a tab.targetElement, which will link to the card element. Inside the callback of getDateNames, enter the following code (in place of the “// render UI in the callback” comment seen above):
for (var i = 0; i < plans.length; i++) {
    var plan = plans[i];

    // create card
    var card = document.createElement('brick-card');
    card.setAttribute('id', plan.id);
    deck.appendChild(card);

    //create tab
    var tab = document.createElement('brick-tabbar-tab');
    tab.setAttribute('target', plan.id);
    tab.appendChild(document.createTextNode(plan.title));
    tabbar.appendChild(tab);

    // link card to tab
    card.tabElement = tab;
    card.addEventListener('show', function() {
        this.tabElement.select();
    });

    // create plan table
    var table = document.createElement('table');
}
Unlike when writing plain HTML, we will create the table body now and then the header. This is because table.insertRow() either creates a new tbody and tr inside or adds a row to any existing HTMLTableSectionElement (thead if already created). We could also call table.tBodies(0) instead but it would complicate the code.
We don’t want to display days which don’t have any lessons. Let’s copy the plan with only non-empty days to new cleanPlan array. Place this code after the line that creates the <table> element (see above listing):
var numberOfDays = plan.week.length;
var cleanPlan = [];
for (j = 0; j < numberOfDays; j++) {
    if (plan.week[j].length > 0) {
        cleanPlan.push(plan.week[j]);
    }
}
There is a problem that needs to be solved before we can create the other DOM elements (<tr> and <td>) — we’re representing the plan in a JSON file structured as humans understand it — hours inside days. Unfortunately tables in HTML are created row by row (days inside hours), which means that the array representing the plan needs to be flipped over.
For example our array stored in JSON will look like this: (dXhY represents day X and hour Y):
d1h1 d1h2 d1h3 ...
d2h1 d2h2 d2h3 ...
d3h1 d3h2 d3h3 ...
...
But our <table> structure will look like this:
d1h1 d2h1 d3h1 ...
d1h2 d2h2 d3h2 ...
d1h3 d2h3 d3h3 ...
...
Add the following code block right after the last one, to start performing this data transformation for us:
var daysInHours = [];
for (j = 0; j < cleanPlan.length; j++) {
    for (var k = 0; k < cleanPlan[j].length; k++) {
        if (!daysInHours[k]) {
            daysInHours[k] = [];
        }
        daysInHours[k][j] = cleanPlan[j][k];
    }
}
The most important line above is the daysInHours[k][j] = cleanPlan[j][k]; where the indexes are reversed — the kj element of one array becomes the jk element of the other. d3h2 takes the place of d2h3 and vice versa.
The daysInHours array should now hold the plan prepared for the UI. Now we can iterate over it to render the plan into the HTML table. There is an important thing to note here — table.insertRow needs to use the (otherwise optional) index set to -1, as by default Android inserts the row on top of the table.
Add the following block right below the previous one:
for (var j = 0; j < daysInHours.length; j++) {
    var tr = table.insertRow(-1);
    var td = tr.insertCell(-1);
    td.appendChild(document.createTextNode(j + 1));
    for (var k = 0; k < cleanPlan.length; k++) {
        var td = tr.insertCell(-1);
        if (daysInHours[j][k]) {
            td.appendChild(document.createTextNode(daysInHours[j][k]));
        }
    }
}
We iterate over all the hours (index j). The first <tr> is created at the bottom of the array, then the <td> with the textNode containing that row number. After that we iterate over the days inside the hour (index k) and create more cells — if there is a plan for this hour and day a textNode is created.
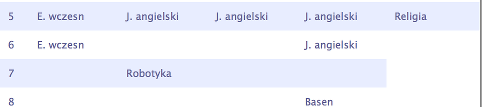
You might be surprised to see this code using cleanPlan.length instead of daysInHours[j].length. This is because we need to create a cell on each day even if no lesson is planned, otherwise we will end up with a broken table structure like this:
Now we’re ready to create a header with days. Add the following code block right below the previous one:
var thead = table.createTHead();
var tr = thead.insertRow();
var th_empty = document.createElement('th');
tr.appendChild(th_empty);
var weekDayNumber;
for (var j = 0; j < numberOfDays; j++) {
    var weekDayNumber = (j + 1) % 7;
    if (plan.week[j].length > 0) {
        var th = document.createElement('th');
        th.appendChild(document.createTextNode(dayOfWeek.value[weekDayNumber]));
        tr.appendChild(th);
    }
}
First, an empty header cell is created for the column, containing the corresponding hour of the day. Then we iterate over the days and create a new <th> with a day name only if there is a plan for the current day (in the same manner as for cleanPlan before.)
Next we need a line to place the created <table> inside the brick-card element — add the following line below the previous block:
card.appendChild(table);When all tabs are ready, we’ll want the first tab to be selected when the app is loaded. To do this we’ll use the following block — add this just below the previous line:
if (plan.active) {
    selectTab(deck, tab);
}
selectTab is a helper function created outside of the app object. It is using polling on activeTab.targetElement to detect if Brick had already linked tab with cards, as seen below. Add this block at the very bottom of your index.js file:
function selectTab(deck, activeTab) {
    function selectActiveTab() {
        if (!activeTab.targetElement) {
            return window.setTimeout(selectActiveTab, 100);
        }
        deck.showCard(activeTab.targetElement);
    }
    selectActiveTab();
}
Testing time
At this moment the app should work exactly the same as on Stage 4 in Part 1. The only difference may be in the localized names of the days in the plan’s header.
When you want to test your app, type in the following terminal commands (from the root directory of your school-plan app):
cordova prepare
cordova serve
This will make the app and its different platforms available to you at localhost:8000.
If you also want to test the app in Firefox OS, you’ll need to open WebIDE in Firefox, go to Open App > Open Packaged App, and from the file chooser select to open the school-plan/platforms/firefoxos/www directory as a packaged app. From here you can choose to load the app in a simulator or a real Firefox OS device. See the MDN WebIDE page for more details.
Note: If you’d like to tailor the application for different people who want to use it, at this stage you can do so by replacing the www/app_data/plans.json file with different information for each individual user.
[EDIT] See the <a href="https://hacks.mozilla.org/2015/04/creating-a-mobile-app-from-a-simple-html-site-part-3/"next part where we added the server.
About Piotr Zalewa
Piotr Zalewa is a Senior Web Developer at Mozilla's Dev Ecosystem team. Working on web apps. He is the creator of JSFiddle.
More articles by Piotr Zalewa…
About Chris Mills
Chris Mills is a senior tech writer at Mozilla, where he writes docs and demos about open web apps, HTML/CSS/JavaScript, A11y, WebAssembly, and more. He loves tinkering around with web technologies, and gives occasional tech talks at conferences and universities. He used to work for Opera and W3C, and enjoys playing heavy metal drums and drinking good beer. He lives near Manchester, UK, with his good lady and three beautiful children.
2 comments