
Have your ever tried to type in a voucher code on your mobile phone or simply enter the number of your membership card into a web form?
These are just two examples of time-consuming and error-prone tasks which can be avoided by taking advantage of printed barcodes. This is nothing new; many solutions exist for reading barcodes with a regular camera, like zxing, but they require a native platform such as Android or iOS. I wanted a solution which works on the Web, without plugins of any sort, and which even Firefox OS could leverage.
My general interest in computer vision and web technologies fueled my curiosity whether something like this would be possible. Not just a simple scanner, but a scanner equipped with localization mechanisms to find a barcode in real-time.
The result is a project called QuaggaJS, which is hosted on GitHub. Take a look at the demo pages to get an idea of what this project is all about.
How does it work?
Simply speaking, the pipeline can be divided into the following three steps:
- Reading the image and converting it into a binary representation
- Determining the location and rotation of the barcode
- Decoding the barcode based on the type EAN, Code128
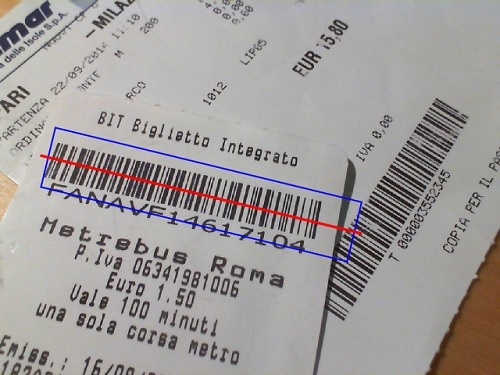
The first step requires the source to be either a webcam stream or an image file, which is then converted into gray-scale and stored in a 1D array. After that, the image data is passed along to the locator, which is responsible for finding a barcode-like pattern in the image. And finally, if a pattern is found, the decoder tries to read the barcode and return the result. You can read more about these steps in how barcode localization works in QuaggaJS.
The real-time challenge
One of the main challenges was to get the pipeline up to speed and fast enough to be considered as a real-time application. When talking about real-time in image-processing applications, I consider 25 frames per second (FPS) the lower boundary. This means that the entire pipeline has to be completed in at least 40ms.
The core parts of QuaggaJS are made up of computer vision algorithms which tend to be quite heavy on array access. As I already mentioned, the input image is stored in a 1D array. This is not a regular JavaScript Array, but a Typed Array. Since the image has already been converted to gray-scale in the first step, the range of each pixel’s value is set between 0 and 255. This is why Uint8Arrays are used for all image-related buffers.
Memory efficiency
One of the key ways to achieve real-time speed for interactive applications is to create memory efficient code which avoids large GC (garbage collection) pauses. That is why I removed most of the memory allocation calls by simply reusing initially created buffers. However this is only useful for buffers when you know the size up front and when the size does not change over time, as with images.
Profiling
When you are curious why a certain part of your application runs too slow, a CPU profile may come in handy.
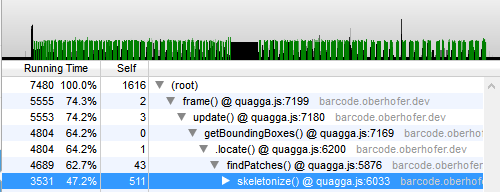
Firefox includes some wonderful tools to create CPU profiles for the running JavaScript code. During development, this proved to be viable for pinpointing performance bottlenecks and finding functions which caused the most load on the CPU. The following profile was recorded during a session with a webcam on an Intel Core i7-4600U. (Config: video 640×480, half-sampling barcode-localization)

The profile is zoomed in and shows four subsequent frames. On average, one frame in the pipeline is processed in roughly 20 ms. This can be considered fast enough, even when running on machines having a less powerful CPU, like mobile phones or tablets.
I marked each step of the pipeline in a different color; green is the first, blue the second and red the third one. The drill-down shows that the localization step consumes most of the time (55.6 %), followed by reading the input stream (28.4 %) and finally by decoding (3.7 %). It is also worth noting that skeletonize is one of the most expensive functions in terms of CPU usage. Because of that, I re-implemented the entire skeletonizing algorithm in asm.js by hand to see whether it could run even faster.
asm.js
Asm.js is a highly optimizable subset of JavaScript that can execute at close to native speed. It promises a lot of performance gains when used for compute-intensive tasks (take a look at MASSIVE), like most computer vision algorithms. That’s why I ported the entire skeletonizer module to asm.js. This was a very tedious task, because you are actually not supposed to write asm.js code by hand. Usually asm.js code is generated when it is cross-compiled from C/C++ or other LLVM languages using emscripten. But I did it anyway, just to prove a point.
The first thing that needs to be sorted out is how to get the image-data into the asm.js module, alongside with parameters like the size of the image. The module is designed to fit right into the existing implementation and therefore incorporates some constraints, like a square image size. However, the skeletonizer is only applied on chunks of the original image, which are all square by definition. Not only is the input-data relevant, but also three temporary buffers are needed during processing (eroded, temp, skeleton).
In order to cover that, an initial buffer is created, big enough to hold all four images at once. The buffer is shared between the caller and the module. Since we are working with a single buffer, we need to keep a reference to the position of each image. It’s like playing with pointers in C.
function skeletonize() {
  var subImagePtr = 0,
    erodedImagePtr = 0,
    tempImagePtr = 0,
    skelImagePtr = 0;

  erodedImagePtr = imul(size, size) | 0;
  tempImagePtr = (erodedImagePtr + erodedImagePtr) | 0;
  skelImagePtr = (tempImagePtr + erodedImagePtr) | 0;
  // ...
}
To get a better understanding of the idea behind the structure of the buffer, compare it with the following illustration:
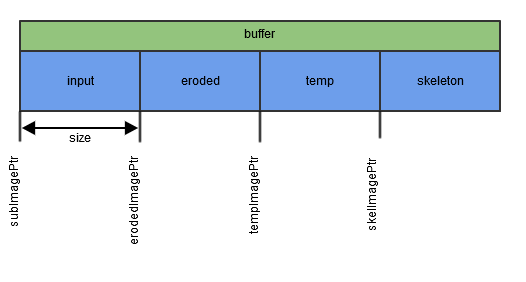
The buffer in green represents the allocated memory, which is passed in the asm.js module upon creation. This buffer is then divided into four blue blocks, of which each contains the data for the respective image. In order to get a reference to the correct data block, the variables (ending with Ptr) are pointing to that exact position.
Now that we have set up the buffer, it is time to take a look at the erode function, which is part of the skeletonizer written in vanilla JavaScript:
function erode(inImageWrapper, outImageWrapper) {
  var v,
    u,
    inImageData = inImageWrapper.data,
    outImageData = outImageWrapper.data,
    height = inImageWrapper.size.y,
    width = inImageWrapper.size.x,
    sum,
    yStart1,
    yStart2,
    xStart1,
    xStart2;

  for ( v = 1; v < height - 1; v++) {
    for ( u = 1; u < width - 1; u++) {
      yStart1 = v - 1;
      yStart2 = v + 1;
      xStart1 = u - 1;
      xStart2 = u + 1;
      sum = inImageData[yStart1 * width + xStart1] +
        inImageData[yStart1 * width + xStart2] +
        inImageData[v * width + u] +
        inImageData[yStart2 * width + xStart1] +
        inImageData[yStart2 * width + xStart2];

      outImageData[v * width + u] = sum === 5 ? 1 : 0;
    }
  }
}
This code was then modified to conform to the asm.js specification.
"use asm";

// initially creating a view on the buffer (passed in)
var images = new stdlib.Uint8Array(buffer),
  size = foreign.size | 0;

function erode(inImagePtr, outImagePtr) {
  inImagePtr = inImagePtr | 0;
  outImagePtr = outImagePtr | 0;

  var v = 0,
    u = 0,
    sum = 0,
    yStart1 = 0,
    yStart2 = 0,
    xStart1 = 0,
    xStart2 = 0,
    offset = 0;

  for ( v = 1; (v | 0) < ((size - 1) | 0); v = (v + 1) | 0) {
    offset = (offset + size) | 0;
    for ( u = 1; (u | 0) < ((size - 1) | 0); u = (u + 1) | 0) {
      yStart1 = (offset - size) | 0;
      yStart2 = (offset + size) | 0;
      xStart1 = (u - 1) | 0;
      xStart2 = (u + 1) | 0;
      sum = ((images[(inImagePtr + yStart1 + xStart1) | 0] | 0) +
        (images[(inImagePtr + yStart1 + xStart2) | 0] | 0) +
        (images[(inImagePtr + offset + u) | 0] | 0) +
        (images[(inImagePtr + yStart2 + xStart1) | 0] | 0) +
        (images[(inImagePtr + yStart2 + xStart2) | 0] | 0)) | 0;
      if ((sum | 0) == (5 | 0)) {
        images[(outImagePtr + offset + u) | 0] = 1;
      } else {
        images[(outImagePtr + offset + u) | 0] = 0;
      }
    }
  }
  return;
}
Although the basic code structure did not significantly change, the devil is in the detail. Instead of passing in the references to JavaScript objects, the respective indexes of the input and output images, pointing to the buffer, are used. Another noticeable difference is the repeated casting of values to integers with the | 0 notion, which is necessary for secure array access. There is also an additional variable offset defined, which is used as a counter to keep track of the absolute position in the buffer. This approach replaces the multiplication used for determining the current position. In general, asm.js does not allow multiplications of integers except when using the imul operator.
Finally, the use of the tenary operator ( ? : ) is forbidden in asm.js which has simply been replaced by a regular if.. else condition.
Performance comparison
And now it is time to answer the more important question: How much faster is the asm.js implementation compared to regular JavaScript? Let's take a look at the performance profiles, of which the first one represents the normal JavaScript version and the second asm.js.

Surprisingly, the difference between the two implementations is not as big as you might expect (~10%). Apparently, the initial JavaScript code was already written clean enough, so that the JIT compiler could already take full advantage of that. This assumption can only be proven wrong or right if someone re-implements the algorithm in C/C++ and cross-compiles it to asm.js using emscripten. I'm almost sure that the result would differ from my naïve port and produce much more optimized code.
getUserMedia
Besides performance, there are many other parts that must fit together in order to get the best experience. One of those parts is the portal to the user's world, the camera. As we all know, getUserMedia provides an API to gain access to the device's camera. Here, the difficulty lies within the differences among all major browser vendors, where the constraints, resolutions and events are handled differently.
Front/back-facing
If you are targeting devices other than regular laptops or computers, the chances are high that these devices offer more than one camera. Nowadays almost every tablet or smartphone has a back- and front-facing camera. When using Firefox, selecting the camera programmatically is not possible. Every time the user confirms access to the camera, he or she has to select the desired one. This is handled differently in Chrome, where MediaStreamTrack.getSources exposes the available sources which can then be filtered. You can find the defined sources in the W3C draft.
The following snippet demonstrates how to get preferred access to the user's back-facing camera:
MediaStreamTrack.getSources(function(sourceInfos) {
  var envSource = sourceInfos.filter(function(sourceInfo) {
    return sourceInfo.kind == "video"
        && sourceInfo.facing == "environment";
  }).reduce(function(a, source) {
    return source;
  }, null);
  var constraints = {
    audio : false,
    video : {
      optional : [{
        sourceId : envSource ? envSource.id : null
      }]
    }
  };
});
In the use-case of barcode-scanning, the user is most likely going to use the device's back-facing camera. This is where choosing a camera up front can enormously improve the user experience.
Resolution
Another very important topic when working with video is the actual resolution of the stream. This can be controlled with additional constraints to the video stream.
var hdConstraint = {
  video: {
    mandatory: {
      width: { min: 1280 },
      height: { min: 720 }
    }
  }
};
The above snippet, when added to the video constraints, tries to get a video-stream with the specified quality. If no camera meets those requirements, an ConstraintNotSatisfiedError error is returned in the callback. However, these constraints are not fully compatible with all browsers, since some use minWidth and minHeight instead.
Autofocus
Barcodes are typically rather small and must be close-up to the camera in order to be correctly identified. This is where a built-in auto-focus can help to increase the robustness of the detection algorithm. However, the getUserMedia API lacks functionality for triggering the auto-focus and most devices do not even support continuous autofocus in browser-mode. If you have an up-to-date Android device, chances are high that Firefox is able to use the autofocus of your camera (e.g. Nexus 5 or HTC One). Chrome on Android does not support it yet, but there is already an issue filed.
Performance
And there is still the question of the performance impact caused by grabbing the frames from the video stream. The results have already been presented in the profiling section. They show that almost 30%, or 8ms of CPU time is consumed for just fetching the image and storing it in a TypedArray instance. The typical process of reading the data from a video-source looks as follows:
- Make sure the camera-stream is attached to a video-element
- Draw the image to a canvas using
ctx.drawImage - Read the data from the canvas using
ctx.getImageData - Convert the video to gray-scale and store it inside a
TypedArray
var video = document.getElementById("camera"),
    ctx = document.getElementById("canvas").getContext("2d"),
    ctxData,
    width = video.videoWidth,
    height = video.videoHeight
    data = new Uint8Array(width*height);

ctx.drawImage(video, 0, 0);
ctxData = ctx.getImageData(0, 0, width, height).data;
computeGray(ctxData, data);
It would be very much appreciated if there were a way to get lower-level access to the camera frames without going through the hassle of drawing and reading every single image. This is especially important when processing higher resolution content.
Wrap up
It has been real fun to create a project centered on computer vision, especially because it connects so many parts of the web platform. Hopefully, limitations such as the missing auto-focus on mobile devices, or reading the camera stream, will be sorted out in the near future. Still, it is pretty amazing what you can build nowadays by simply using HTML and JavaScript.
Another lesson learned is that implementing asm.js by hand is both hard and unnecessary if you already know how to write proper JavaScript code. However, if you already have an existing C/C++ codebase which you would like to port, emscripten does a wonderful job. This is where asm.js comes to the rescue.
Finally, I hope more and more people are jumping on the computer vision path, even if technologies like WebCL are still a long way down the road. The future for Firefox might even be for ARB_compute_shader to eventually jump on to the fast track.
About Christoph Oberhofer
I'm an application developer focused on web technologies and mobile solutions working @Netconomy. Every bit of JavaScript, Java or CSS gets me excited. I'm @overaldi on Twitter.
7 comments