Since its debut in Firefox 61, the Accessibility Inspector in the Firefox Developer Tools has evolved from a low-level tool showing the accessibility structure of a page. In Firefox 70, the Inspector has become an auditing facility to help identify and fix many common mistakes and practices that reduce site accessibility. In this post, I will offer an overview of what is available in this latest release.
Inspecting the Accessibility Tree
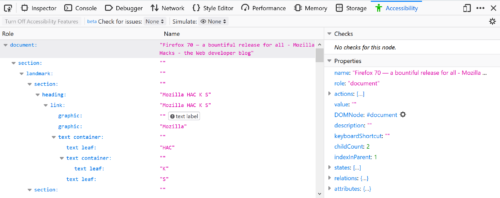
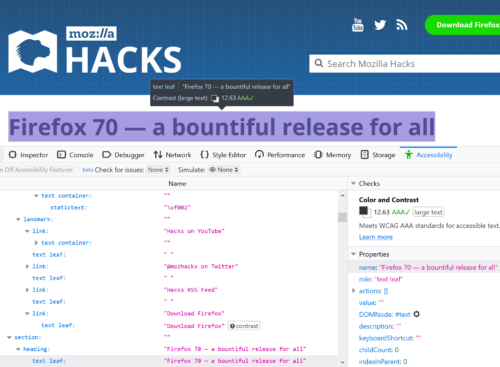
First, select the Accessibility Inspector from the Developer Toolbox. Turn on the accessibility engine by clicking “Turn On Accessibility Features.” You’ll see a full representation of the current foreground tab as assistive technologies see it. The left pane shows the hierarchy of accessible objects. When you select an element there, the right pane fills to show the common properties of the selected object such as name, role, states, description, and more. To learn more about how the accessibility tree informs assistive technologies, read this post by Hidde de Vries.
The DOM Node property is a special case. You can double-click or press ENTER to jump straight to the element in the Page Inspector that generates a specific accessible object. Likewise, when the accessibility engine is enabled, open the context menu of any HTML element in the Page Inspector to inspect any associated accessible object. Note that not all DOM elements have an accessible object. Firefox will filter out elements that assistive technologies do not need. Thus, the accessibility tree is always a subset of the DOM tree.
In addition to the above functionality, the inspector will also display any issues that the selected object might have. We will discuss these in more detail below.
The accessibility tree refers to the full tree generated from the HTML, JavaScript, and certain bits of CSS from the web site or application. However, to find issues more easily, you can filter the left pane to only show elements with current accessibility issues.
Finding Accessibility Problems
To filter the tree, select one of the auditing filters from the “Check for issues” drop-down in the toolbar at the top of the inspector window. Firefox will then reduce the left pane to the problems in your selected category or categories. The items in the drop-down are check boxes — you can check for both text labels and focus issues. Alternatively, you can run all the checks at once if you wish. Or, return the tree to its full state by selecting None.
Once you select an item from the list of problems, the right pane fills with more detailed information. This includes an MDN link to explain more about the issue, along with suggestions for fixing the problem. You can go into the page inspector and apply changes temporarily to see immediate results in the accessibility inspector. Firefox will update Accessibility information dynamically as you make changes in the page inspector. You gain instant feedback on whether your approach will solve the problem.
Text labels
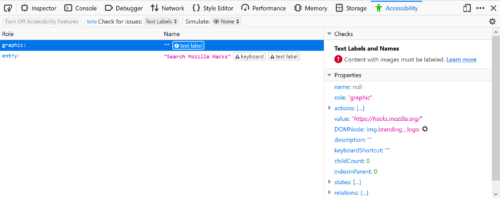
Since Firefox 69, you have the ability to filter the list of accessibility objectss to only display those that are not properly labeled. In accessibility jargon, these are items that have no names. The name is the primary source of information that assistive technologies, such as screen readers, use to inform a user about what a particular element does. For example, a proper button label informs the user what action will occur when the button is activated.
The check for text labels goes through the whole document and flags all the issues it knows about. Among other things, it finds missing alt-text (alternative text) on images, missing titles on iframes or embeds, missing labels for form elements such as inputs or selects, and missing text in a heading element.
Check for Keyboard issues
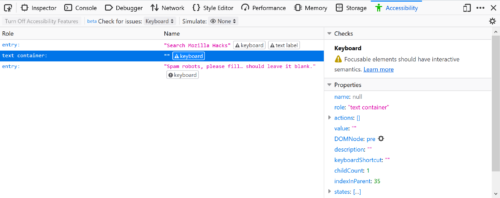
Keyboard navigation and visual focus are common sources of accessibility issues for various types of users. To help debug these more easily, Firefox 70 contains a checker for many common keyboard and focus problems. This auditing tool detects elements that are actionable or have interactive semantics. It can also detect if focus styling has been applied. However, there is high variability in the way controls are styled. In some cases, this results in false positives. If possible, we would like to hear from you about these false positives, with an example that we can reproduce.
For more information about focus problems and how to fix them, don’t miss Hidde’s post on indicating focus.
Contrast
Firefox includes a full-page color contrast checker that checks for all three types of color contrast issues identified by the Web Content Accessibility Guidelines 2.1 (WCAG 2.1):
- Does normal text on background meet the minimum requirement of 4.5:1 contrast ratio?
- Does the heading, or more generally, does large-scale, text on background meet the 3:1 contrast ratio requirement?
- Will interactive elements and graphical elements meet a minimum ratio of 3:1 (added in WCAG 2.1)?
In addition, the color contrast checker provides information on the triple-A success criteria contrast ratio. You can see immediately whether your page meets this advanced standard.
Are you using a gradient background or a background with other forms of varying colors? In this case, the contrast checker (and accessibility element picker) indicates which parts of the gradient meet the minimum requirements for color contrast ratios.
Color Vision Deficiency Simulator
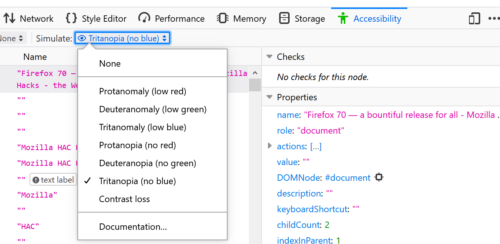
Firefox 70 contains a new tool that simulates seven types of color vision deficiencies, a.k.a. color blindness. It shows a close approximation of how a person with one of these conditions would see your page. In addition, it informs you if you’ve colored something that would not be viewable by a colorblind user. Have you provided an alternative? For example, someone who has Protanomaly (low red) or Protanopia (no red) color perception would be unable to view an error message colored in red.
As with all vision deficiencies, no two users have exactly the same perception. The low red, low green, low blue, no red, no green, and no blue deficiencies are genetic and affect about 8 percent of men, and 0.5 percent of women worldwide. However, contrast sensitivity loss is usually caused by other kinds of mutations to the retina. These may be age-related, caused by an injury, or via genetic predisposition.
Note: The color vision deficiency simulator is only available if you have WebRender enabled. If it isn’t enabled by default, you can toggle the gfx.webrender.all property to True in about:config.
Quick auditing with the accessibility picker
As a mouse user, you can also quickly audit elements on your page using the accessibility picker. Like the DOM element picker, it highlights the element you selected and displays its properties. Additionally, as you hover the mouse over elements, Firefox displays an information bar that shows the name, role, and states, as well as color contrast ratio for the element you picked.
First, click the Accessibility Picker icon. Then click on an element to show its properties. Want to quickly check multiple elements in rapid succession? Click the picker, then hold the shift key to click on multiple items one after another to view their properties.
In Conclusion
Since its release back in June 2018, the Accessibility Inspector has become a valuable helper in identifying many common accessibility issues. You can rely on it to assist in designing your color palette. Use it to ensure you always offer good contrast and color choices. We build a11y features into the DevTools that you’ve come to depend on, so you do not need to download or search for external services or extensions first.
About Marco Zehe
Marco has been at Mozilla since 2007. He has always worked in the accessibility team, helping to ensure that Firefox and other Mozilla products are accessible. Before, he worked at a major commercial assistive technology vendor for the blind. He is blind from birth and lives in Hamburg, Germany.


7 comments