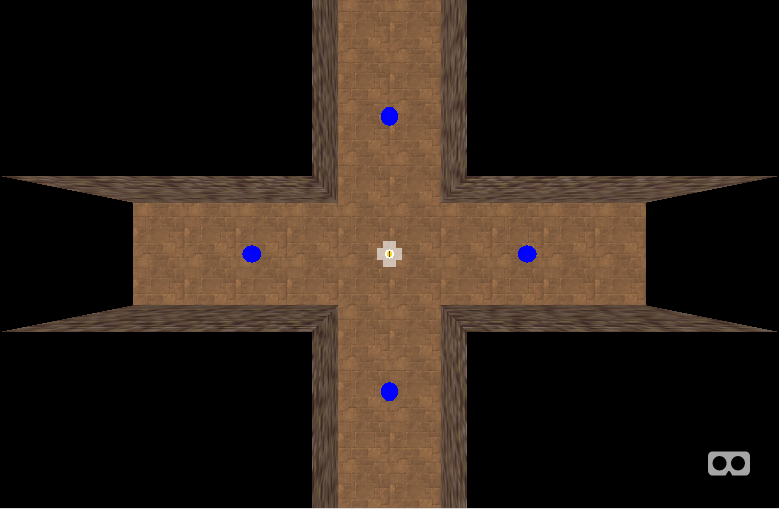
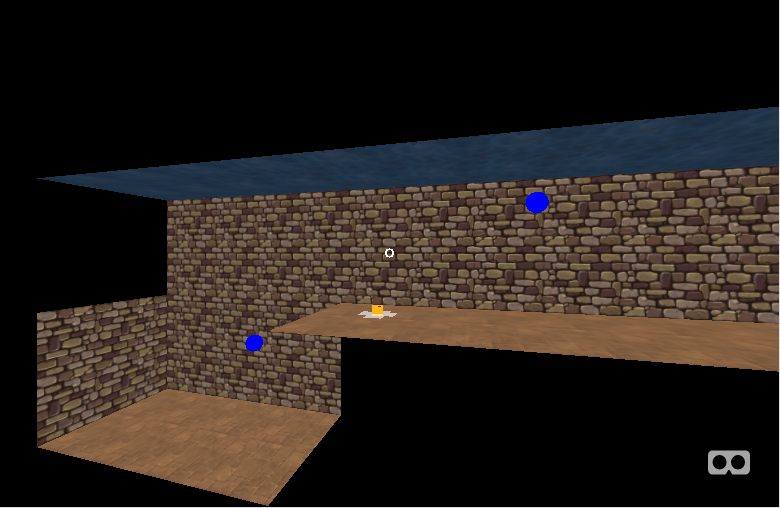
Cardboard Dungeon is a web-based dungeon-crawling experience designed for use with Google Cardboard and written using Mozilla’s virtual reality framework, A-Frame.
In this case study, I’ll discuss the key challenges I faced during the development of Cardboard Dungeon, my experiences with A-Frame, and some of the lessons I learned whilst approaching virtual reality for the first time.
Getting started with A-Frame
I stumbled across A-Frame looking for an easy way to get started with VR development. A-Frame attracted me because it fits so naturally with the web development concepts that I’m used to. The ability to place entities within a scene through pure markup is extremely powerful and offers a very low barrier to entry. It also helps that the A-Frame documentation is clean and concise – something that is so important to me as a developer opting to use third-party code/libraries.
I was honestly surprised at how robust A-Frame is. Most of the hurdles I faced were related to handling VR-specific challenges.
Building a dungeon

Cardboard Dungeon started as a quick way to test some of the features of A-Frame. Rather than create an entire dungeon upfront, my concept was to have a fixed number of rooms defining the renderable area around the player. These rooms would be rendered based on data from a JSON file. This would reduce the number of entities within the DOM and allow for an extremely large dungeon should I wish, with little to no impact on performance.
A room is simple and is always comprised of up to four walls, a floor, and a ceiling. The JSON data defines which of these should be rendered for each room. I also opted for a simple grid system to define the virtual position of the room – with (0,0,0) being the player’s starting point.
Initially I injected new A-Frame entities each time the player triggered movement. However, in talking to the A-Frame team, I was pointed to the “visible” component. I settled on initializing each rendered space upfront and then toggling the “visible” component for each room when the player enters.
// Called once during scene initialization.
Container.prototype.init = function () {
  var entity = document.createElement('a-entity');
  entity.className = 'top';
  entity.setAttribute('mixin','wall top');
  entity.setAttribute('visible', 'false');
  entity.setAttribute('position', {
    x: this.position_multipliers.x,
    y: (4 + this.position_multipliers.y),
    z: this.position_multipliers.z
  });
  document.getElementById(this.target).appendChild(entity);
  // …
};

// Called whenever the player triggers movement.
Container.prototype.render = function () {
  // Set the `visible` component on the entities for this container.
  var container = document.getElementById(this.target);
  if (this.room) {
    setAttributeForClass(container, 'top', 'visible', (this.room.data.top ? this.room.data.top : 'false'));
    setAttributeForClass(container, 'bottom', 'visible', (this.room.data.bottom ? this.room.data.bottom : 'false'));
    setAttributeForClass(container, 'left', 'visible', (this.room.data.left ? this.room.data.left : 'false'));
    setAttributeForClass(container, 'right', 'visible', (this.room.data.right ? this.room.data.right : 'false'));
    setAttributeForClass(container, 'back', 'visible', (this.room.data.back ? this.room.data.back : 'false'));
    setAttributeForClass(container, 'front', 'visible', (this.room.data.front ? this.room.data.front : 'false'));
  }
  // …
};

function setAttributeForClass (parent, class_name, attribute, value) {
  var elements = parent.getElementsByClassName(class_name);
  for (var i = 0; i < elements.length; i++) {
    elements[i].setAttribute(attribute, value);
  }
}
To begin with, I was rendering a 3×3 area around the player but I increased this to 3×3×3 to allow for vertical traversal. I also extended this to 2 squares in the north, south, east, and west directions to help with the illusion of distance.
VR lesson #1: Scale
Scale on the screen does not translate well to scale in a headset. On a screen, heights can look fine but strapping on a headset can drastically alter the player’s perception of scale. This is still subtly present within Cardboard Dungeon, especially when traversing vertically such that the walls can seem taller than intended. It was important to test the experience within the headset often.
Traversal

Map traversal was one of the first things I needed to solve. Like everything in VR, it required substantial iteration.
Initially I utilized squares on the ground (N, E, S, W) to trigger player movement. This worked well, and I so iterated upon it to provide additional controls for vertical traversal. I made these context sensitive so that the vertical traversal option appeared only when necessary. However, this resulted in a lot of looking around and relying upon the player to spot the controls.
VR lesson #2: Strain
Placing common interactions out of the player’s line of sight creates an uncomfortable experience. Having to gaze at the ground in order to trigger movement means constantly tipping your head forwards and backwards. Placing this interaction close to the player’s natural resting gaze position makes for a much more comfortable experience.
My final solution was therefore to utilize a teleportation mechanic. The player simply gazes at any blue sphere to move to that location, regardless of whether the room is on a lower or higher floor. I opted to limit this to one dungeon square around the player in order to retain the feeling of exploration.
function move (dom_element) {
  // Fetch the current and target room ids.
  var current_room_key_array = containers.center.room_id.split(',');
  var container_key = dom_element.parentElement.getAttribute('id');
  var target_room_key_array = containers[container_key].room_id.split(',');

  // Calculate the offsets.
  var offset_x = parseInt(target_room_key_array[0], 10) - parseInt(current_room_key_array[0], 10);
  var offset_y = parseInt(target_room_key_array[1], 10) - parseInt(current_room_key_array[1], 10);
  var offset_z = parseInt(target_room_key_array[2], 10) - parseInt(current_room_key_array[2], 10);

  // Apply to each room.
  Object.keys(containers).forEach(function (key) {
    var container = containers[key];
    var room_key_array = container.room_id.split(',');
    room_key_array[0] = parseInt(room_key_array[0], 10) + offset_x;
    room_key_array[1] = parseInt(room_key_array[1], 10) + offset_y;
    room_key_array[2] = parseInt(room_key_array[2], 10) + offset_z;
    var new_room_key = room_key_array.join(',');

    if (map[new_room_key]) {
      container.room = new Room(map[new_room_key].data);
      container.room_id = new_room_key;

      // Remove any existing item data.
      container.removeItems();

      // Add item if it exists in the new room data.
      if (map[new_room_key].item) {
        container.addItem(map[new_room_key].item);
      }

      container.render();
    } else {
      container.room = null;
      container.room_id = new_room_key;

      // Remove any existing item data.
      container.removeItems();
      container.render();
    }
  });
}
Inventory and interaction

The inventory and interaction took the most effort and iteration to create something functional. I experimented with many wild ideas, such as shrinking the player into an inventory box at their feet or teleporting them to a separate inventory room.
Whilst fun, these prototypes highlighted the issue of convenience within VR. Concepts can be fun to explore as initial experiences, but unfamiliar mechanics can eventually become inconvenient and ultimately irritating.
VR lesson #3: Automated movement
Taking control of the player creates a bad experience. In the case of Cardboard Dungeon, the aforementioned shrinking mechanic had an animation that scaled the camera and moved it to a box at the player’s feet. This quickly generated a sensation of nausea because the player has no control over the animation; it’s an unnatural action.
In the end, I settled on the most convenient method of interaction for the player. This was simply a grid of items at the player’s feet. Collecting items in the dungeon placed them in the grid from which items could be easily selected. Sometimes, the simplest solution provides the best experience.
Conclusion
I thoroughly enjoyed using A-Frame to create my game. It’s a powerful framework, and I think it makes an excellent rapid prototyping tool, in addition to being a useful production tool in its own right.
I was worried that web-based VR would really suffer from performance issues, but I was delighted to find that to not be the case. Texture sizes were the biggest performance killer, as they introduce juddering and have a noticeable impact on latency.
What’s great about A-Frame is that it’s possible to create your own components to augment the existing entities and components. I haven’t had a chance to experiment with the concept much, but this is the obvious next step to improve the Cardboard Dungeon experience.
On a final note, the A-Frame team and community are a delight. Their Slack group is very active, and the team members are extraordinarily responsive.
I hope this gives you some insight into the challenges I faced when building Cardboard Dungeon. Virtual reality is a newish frontier and, as such, answers are few, with many lessons still to be learned. It’s an exciting space to explore, and frameworks such as A-Frame are helping to make VR more accessible to web developers who want to explore this new frontier.
You can play Cardboard Dungeon here (Google Cardboard recommended) and the full source code is available on GitHub.
Thank you for reading.
About Christopher Waite
Christopher Waite is the Technical Director of a web development agency in London and Suffolk, UK. He creates games in his spare time.

