SVG is a vector image format based on XML. It has great advantages, most notably it is lightweight. Since SVG is a text format, it can be viewed and modified using a simple text editor, and applying GZIP compression produces excellent results.
It’s critical for a website to provide assets that are as lightweight as possible, especially on mobile where bandwidth can be very limited. You want to optimise your SVG files to have your app load and display as quickly as possible.
This article will show how to use dedicated tools to optimise SVG images. You will also learn how the markup works so you can go the extra mile to produce the lightest possible images.
Introducing svgo
Optimising SVG is very similar to minifying CSS or other text-based formats such as JavaScript or HTML. It is mainly about removing useless whitespace and redundant characters.
The tool I recommend to reduce the size of SVG images is svgo. It is written for node.js. To install it, just do:
$ npm install -g svgo
In its basic form, you’ll use a command line like this:
$ svgo --input img/graph.svg --output img/optimised-graph.svg
Please make sure to specify an --output parameter if you want to keep the original image. Otherwise svgo will replace it with the optimised version.
svgo will apply several changes to the original file—stripping out useless comments, tags, and attributes, reducing the precision of numbers in path definitions, or sorting attributes for better GZIP compression.
This works with no surprises for simple images. However, in more complex cases, the image manipulation can result in a garbled file.
svgo plugins
svgo is very modular thanks to a plugin-based architecture.
When optimising complex images, I’ve noticed that the main issues are caused by two svgo plugins:
- convertPathData
- mergePaths
Deactivating these will ensure you get a correct result in most cases:
$ svgo --disable=convertPathData --disable=mergePaths -i img/a.svg
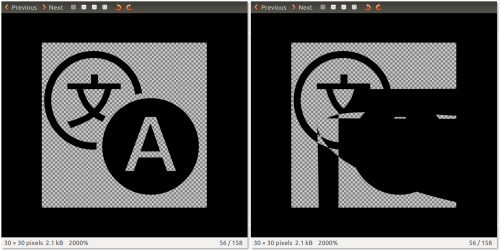
convertPathData will convert the path data using relative and shorthand notations. Unfortunately, some environments won’t fully recognise this syntax and you’ll get something like:

Screenshot of Gnome Image Viewer displaying an original SVG image (left) and a version optimised via svgo on (right)
Please note that the optimised image will display correctly in all browsers. So you may still want to use this plugin.
The other plugin that can cause you trouble—mergePaths—will merge together shapes of the same style to reduce the number of <path> tags in the source. However, this might create issues if two paths overlap.
In the image on the right, please note the rendering differences around the character’s neck and hand, also note the Twitter logo. The outline view shows 3 overlapping paths that make up the character’s head.
My suggestion is to first try svgo with all plugins activated, then if anything is wrong, deactivate the two mentioned above.
If the result is still very different from your original image, then you’ll have to deactivate the plugins one by one to detect the one which causes the issue. Here is a list of svgo plugins.
Optimising even further
svgo is a great tool, but in some specific cases, you’ll want to compress your SVG images even further. To do so, you have to dig into the file format and do some manual optimisations.
In these cases, my favourite tool is Inkscape: it is free, open source and available on most platforms.
If you want to use the mergePaths plugin of svgo, you must combine overlapping paths yourself. Here’s how to do it:
Open your image in Inkscape and identify the path with the same style (fill and stroke). Select them all (maintain shift pressed for multiple selection). Click on the Path menu and select Union. You’re done—all three paths have been merged into a single one.

The 3 different paths that create the character’s head are merged, as shown by the outline view on the right.
Repeat this operation for all paths of the same style that are overlapping and then you’re ready to use svgo again, keeping the
mergePaths plugin.
There are all sorts of different optimisations you can apply manually:
- Convert strokes to paths so they can be merged with paths of similar style.
- Cut paths manually to avoid using
clip-path. - Exclude an underneath path from a overlapping path and merge with a similar path to avoid layer issues. (In the image above, see the character’s hair—the side hair path is under his head, but the top hair is above it—so you can’t merge the 3 hair paths as is.)
Final considerations
These manual optimisations can take a lot of time for meagre results, so think twice before starting!
A good rule of thumb when optimising SVG images is to make sure the final file has only one path per style (same fill and stroke style) and uses no <g> tags to group path to objects.
In Firefox OS, we use an icon font, gaia-icons, generated from SVG glyphs. I noticed that optimising them resulted in a significantly lighter font file, with no visual differences.
Whether you use SVG for embedding images on an app or to create a font file, always remember to optimise. It will make your users happier!
About Guillaume Cedric Marty
Guillaume has been working in the web industry for more than a decade. He's passionate about web technologies and contributes regularly to open source projects, which he writes about on his technical blog. He's also fascinated by video games, animation, and, as a Japanese speaker, foreign languages.


5 comments