
I recently launched a new hobby website of mine: http://jsstyle.github.com/. The purpose of this page is simple: after filling out a JS-related questionnaire, users are awarded by a small fingerprint of their answers (somewhat similar to the Geek Code). It is possible to use the generated badge as an e-mail signature or to impress your friends. There is a second purpose for this web as well: measuring and gathering of selected answers, which allows for some neat comparison and usage statistics.
This article explains some design decisions and implementation techniques used during the development of the JS Style Badge.
Page navigation
My goal was to design a website which does not reload, but keep the amount of necessary JS code at an absolute minimum. Fortunately, there is a pretty neat way to do this in pure HTML+CSS. We use semantic HTML5, naturally, and give the page a proper <nav> section with local anchor links:
...
...
...
Then, a tiny CSS one-liner (with the crucial :target pseudoclass) kicks in:
section[id]:not(:target) { display: none; }
And voilà – we have a working cross-page navigation with full browser history support.
Questions and their Answers
All the questions and their potential answers are defined in a separate file, def.js. This allows for easy maintenance of the questionnaire.
It is necessary to assign some IDs to questions (these need to be immutable and unique) and answers (immutable and unique within one question). These IDs are used to:
- Guarantee fixed question ordering in the generated data (even if the visual ordering of question changes)
- Guarantee the chosen answer, even if its textation or order changes
- Represent the color and/or character in the generated image/ascii
As an example, the question “Semicolons” has an ID of “;” – this makes it the fifth question in the resulting fingerprint (IDs are sorted lexicographically). Its answer “sometimes” has an ID of “=“, to be used in the ASCII signature. This answer is third (sorted by IDs), which corresponds to a blue color in the answer palette (to be used in the <canvas> image).
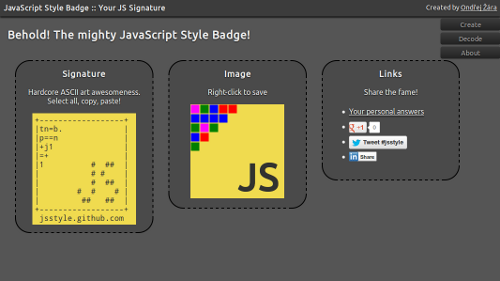
Results: ASCII and <canvas>
When the questionnaire is complete, we need to generate the resulting badge. Actually, three different things need to be generated: image version, ASCII version and the URL, which is used as a permalink.
Image
This is the most straightforward task: take a HTML5 <canvas>, fill it with a proper background color, render a “JS” at the right bottom corner. (Remark: the official JS logo is not drawn with a font; it is a purely geometric shape. I decided to go with Arial, as it is relatively similar.)
Individual answers are represented by small colored squares. Their order is given by the sort order of question IDs; in the image, the ordering goes like this:
0 2 5 9
1 4 8
3 7
6
…and so on. Converting the answer index to a pair of [x, y] coordinates is a simple mathematical exercise. We pick the square color from a fixed palette, based on the sort order of the picked answer. When the user skipped a question, we leave the corresponding square transparent.
ASCII
Textual version corresponds to the image version, but instead of colored squares, answer IDs are used to visualize the output. The whole signature is rendered into a <textarea> element; there is a tiny bit of JS which “selects all” when the area is clicked.
I spent some time looking for an optimal styling of a <textarea>: with a proper width/height ratio, aesthetic font and a reasonable line height. The optimal solution for me is the Droid Sans Mono typeface, implemented using the CSS @font-face.
URL
We want the generated permalinks to be truly permanent: invariant to question/answer textation or ordering. To achieve this, a simple algorithm encodes the picked answers:
- Sort questions by their IDs
- For every question, take the user’s answer. If the question was not answered, output “-“
- If the question was answered, take that answer’s ID and get its unicode code points
- Answers use IDs from unicode range 32..127. Subtract 32 and left-pad with zero to generate a value from “00” to “99”
- Concatenate these values and/or hyphens (for empty questions)
The resulting “hash” does not need to be URL encoded, as it consists solely of numbers.
Sharing is caring
I decided to include links to three popular sharing services. They all expose a sharing API, but not all of them expect you to build their sharing UIs via JavaScript calls. Let’s have a look:
- Google Plus button is the most straightforward: after including the JS API file, it is sufficient to call the
gapi.plusone.renderfunction. Two minor caveats:- Make sure the button’s container is appended in the page when your render into it.
- The resulting button is hard to align perfectly; some
!importantCSS tweaks were necessary.
- Twitter does not expect you to build stuff on the fly. It is necessary to create a hyperlink, fill it with data-* attributes and append the Twitter JS API to the page.
- Finally, the LinkedIn share button is very peculiar: once their sharing API is loaded, it is necessary to create a
<script>node with a type ofIN/Share, enrich it with proper attributes, append to page and callIN.parse().
Conclusion
I had some fun time writing this tiny service; so far, over 1400 signatures were generated by users. As this number grows bigger, more and more interesting JS usage patterns emerge in the usage statistics. If you have not done it so far, go ahead and generate your own JS Style Badge!
About Ondřej Žára
Ondřej Žára likes to experiment with anything related to JavaScript, HTML5 and other web technologies. He showcases many of his projects at http://ondras.zarovi.cz/. He is currently employed at Seznam.cz, a.s., focusing mainly on popular mapping service Mapy.cz as well as HTML5 evangelism. From time to time, he tweets about JS stuff as @0ndras.