
In the Dweb series, we are covering projects that explore what is possible when the web becomes decentralized or distributed. These projects aren’t affiliated with Mozilla, and some of them rewrite the rules of how we think about a web browser. What they have in common: These projects are open source and open for participation, and they share Mozilla’s mission to keep the web open and accessible for all.
We’ve covered a number of projects so far in this series that require foundation-level changes to the network architecture of the web. But sometimes big things can come from just changing how we use the web we have today.
Imagine if you never had to remember a password to log into a website or app ever again. IndieAuth is a simple but powerful way to manage and verify identity using the decentralization already built into the web itself. We’re happy to introduce Aaron Parecki, co-founder of the IndieWeb movement, who will show you how to set up your own independent identity on the web with IndieAuth.
– Dietrich Ayala
Introducing IndieAuth
IndieAuth is a decentralized login protocol that enables users of your software to log in to other apps.
From the user perspective, it lets you use an existing account to log in to various apps without having to create a new password everywhere.
IndieAuth builds on existing web technologies, using URLs as identifiers. This makes it broadly applicable to the web today, and it can be quickly integrated into existing websites and web platforms.
IndieAuth has been developed over several years in the IndieWeb community, a loosely connected group of people working to enable individuals to own their online presence, and was published as a W3C Note in 2018.
IndieAuth Architecture
IndieAuth is an extension to OAuth 2.0 that enables any website to become its own identity provider. It builds on OAuth 2.0, taking advantage of all the existing security considerations and best practices in the industry around authorization and authentication.
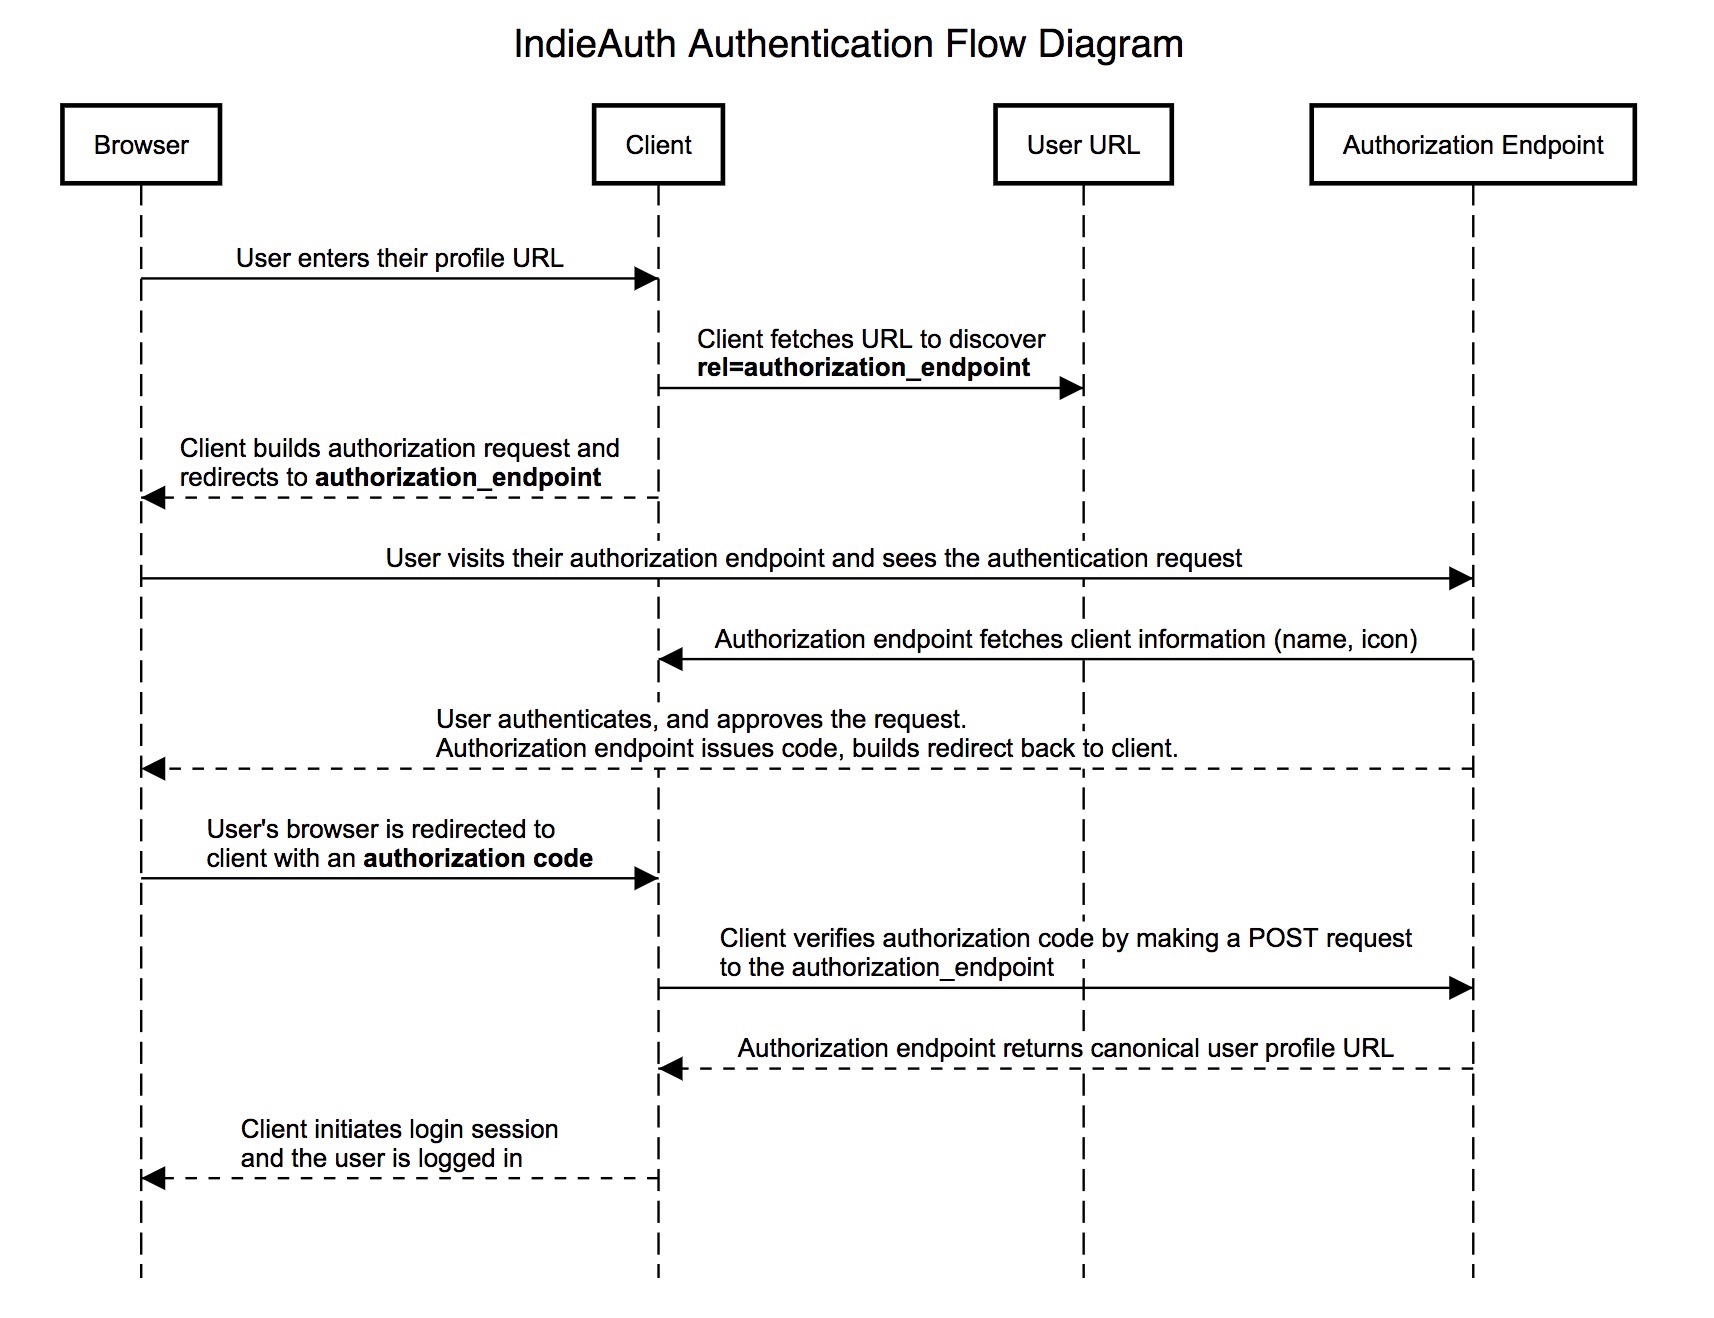
IndieAuth starts with the assumption that every identifier is a URL. Users as well as applications are identified and represented by a URL.
When a user logs in to an application, they start by entering their personal home page URL. The application fetches that URL and finds where to send the user to authenticate, then sends the user there, and can later verify that the authentication was successful. The flow diagram below walks through each step of the exchange:
Get Started with IndieAuth
The quickest way to use your existing website as your IndieAuth identity is to let an existing service handle the protocol bits and tell apps where to find the service you’re using.
If your website is using WordPress, you can easily get started by installing the IndieAuth plugin! After you install and activate the plugin, your website will be a full-featured IndieAuth provider and you can log in to websites like https://indieweb.org right away!
To set up your website manually, you’ll need to choose an IndieAuth server such as https://indieauth.com and add a few links to your home page. Add a link to the indieauth.com authorization endpoint in an HTML <link> tag so that apps will know where to send you to log in.
<link rel="authorization_endpoint" href="https://indieauth.com/auth">Then tell indieauth.com how to authenticate you by linking to either a GitHub account or email address.
<a href="https://github.com/username" rel="me">GitHub</a>
<a href="mailto:you@example.com" rel="me">Email</a>
Note: This last step is unique to indieauth.com and isn’t part of the IndieAuth spec. This is how indieauth.com can authenticate you without you creating a password there. It lets you switch out the mechanism you use to authenticate, for example in case you decide to stop using GitHub, without changing your identity at the site you’re logging in to.
If you don’t want to rely on any third party services at all, then you can host your own IndieAuth authorization endpoint using an existing open source solution or build your own. In any case, it’s fine to start using a service for this today, because you can always swap it out later without your identity changing.
Now you’re ready! When logging in to a website like https://indieweb.org, you’ll be asked to enter your URL, then you’ll be sent to your chosen IndieAuth server to authenticate!
Learn More
If you’d like to learn more, OAuth for the Open Web talks about more of the technical details and motivations behind the IndieAuth spec.
You can learn how to build your own IndieAuth server at the links below:
You can find the latest spec at indieauth.spec.indieweb.org. If you have any questions, feel free to drop by the #indieweb-dev channel in the IndieWeb chat, or you can find me on Twitter, or my website.