
Note: This is Part 1 of a two-part tutorial.
There is a big difference between immersion and realism. A high-end computer game with detailed models and a powerful GPU can feel realistic, but still not feel immersive. There’s more to creating a feeling of being there than polygon count. A low poly experience can feel very immersive through careful set design and lighting choices, without being realistic at all.
Today I’m going to show you how to build a simple but immersive game with A-Frame and models from the previous Sketchfab design challenge. Unlike my previous tutorials, in this one we will walk through creating the entire application. Not just the basic interaction, but also adding and positioning 3d models, programmatically building a landscape with rocks, adding sounds and lighting to make the player feel immersed in the environment, and finally interaction tweaks for different form factors.
Here’s a condensed video version of my tutorial that introduces the steps you’ll need to follow to build your WebVR game:
I hope this blog will inspire you to submit to the current challenge we are running with SketchFab. There’s still time to enter before submissions close on April 2nd.
Boilerplate
Our WebVR Whack-an-Imp game is a variation on Whack-A-Mole, except in our case it will be an imp flying out of a bubbling cauldron. Before we get to fancy 3D models, however, we must begin with an empty HTML file that includes the A-Frame library.
<html>
  <head>
    <!-- aframe itself -->
    <script src="https://aframe.io/releases/0.7.0/aframe.min.js"></script>
  </head>
  <body>
  </body>
</html>
At first we won’t make the scene pretty at all. We just want to prove that our concept will work, so we will keep it simple. That means no lighting, models, or sound effects. Once the underlying concept is proven we will make it pretty.
Let’s start off with a scene with stats turned on, then add a camera with look-controls at a height of 1.5 m; which is a good camera height for VR interaction (roughly corresponding to the average eye height of most adult humans).
<a-scene stats>
    <a-entity camera look-controls position="0 1.5 0">
        <a-cursor></a-cursor>
    </a-entity>
</a-scene>
Notice the a-cursor inside of the camera. This will draw a little circular cursor, which is important for displays that don’t have controllers, such as Cardboard.
Our game will have an object that pops up from a cauldron, then falls back down as gravity takes hold. The player will have a paddle or stick to hit the object. If the player misses, then the object should fall on the ground. For now let’s represent the object with a sphere and the ground with a simple plane. Put this code inside of the a-scene.
<a-entity id='ball'
          position="0 1 -4"
          material="color:green;"
          geometry="primitive:sphere; radius: 0.5;"
></a-entity>

<a-plane color='red' rotation="-90 0 0"
         width="100" height="100"></a-plane>
Note that I’m using the long syntax of a-entity for the ball rather than a-sphere. That’s because later we will switch the geometry to an externally loaded model. However, the plane will always be a plane, so I’ll use the shorter a-plane syntax for that one.
We have an object to hit but nothing to hit it with. Now add a box for the paddle. Instead of using a controller to swing the paddle, we will start with the simplest possible interaction: put the box inside of the camera. Then you can swing it by just turning your head (or dragging the scene camera w/ the mouse on desktop). A little awkward but it works well enough for now.
Also note that I placed the paddle box at z -3. If I’d left it at the default position it would seem to disappear, but it’s actually still there. The paddle is too close to the camera for us to see. If I look down at my feet I can see it though. Whenever you are working with VR and your object doesn’t show up, first check if it’s behind you or too close to the camera.
<a-entity position="0 0 -3" id="weapon">
    <a-box color='blue' width='0.25' height='0.5' depth='3'></a-box>
</a-entity>
Great. Now all of the elements of our scene are here. If you followed along you should have a scene on your desktop that looks like this.

If you play with this demo you’ll see that you can move your head and the paddle moves with it, but trying to hit the ball won’t do anything. That’s because we only have geometry. The computer knows how our objects look but nothing about how they behave. For that we need physics.
Physics
Physics engines can be complicated, but fortunately Don McCurdy has created A-Frame bindings for the excellent Cannon.js open source physics framework. We just need to include his aframe-extras library to start playing with physics.
Add this to the head of the html page:
<!-- physics and other extras -->
<script src="//cdn.rawgit.com/donmccurdy/aframe-extras/v3.13.1/dist/aframe-extras.min.js"></script>
Now we can turn on physics by adding physics="debug:true;” to the a-scene.
Of course merely turning on the physics engine won’t do anything. We still have to tell it which objects in the scene should be affected by gravity and other forces. We do this with dynamic and static bodies. A dynamic body is an object with full physics. It can transmit force and be affected by other forces, including gravity. A static body can transmit force when something hits it, but is otherwise unaffected by forces. Generally you will use a static body for something that doesn’t move, like the ground or a wall, and a dynamic body for things which do move around the scene, such as our ball.
Let’s make the ground static and the ball dynamic by adding dynamic-body and static-body to their components:
<a-entity id='ball'
          position="0 1 -4"
          material="color:green;"
          geometry="primitive:sphere; radius: 0.5;"
          dynamic-body
></a-entity>

<a-plane color='red'
         static-body
         rotation="-90 0 0" width="100" height="100"></a-plane>
Great. Now when you reload the page the ball will fall to the ground. You may also see grid lines or dots on the ball or plane. These are bits of debugging information from the physics engine to let us see the edges of our objects from a physics perspective. It is possible to have the physics engine use a size or shape for our objects that’s different than the real drawn geometry. I know this sounds strange, but it’s actually quite useful, as we will see later.
Now we need to make the paddle able to hit the ball. Since the paddle moves, you might think we should use a dynamic-body, but really we want our code (and the camera) to control the position of the paddle, not the physics engine. We just want the paddle to be there for exerting forces on the ball, not the other way around, so we will use a static-body.
<a-entity camera look-controls position="0 1.5 0">
    <a-cursor></a-cursor>
    <a-entity position="0 0 -3" id='weapon'>
        <a-box color='blue' width='0.25' height='0.5' depth='3'
               static-body></a-box>
    </a-entity>
</a-entity>
Now we can move the camera to swing the paddle and hit the ball. If you hit it hard then it will fly off to the side instead of rolling, exactly what we want!
You might ask why not just turn on physics for everything. Two reasons: First, physics requires CPU time. If more objects have associated physics, the more CPU resources they will consume.
Second reason: For many objects in the scene, we don’t actually want physics turned on. If I have a tree in my scene, I don’t want it to fall down just because it’s a millimeter above the ground. I don’t want the moon to be able to fall from the sky just because it’s above the ground. Only turn on physics for things that really need it for your application.
Collisions
Moving the ball by hitting it is fun, but for a real game we need to track when the paddle hits the ball to increase the player’s score. We also need to reset the ball back to the middle for another shot. We use collisions to do this. The physics engine emits a collide event each time an object hits another object. By listening to this event we can find out when something has been hit, what it is, and we can manipulate it.
First, let’s make some utility functions for accessing DOM elements. I’ve put these at the top of the page so they will be available to code everywhere.
<script>
    $ = (sel) => document.querySelector(sel)
    $$ = (sel) => document.querySelectorAll(sel)
    on = (elem, type, hand) => elem.addEventListener(type,hand)
</script>
Let’s talk about the functions we need. First, we want to reset the ball after the player has hit it or if they’ve missed and a certain number of seconds have gone by. Resetting means moving the ball back to the center, setting the forces back to zero, and initializing a timeout. Let’s create the resetBall function to do this:
let hit = false
let resetId = 0
const resetBall = () => {
    clearTimeout(resetId)
    $("#ball").body.position.set(0, 0.6,-4)
    $("#ball").body.velocity.set(0, 5,0)
    $("#ball").body.angularVelocity.set(0, 0,0)
    hit = false
    resetId = setTimeout(resetBall,6000)
}
In the above code I’m using the $ function with a selector to find the ball element in the page. The physics engine adds a body property to the element containing all of the physics attributes. We can reset the position, velocity, and angularVelocity from here. The code above also sets a timeout to call resetBall again after six seconds, if nothing else happens.
There are two things to note here. First, I’m setting body.position rather than the regular position component that all A-Frame entities have. That’s because the physics engine is in charge of this object, so we need to tell the physics engine about the changes, not A-Frame.
The second thing to note—the velocity is not reset to zero. Instead it’s set to the vector 0,5,0. This means zero velocity in the x and z directions, but 5 in the y direction. This gives the ball an initial vertical velocity, shooting it up. Of course gravity will start to affect it as soon as the ball jumps, so the velocity will quickly slow down. If I wanted to make the game harder I could increase the initial velocity here, or point the vector in a random direction. Lots of opportunities for improvements.
Now we need to know when the collision actually happens so we can increment the score and trigger the reset. We’ll do this by handling the collide event on the #weapon entity. Note, this code should go after the closing </a-scene> so it won’t be loaded until after the scene is ready.
<script>
let score = 0;
let hit = false
let resetId = 0
on($("#weapon"),'collide',(e)=>{
    const ball = $("#ball")
    if(e.detail.body.id === ball.body.id && !hit) {
        hit = true
        score = score + 1
        clearTimeout(resetId)
        resetId = setTimeout(resetBall,2000)
    }
})

setTimeout(resetBall,3000)
</script>
The code above checks if the collision event is for the ball by comparing the body ids. It also makes sure the player didn’t already hit the ball, otherwise they could hit the ball over and over again before we reset it. If the ball was hit, then set hit to true, clear the reset timeout, and schedule a new one for two seconds in the future.
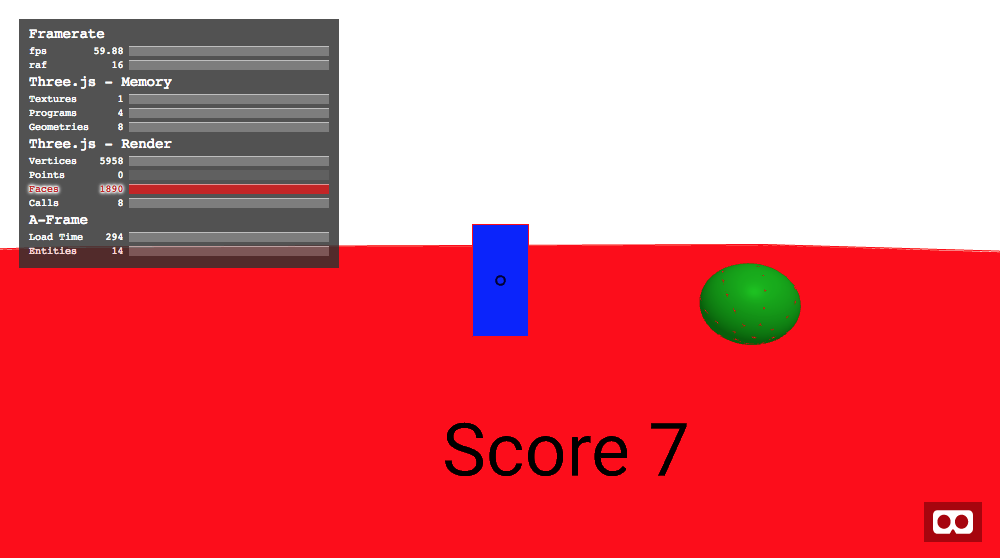
Great, now we can launch the ball over and over and keep track of score. Of course a score isn’t very useful if we can’t see it. Let’s add a text element inside of the camera, so it is always visible. This is called a Heads Up Display or HUD.
<a-entity camera ....
        <a-text id="score" value="Score" position="-0.2 -0.5 -1" color="red" width="5" anchor="left"></a-text>
</a-entity>
We need to update the score text whenever the score changes. Let’s add this to the end of the collide event handler.
on($("#weapon"),'collide',(e)=>{
    const ball = $("#ball")
    if(e.detail.body.id === ball.body.id && !hit) {
...
        $("#score").setAttribute('text','value','Score '+score)
    }
})
Now we can see the score on screen. It should look like this:
Models
We have a basic game running. The player can hit the ball with a paddle and get points. It’s time to make this look better with real 3D models. We need a cool-looking imp to whack with the stick.
The last challenge resulted in tons of great 3D scenes built around the theme of Low-Poly Medieval Fantasy. Many of these have already been split up into individual assets and tagged with medievalfantasyassets.
For this project I chose to use this imp model for the ball and this staff mode for the paddle.
Since we are going to be loading lots of models we should load them as assets. Assets are large chunks of data (images, sounds, models) that are preloaded and cached automatically when the game starts. Put this at the top of the scene and adjust the src urls to point to wherever you downloaded the models.
<a-assets>
    <a-asset-item id="imp" src="models/imp/scene.gltf"></a-asset-item>
    <a-asset-item id="staff" src="models/staff/scene.gltf"></a-asset-item>
</a-assets>
Now we can swap the sphere with the imp and the paddle box for the staff. Update the weapon element like this:
<a-entity position="0 0 -3" id="weapon">
    <a-entity gltf-model="#staff"></a-entity>
</a-entity>
And the ball element like this:
<a-entity id='ball'
          position="0 1 -4"
          dynamic-body
    >
    <a-entity id='imp-model' gltf-model="#imp"></a-entity>
</a-entity>
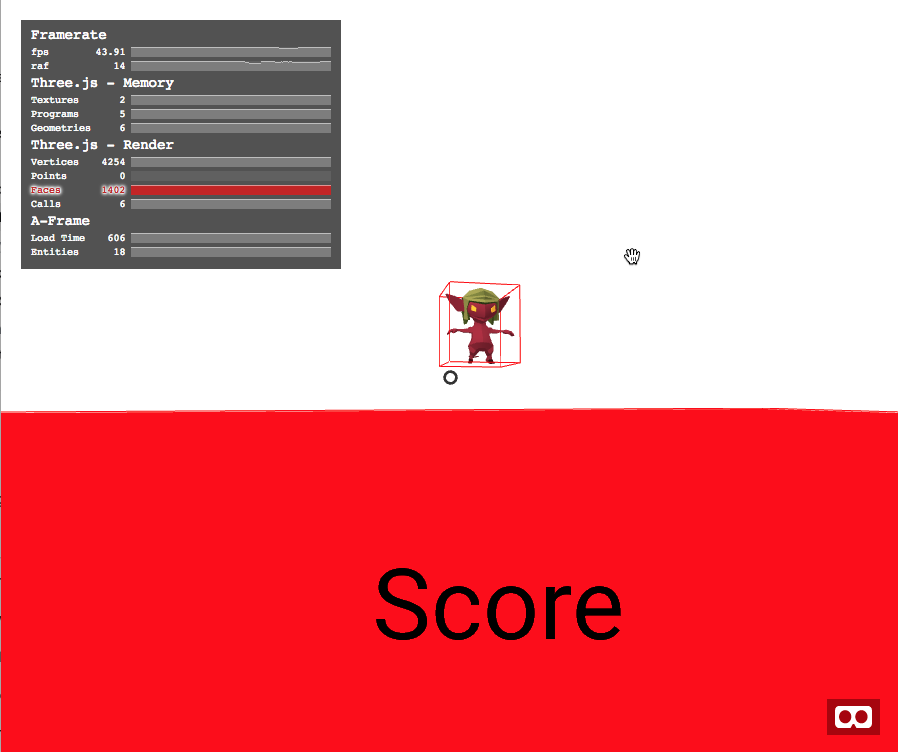
We can see the imp but the staff is missing. What happened?
The problem is the staff model itself. The imp model is (mostly) centered inside of its coordinate system, so it is visually positioned where we put it. However the staff model’s center is significantly off from the center of its coordinate system; roughly 15 to 20 meters away. This is a common issue with models you find online. To fix it we need to translate the model’s position to account for the offset. After playing around with the staff model I found that an offset of 2.3, -2.7, -16.3 did the trick. I also had to rotate it 90 degrees to make it horizontal and shift it forward by four meters to make it visible. Wrap the model with an additional entity to apply the translation and rotation.
<a-entity id=“weapon”  rotation="-90 0 0" position="0 0 -4">
    <a-entity position="2.3 -2.7 -16.3"
              gltf-model="#staff"
              static-body></a-entity>
</a-entity>
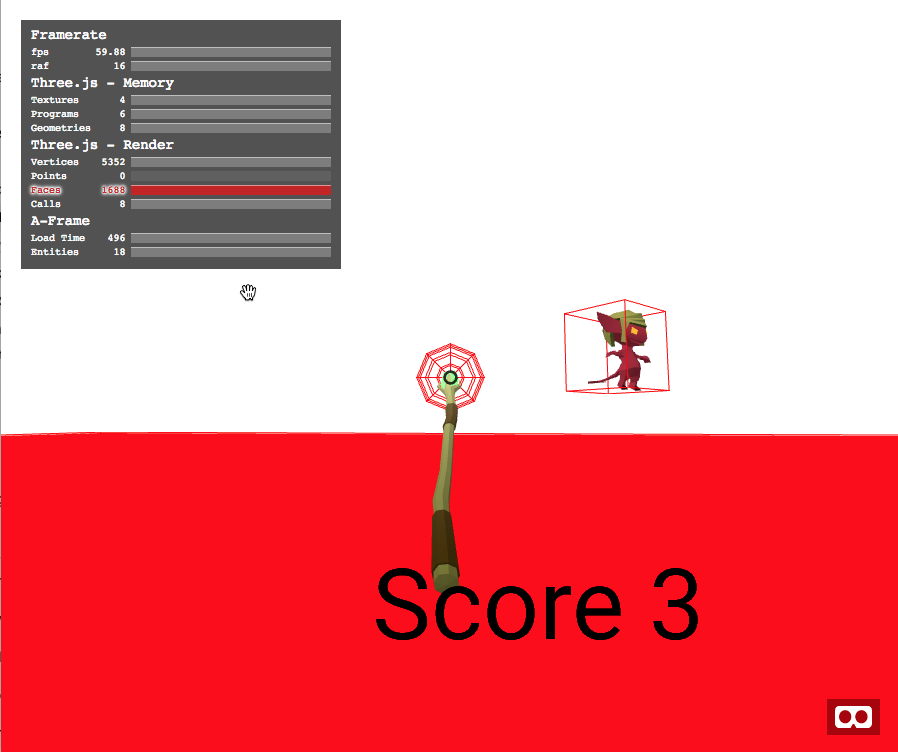
Now we can see the staff, but we still have a problem. The staff is not a simple geometric shape, it’s a full 3d model. The physics engine can’t work directly with a full mesh. Instead it needs to know which primitive object to use. We could use a box like we did originally, but I chose to go with a sphere centered at the end of the staff. That’s the part that the player should actually use to hit the imp, and by making it larger than the staff’s diameter we can make the game easier than it would be in real life. We also need to move the static-body definition to the outer entity so that it isn’t affected by the model offset.
<a-entity rotation="-90 0 0" position="0 0 -4" id='weapon'
          static-body="shape:sphere; sphereRadius: 0.3;">
    <a-entity position="2.3 -2.7 -16.3"
              gltf-model="#staff" ></a-entity>
</a-entity>
Scenery
We have the core game mechanics working correctly with the new models, let’s add some decorations next. I grabbed more models from SketchFab for a moon, a cauldron, a rock, and two different trees. Place them in the scene at different positions.
<a-assets>
    <a-asset-item id="imp" src="models/imp/scene.gltf"></a-asset-item>
    <a-asset-item id="staff" src="models/staff/scene.gltf"></a-asset-item>
    <a-asset-item id="tree1" src="models/arbol1/scene.gltf"></a-asset-item>
    <a-asset-item id="tree2" src="models/arbol2/scene.gltf"></a-asset-item>
    <a-asset-item id="moon" src="models/moon/scene.gltf"></a-asset-item>
    <a-asset-item id="cauldron" src="models/cauldron/scene.gltf"></a-asset-item>
    <a-asset-item id="rock1" src="models/rock1/scene.gltf"></a-asset-item>
</a-assets>
...
<!-- cauldron -->
<a-entity  position="1.5 0 -3.5" gltf-model="#cauldron"></a-entity>
<!-- the moon -->
<a-entity gltf-model="#moon"></a-entity>

<!-- trees -->
<a-entity gltf-model="#tree2" position="38 8.5 -10"></a-entity>
<a-entity gltf-model="#tree1" position="33 5.5 -10"></a-entity>
<a-entity gltf-model="#tree1" position="33 5.5 -30"></a-entity>
Our little game is starting to look like a real scene!
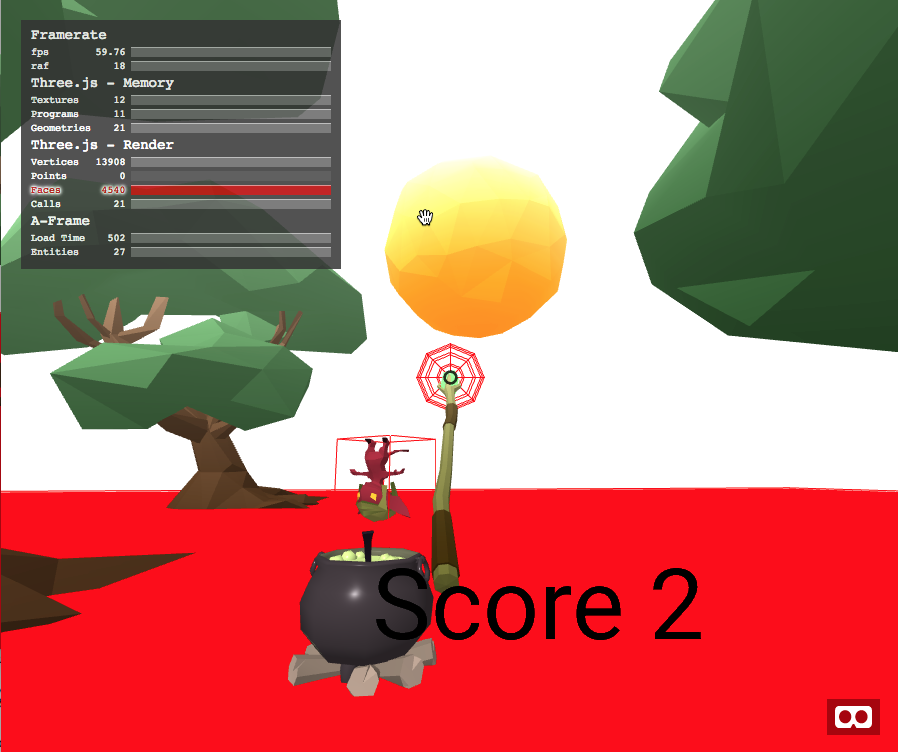
The cauldron has bubbles which appeared to animate on SketchFab but they aren’t animating here. The animation is stored inside the model but it isn’t automatically played without an additional component. Just add animation-mixer to the entity for the cauldron.
The final game has rocks scattered around the field. However, we really don’t want to manually position fifty different rocks. Instead we can write a component to randomly position them for us.
The A-Frame docs explain how to create a component so I won’t recount it all here. The gist of it is this: A component has some input properties and then executes code when init() is called (and a few other functions). In this case, we want to accept the source of a model, some variables controlling how to distribute the model around the scene, and then have a function which will create N copies of the model.
Below is the code. I know it looks intimidating but it’s actually pretty simple. We’ll go through it step by step.
<!-- alternate random number generator -->
<script src="js/random.js"></script>
<!-- our `distribute` component -->
<script>
    AFRAME.registerComponent('distribute', {
        schema: {
            src: {type:'string'},
            jitter: {type:'vec3'},
            centerOffset: {type:'vec3'},
            radius: {type:'number'}
        },
        init: function() {
            const rg = new Random(Random.engines.mt19937().seed(10))
            const center = new THREE.Vector3(this.data.centerOffset.x,
                      this.data.centerOffset.y, this.data.centerOffset.z)
            const jx = this.data.jitter.x
            const jy = this.data.jitter.y
            const jz = this.data.jitter.z
            if($(this.data.src).hasLoaded) {
                const s = this.data.radius
                for(let i = -s; i<s; i++) {
                    for(let j=-s; j<s; j++) {
                        const el = document.createElement('a-entity')
                        el.setAttribute('gltf-model', this.data.src)
                        const offset = new THREE.Vector3(i*s + rg.real(-jx,jx),
                               rg.real(-jy,jy),
                               j*s - rg.real(-jz,jz));
                        el.setAttribute('position', center.clone().add(offset));
                        el.setAttribute('rotation',{x:0, y:rg.real(-45,45)*Math.PI/180, z:0})
                        const scale = rg.real(0.5,1.5)
                        el.setAttribute('scale',{x:scale,y:scale,z:scale})
                        $('a-scene').appendChild(el)
                    }
                }
            }
        }
    })
</script>
First I import random.js. This is a random number generator from this random-js project by Cameron Knight. We could use the standard Math.random() function built into Javascript, but I want to ensure that the rocks are always positioned the same way every time the game is run. This other generator lets us provide a seed.
In the first line of the init() code you can see that I used the seed 10. I actually tried several different seeds until I found one that I liked the look of. If I did actually want each load to be different, say for different levels of the game, then I could provide a different seed for each level.
The core of the distribute component consists of the nested for loops. The code creates a grid of entities, each attached to the same model. For each copy, we will translate it from the natural center point of the original model (the modelCenter parameter) , adding a random offset using the jitter parameter. Jitter represents the maximum amount the rock should move from that grid point. Using 0 0 0 would be no jitter. Using 0 10 0 would make the rocks go vertically anywhere between -10 and 10, but not move at all in the horizontal plane. For this game I used 2 0.5 2 to move them around mostly horizontally but move up and down a tiny bit. The loop code also gives the rocks a random scale and rotation around the Y axis, just to make the scene look a bit more organic.
This is the final result.

This blog has gotten pretty long and we still haven’t worked on lighting, sounds, or polish. Let’s continue the game right now in Part 2.
If you’d like to look at the source to the finished project, I’ve put it all in this github repo.
About Josh Marinacci
I am an author, researcher, and recovering engineer. Formerly on the Swing Team at Sun, the webOS team at Palm, and Nokia Research. I spread the word of good user experiences. I live in sunny Eugene Oregon with my wife and genius Lego builder child.
10 comments