
The Project Things Gateway exists as a platform to bring all of your IoT devices together under a unified umbrella, using a standardized HTTP-based API. We recently announced the Things Gateway and we’ve started a series of hands-on project posts for people who want to set up a Gateway and start playing around with the Web of Things. Earlier this month we began with a high-level overview of how to build a Gateway add-on.
In this post we’ll take what we’ve learned so far and build a real add-on for the Gateway. This add-on will provide a clap-sensing Web Thing that we can use to control our lights and other devices.
For this walkthrough we’ll be writing our Gateway add-on in JavaScript with the goal of making our lights clap-activated. This requires a microphone as input, so I’ll be plugging one into my Gateway and setting it up as a clap-sensing Web Thing. If you want to follow along you can plug any basic USB microphone into your Raspberry Pi. The eLinux-verified USB sound cards are all good options for gaining a microphone input.
We’ll start off with evaluating what kind of microphone add-on we want to create, then copy the example add-on to use as a skeleton for our code. Next, we’ll flesh out that skeleton with a bit of code and finish by testing out the add-on with the Gateway.
Outlining our add-on
We need to think about what we want as the “device” our add-on’s adapter provides. While our add-on could provide an adapter that handles multiple devices, we can simplify our work because we only have one device: the microphone listening for claps. We’re effectively using the microphone as our “clap sensor” device. Next, we have to consider how we want to perform the clap detection. A quick search of npmjs.com for libraries comes up with clap-detector, an open source library developed by Thomas Schell. Our adapter can include this library to use the microphone as a clap sensor.
We now can consider whether our idea of a clap sensor fits into any existing Web Thing types. An important part of the Web of Things specification is that each Thing can have a device type which tells the Gateway and other consumers of the API the properties, actions, and events available. For example, the type dimmableLight represents a light that can be turned on and off or dimmed. From the list of Web Thing types, it looks like a binarySensor with its active and inactive states is a great fit for the clap sensor’s clapping and silent states.
Writing the code
We can now begin the implementation. We can start our development on any computer with the Gateway software installed. If you have a Raspberry Pi flashed with the 0.3.0 release, you can log into it by following these instructions, and follow along from the ~/mozilla-iot/gateway/src/addons directory. Otherwise, if you have the Gateway software setup installed locally according to the instructions in the GitHub project page, you can follow along from the src/addons directory in that copy instead.
The second step is to download a copy of the example-adapter code into this src/addons directory so we can edit an existing adapter instead of writing everything from scratch. On the Pi, we can do this by making sure we have git installed then cloning the example-adapter repo.
cd ~/mozilla-iot/gateway/src/addons
sudo apt install git
git clone https://github.com/mozilla-iot/example-adapter
Once this step is completed, we should have an example-adapter directory in src/addons. We can now move on to getting the clap-detector library to update the active property of our clap sensing binarySensor. The only file we need to edit is example-plugin-adapter.js in the example-adapter directory.
First, let’s remove some of the generic-ness of the example adapter. We’re going to be doing a lot of renaming, so now is the time to use the Find-and-Replace function of your editor if you know how. We really only want one property–whether the sensor is active–so let’s rename ExampleProperty to ActiveProperty.
class ActiveProperty extends Property {
We also know that we want ExampleDevice to only ever be a clap sensor, so let’s rename it to ClapSensor. Note that we also change ExampleProperty to ActiveProperty in the ClapSensor‘s constructor and ExampleDevice to ClapSensor in addDevice.
class ClapSensor extends Device {
  constructor(adapter, id, deviceDescription) {
    super(adapter, id);
    this.name = deviceDescription.name;
    this.type = deviceDescription.type;
    this.description = deviceDescription.description;
    for (var propertyName in deviceDescription.properties) {
      var propertyDescription = deviceDescription.properties[propertyName];
      var property = new ActiveProperty(this, propertyName,
                                         propertyDescription);
      this.properties.set(propertyName, property);
    }
  }
}
Our final bit of modification for now is to make sure we’re making a binarySensor in the loading function. Therefore, we update the uses of ExampleDevice in addDevice and loadExamplePluginAdapter as follows:
class ClapSensorAdapter extends Adapter {
  // ...
  addDevice(deviceId, deviceDescription) {
    return new Promise((resolve, reject) => {
      if (deviceId in this.devices) {
        reject('Device: ' + deviceId + ' already exists.');
      } else {
        var device = new ClapSensor(this, deviceId, deviceDescription);
        this.handleDeviceAdded(device);
        resolve(device);
      }
    });
  }
  // ...
}
function loadExamplePluginAdapter(addonManager, manifest, _errorCallback) {
  var adapter = new ExamplePluginAdapter(addonManager, manifest.name);
  var device = new ClapSensor(adapter, 'clap-sensor-0', {
    name: 'Clap Sensor',
    type: 'binarySensor',
    description: 'Clap Sensor',
    properties: {
      active: {
        name: 'active',
        type: 'boolean',
        value: false,
      },
    },
  });
  adapter.handleDeviceAdded(device);
}
Now let’s figure out how clap-detector works. Based on clap-detector‘s documentation we have to install sox and clap-detector before we can begin using it in our adapter.
cd ~/mozilla-iot/gateway/src/addons/example-adapter
sudo apt-get install sox
npm install --save clap-detector
Then, we can use its documentation’s API example to get whether clapping is occurring:
const clapDetector = require('clap-detector');

// Start clap detection
clapDetector.start();

// Register on clap event
clapDetector.onClap(function(history) {
    console.log('clapping is happening', history)
});
We can then hook this up to our ActiveProperty by telling it to toggle its state whenever it detects clapping.
var clapDetector = require('clap-detector');
// Start clap detection
clapDetector.start();

class ActiveProperty extends Property {
  constructor(device, name, propertyDescription) {
    super(device, name, propertyDescription);
    this.unit = propertyDescription.unit;
    this.description = propertyDescription.description;
    this.setCachedValue(propertyDescription.value);
    this.device.notifyPropertyChanged(this);

    clapDetector.onClap(function() {
      console.log('clap!');
      this.value = !this.value;
      this.setCachedValue(this.value);

      this.device.notifyPropertyChanged(this);
    }.bind(this));
  }
  // ...
}
Clapping for lights
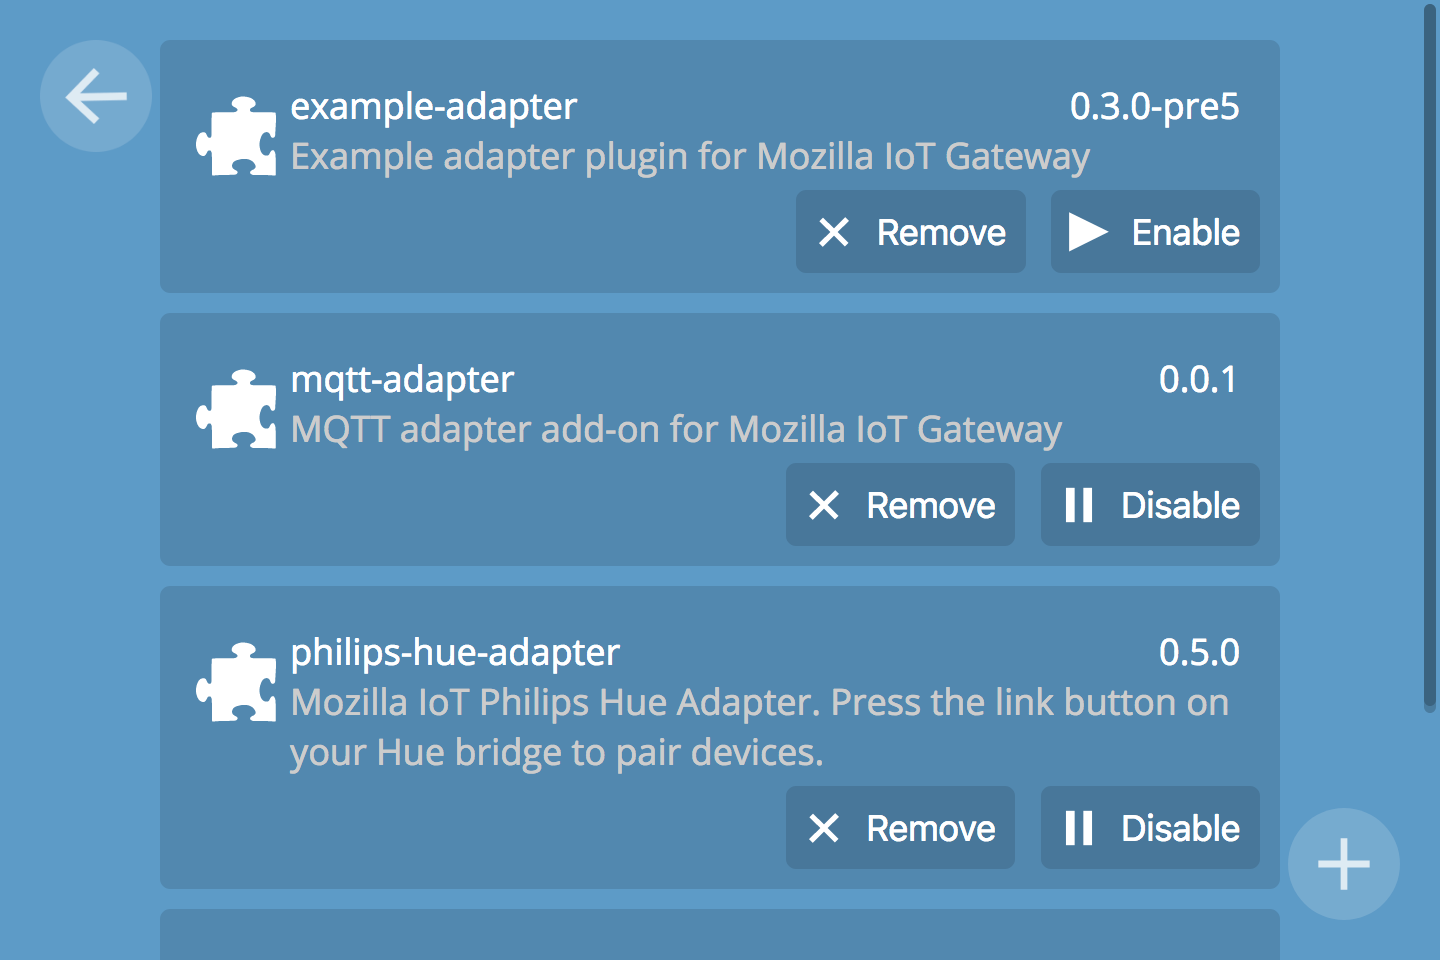
We’re done with the code part of this project. Now all we need to do is make sure our clap-sensing version of example-adapter installs and does what we want it to do. First, let’s restart our Gateway to make sure it cleanly loads our add-on. Run sudo systemctl restart mozilla-iot-gateway.service and wait until your Gateway restarts. Now we can verify that the add-on is working by going to our Gateway’s Settings screen. If you don’t see the add-on listed in the Settings screen, run tail -n +0 -f ~/mozilla-iot/gateway/run-app.log for logs that you can read to find out what went wrong:
Next, we add the ClapSensor device by clicking on the plus sign on the main Things page of our Gateway and saving the binarySensor named “Clap Sensor” that shows up:
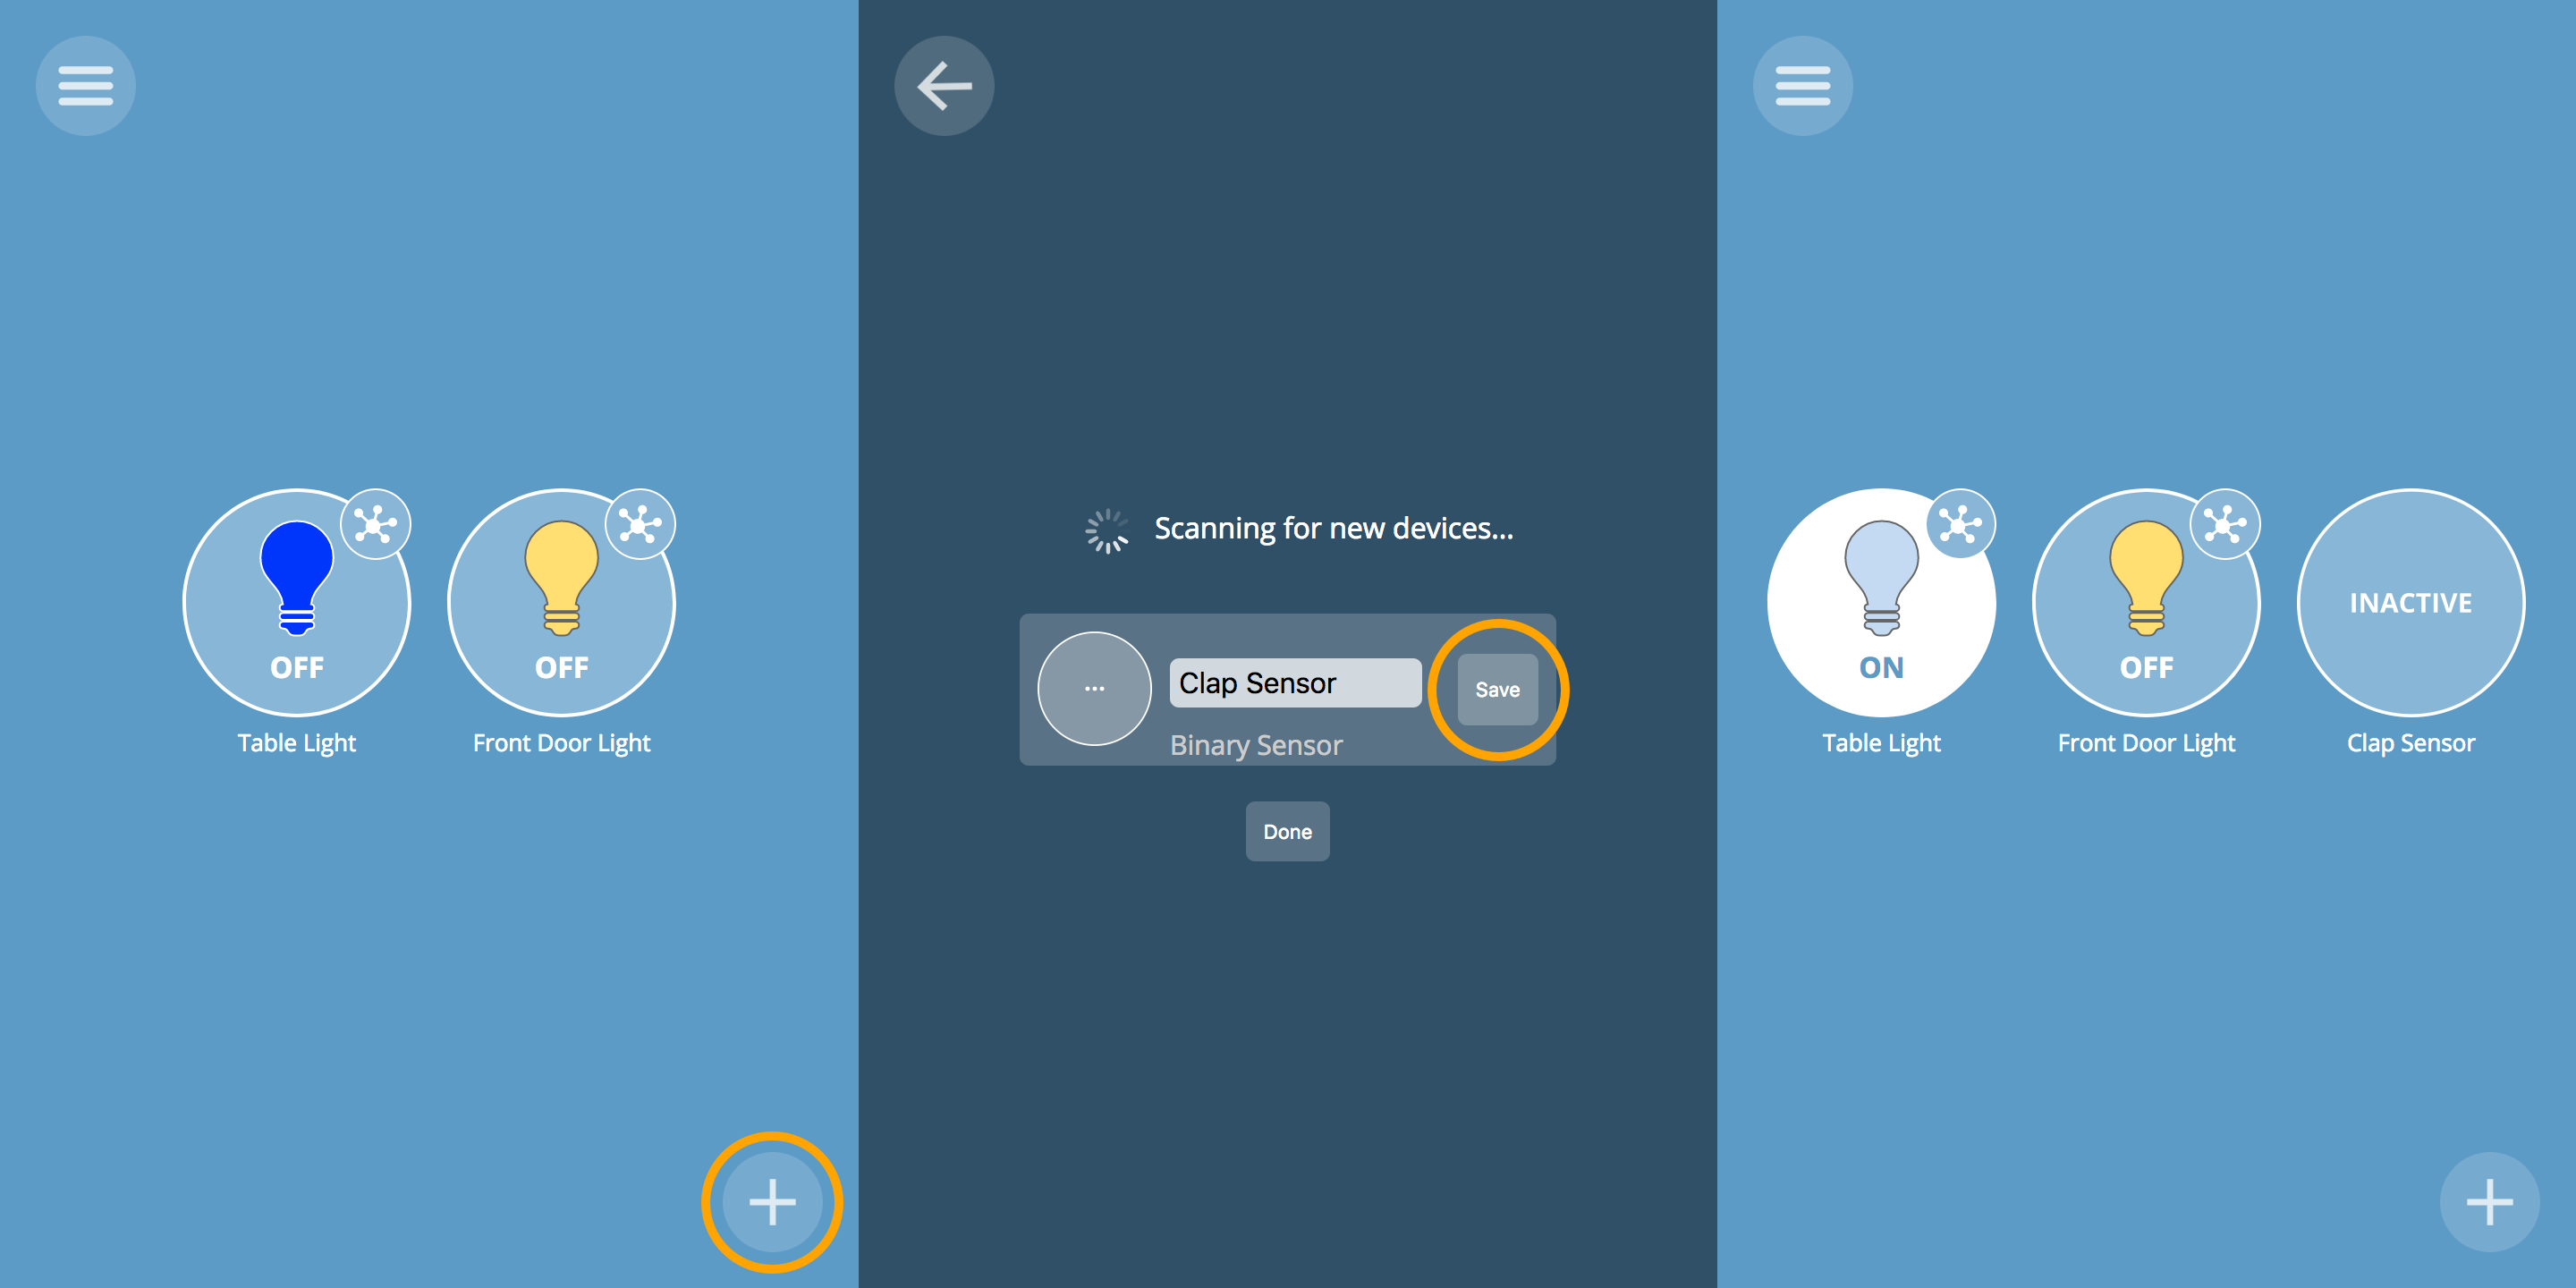
Now we get to test our device by clapping near the microphone. If it’s working as intended, the sensor should turn on or turn off every time you clap. Otherwise, try adjusting the clap sensor configuration or compare your version to the official ClapSensor code.
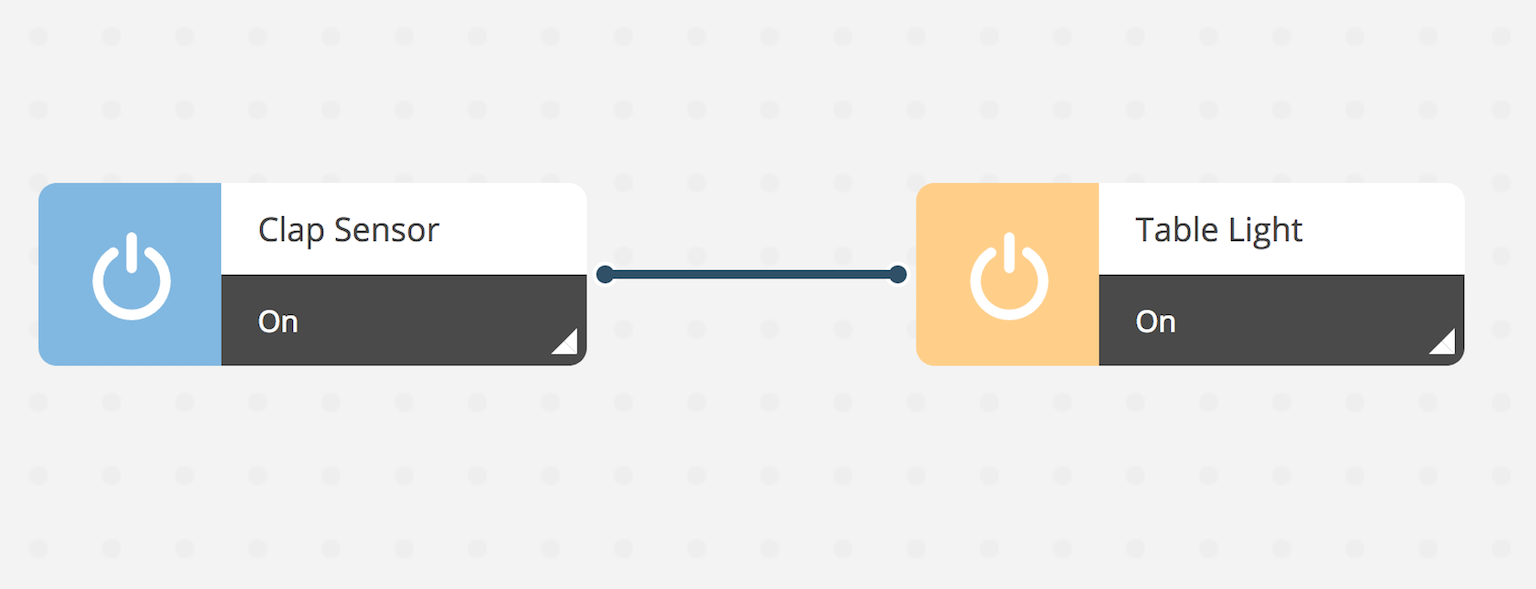
Once everything is working we can get creative and set up a rule to turn on and off our lights every time we clap. Go to the Rules page in your Gateway and click the plus sign to add a new rule. On the bottom devices list, select your clap sensor and drag it into place as a trigger. Select “on” as the trigger’s property so that it triggers every time the sensor is active instead of when it is inactive. Next, drag whichever light you want to control into the rule area’s effect section. Select that you want to turn the light “on”. If you’re having any trouble, the completed rule is shown below for reference. We can now clap to turn on and off our light:
Thank you for reading! If you want to learn more, check out the main Mozilla IoT page for more information about the Web of Things and how you can contribute!
About James Hobin
Level 25 Computer Wizard on a quest to keep the Internet of Things free and open.
15 comments