
Prolog
Until recently having more than one color in a glyph of a vector font was technically not possible. Getting a polychrome letter required multiplying the content for every color. Like it happened with many other techniques before, it took some time for digital type to overcome the constraints of the old technique. When printing with wood or lead type the limitation to one color per glyph is inherent (if you don’t count random gradients). More than one color per letter required separate fonts for the differently colored parts and a new print run for every color. This has been done beautifully and pictures of some magnificent examples are available online. Using overprinting the impression of three colors can be achieved with just two colors.

Digital font formats kept the limitation to one ‘surface’ per glyph. There can be several outlines in a glyph but when the font is used to set type the assigned color applies to all outlines. Analog to letterpress the content needs to be doubled and superimposed to have more than one color per glyph. Multiplying does not sound like an elegant solution and it is a constant source of errors.
It took some emojis until the demand for multi-colored fonts was big enough to develop additional tables to store this information within OpenType fonts. As of this writing there are several different ways to implement this. Adam Twardoch compares all proposed solutions in great detail on the FontLab blog.
To me the Adobe/Mozilla way looks the most intriguing.
Upon its proposal it was discussed by a W3C community group and published as a stable document. The basic idea is to store the colored glyphs as svgs in the OpenType font. Of course this depends on the complexity of your typeface but svgs should usually result in a smaller file size than pngs. With the development of high resolution screens vectors also seem to be a better solution than pixels. The possibility to animate the svgs is an interesting addition and will surely be used in interesting (and very annoying) ways. BLING BLING.
Technique
I am not a font technician or a web developer just very curious about this new developments. There might be other ways but this is how I managed to build colorful OpenType fonts.
In order to make your own you will need a font editor. There are several options like RoboFont and Glyphs (both Mac only), FontLab and the free FontForge. RoboFont is the editor of my choice, since it is highly customizable and you can build your own extensions with python. In a new font I added as many new layers as the amount of colors I wanted to have in the final font. Either draw in the separate layers right away or just copy the outlines into the respective layer after you’ve drawn them in the foreground layer. With the very handy Layer Preview extension you can preview all Layers overlapping. You can also just increase the size of the thumbnails in the font window. At some point they will show all layers. Adjust the colors to your liking in the Inspector since they are used for the preview.


When you are done drawing your outlines you will need to safe a ufo for every layer / color. I used a little python script to safe them in the same place as the main file:
f = CurrentFont()
path = f.path
for layer in f.layerOrder:
newFont = RFont()
for g in f:
orig = g.getLayer(layer)
newFont.newGlyph(g.name)
newFont[g.name].appendGlyph(orig)
newFont[g.name].width = orig.width
newFont[g.name].update()
newFont.info.familyName = f.info.familyName
newFont.info.styleName = layer
newFont.save(destDir = path[:-4] +"_%s" % layer +".ufo")
newFont.close()
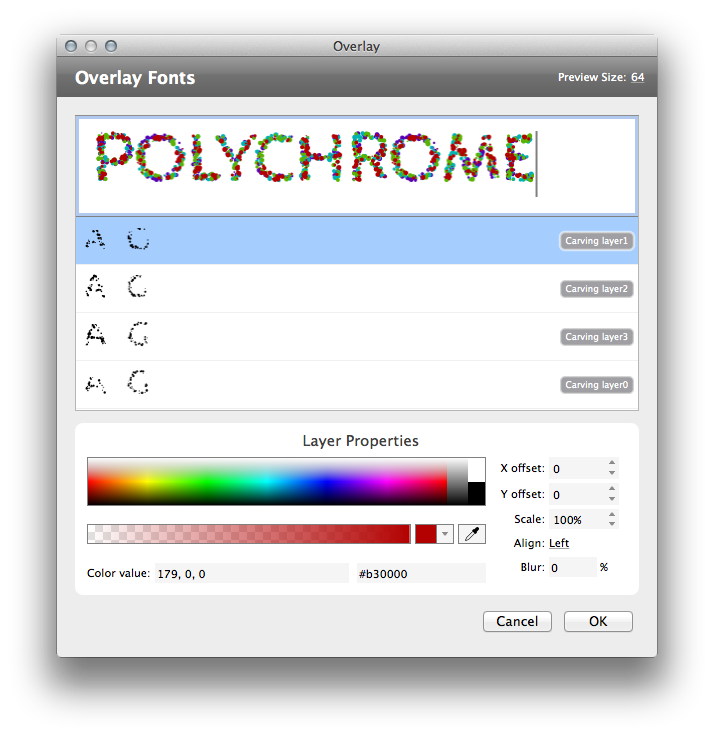
print "Done Splitting"Once I had all my separate ufos I loaded them into TransType from FontLab. Just drop your ufos in the main window and select the ones you want to combine. In the Effect menu click ‘Overlay Fonts …’. You get a preview window where you can assign a rgba value for each ufo and then hit OK. Select the newly added font in the collection and export it as OpenType (ttf). You will get a folder with all colorfont versions.
RoboChrome
In case you don’t want to use TransType you might have a look at the very powerful RoboFont extension by Jens Kutílek called RoboChrome. You will need a separate version of your base-glyph for every color, which can also be done with a scipt if you have all of your outlines in layers.
f = CurrentFont()
selection = f.selection

for l, layer in enumerate(f.layerOrder):
for g in selection:
    char = f[g]
    name = g + ".layer%d" % l
    f.newGlyph(name)
    f[name].width = f[g].width
    l_glyph = f[g].getLayer(layer)
    f[name].appendGlyph(l_glyph)
    f[name].mark = (.2, .2, .2, .2)

print "Done with the Devision"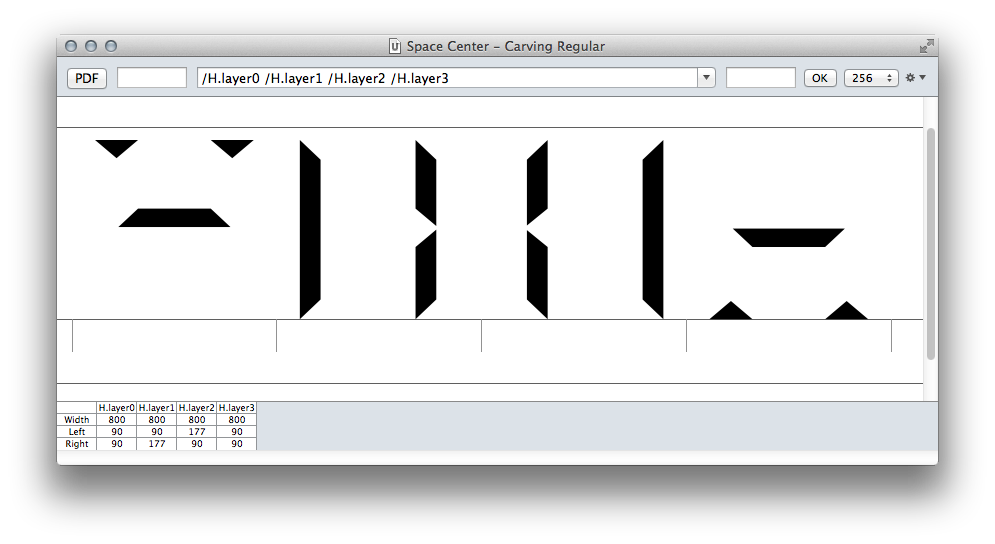
Fonttools
You can also modify the svg table of a compiled font or insert your own if it does not have any yet. To do so I used the very helpful fonttools by Just van Rossum. Just generate a otf or ttf with the font editor of your choice. Open the Terminal and type ttx if you are on Mac OS and have fonttools installed. Drop the font file in the Terminal window and hit return. Fonttools will convert your font into an xml (YourFontName.ttx) in the same folder. This file can then be opened, modified and recompiled into a otf or ttf.
This can be quite helpful to streamline the svg compiled by a program and therefore reduce the file size. I rewrote the svg of a 1.6mb font to get it down to 980kb. Using it as a webfont that makes quite a difference. If you want to add your own svg table and font that does not have any yet you might read a bit about the required header information. The endGlyphID and startGlyphID for the glyph you want to supply with svg data can be found in the <GlyphOrder> Table.
<svg>
<svgDoc endGlyphID="18" startGlyphID="18">
    <![CDATA[
    <!-- here goes your svg -->
    ]]>
</svgDoc>
<svgDoc endGlyphID="19" startGlyphID="19">...</svgDoc>
<svgDoc endGlyphID="20" startGlyphID="20">...</svgDoc>
...
<colorPalettes></colorPalettes>
</svg>
One thing to keep in mind is the two different coordinate systems. Contrary to a digital font svg has a y-down axis. So you either have to draw in the negative space or you draw reversed and then mirror everything with:
transform="scale(1,-1)"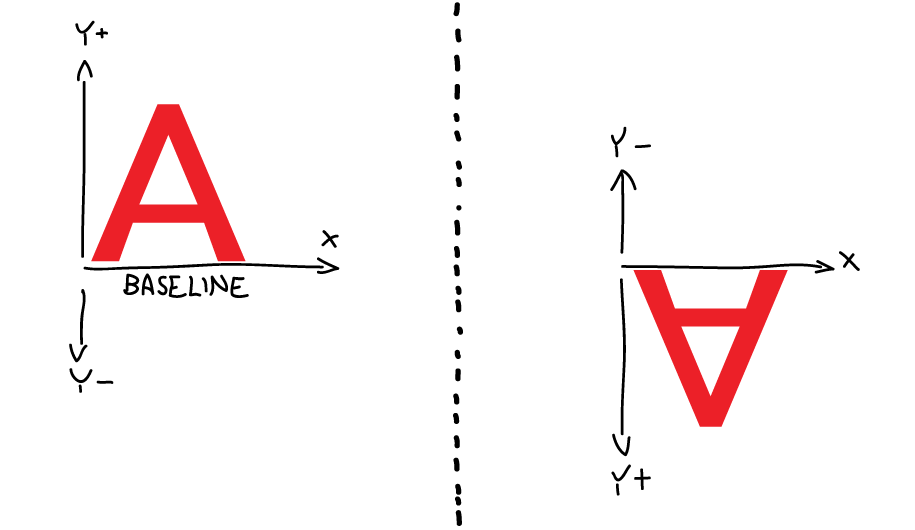
Animation
Now if you really want to pimp your fonts you should add some unnecessary animation to annoy everybody. Just insert it between the opening and closing tags of whatever you want to modify. Here is an example of a circle changing its fill-opacity from zero to 100% over a duration of 500ms in a loop.
<circle>
<animate    attributeName="fill-opacity"
            begin="0"
            dur="500ms"
            from="0"
            to="1"
            repeatCount="indefinite"/>
</circle>
Implementation
Technically these fonts should work in any application that works with otfs or ttfs. But as of this writing only Firefox shows the svg. If the rendering is not supported the application will just use the regular glyph outlines as a fallback. So if you have your font(s) ready it’s time to write some css and html to test and display them on a website.
The @font-face
@font-face {
font-family: "Colors-Yes"; /* reference name */
src: url('./fonts/Name_of_your_font.ttf');
font-weight: 400; /* or whatever applies */
font-style: normal; /* or whatever applies */
text-rendering: optimizeLegibility; /* maybe */
}
The basic css
.color_font { font-family: "Colors-Yes"; }The HTML
<p class="color_font">Shiny polychromatic text</p>Restrictions
As of this writing (October 2014) the format is supported by Firefox (26+) only. Since this was initiated by Adobe and Mozilla there might be a broader support in the future.
While using svg has the advantage of reasonably small files and the content does not have to be multiplied it brings one major drawback. Since the colors are ‘hard-coded’ into the font there is no possibility to access them with css. Hopefully this might change with the implementation of a <COLR/CPAL> table.
There is a bug that keeps animations from being played in Firefox 32. While animations are rendered in the current version (33) this might change for obvious reasons.
Depending how you establish your svg table it might blow up and result in fairly big files. Be aware of that in case you use them to render the most crucial content of your websites.
Examples
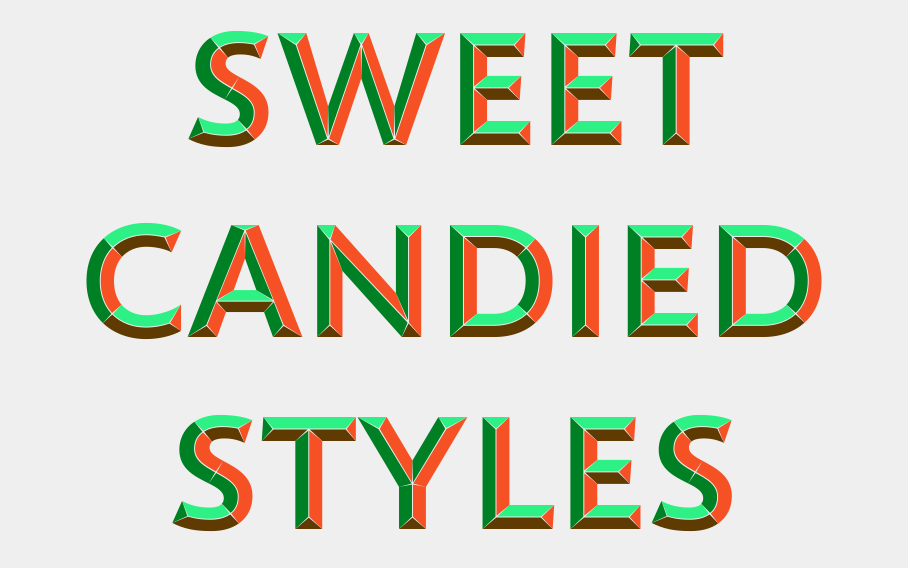
- Carving typeface
- International maritime signal flags The flag alphabet of the ICS
- Sparkle Motion Be warned! A hefty 980kb font with lots of animation.
- Bubbles gone wrong do not confuse $1 and $2 in your grep.
Links, Credits & Thanks
- The Specifications of svg glyphs in OpenType on w3.org
- The ufo format by Tal Leming, Just van Rossum and Erik van Blokland
- Robofont by Frederik Berlaen
- Layer preview for Robofont by Frederik Berlaen
- RoboChrome for Robofont by Jens Kutílek
- TransType by FontLab
- fonttools by Just van Rossum and a fork on github
- Polychromatic type specimen on archive.org
- An animated sample from mozilla
- Syntax highlighting done with prism.
- Symbolset has a similar Tutorial
Thanks Erik, Frederik, Just and Tal for making great tools!
About Johannes Lang
I am a graphic and type designer working in Vienna (Austria). I am also part-time teaching typography at the university of applied arts Vienna. I like paper objects and riding my bicycle.
More articles by Johannes Lang…
About Robert Nyman [Editor emeritus]
Technical Evangelist & Editor of Mozilla Hacks. Gives talks & blogs about HTML5, JavaScript & the Open Web. Robert is a strong believer in HTML5 and the Open Web and has been working since 1999 with Front End development for the web - in Sweden and in New York City. He regularly also blogs at http://robertnyman.com and loves to travel and meet people.