
This is the first part out of two in a tutorial series where we will build a Todo app for Firefox OS from scratch. I assume you have some understanding of HTML5, CSS3, JavaScript, jQuery/Zepto, and Backbone.js. In this part we will handcraft a properly structured and semantic UI of a Todo app using best practices for designing UIs for mobile.
The source for the Todo app is available on GitHub.
Setting Up the Environment
We will use volo as our package manager and build tool.
Step 1
First you need to install Node.js because volo depends on it. Windows and Mac users can download it from here. But for Linux users, I recommend you use the package manager: instructions for installation using package manager on different distros.
Step 2
Install volo using the following command.
npm install -g volo
Make sure you use `sudo` before above command in *nix environment.
Step 3
Create a blank project fos-todo-app using `volo create` command.
volo create fos-todo-app
This will create a folder fos-todo-app and copy required volo project files from GitHub.
Remember we will work only with the files in fos-todo-app/www directory. If you have never worked with volo before, [Streamline your Process with Volo](http://net.tutsplus.com/tutorials/javascript-ajax/streamline-your-process-with-volo/) is a recommended read.
Step 4
Make sure you have the latest stable version of Firefox installed. Then [install the Firefox OS simulator add-on](https://addons.mozilla.org/en-US/firefox/addon/firefox-os-simulator/). At the end of this article we will test UI of our app in this simulator.
Step 5
Get the [MozTT font](https://github.com/mozilla-b2g/moztt/tree/master/MozTT) and install it. MozTT is the font used in Firefox OS. It’s an optional step but it’s better to install this font on your system so you can get consistent look and feel in the Firefox OS Simulator and the real phone.
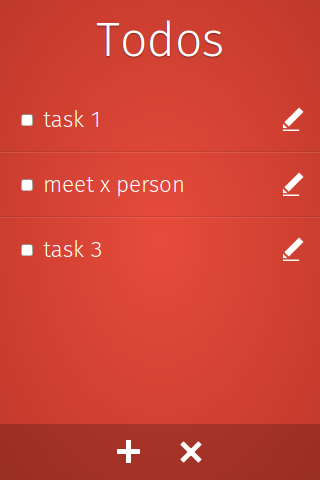
Todo View
The first UI that we will build will show a title in the header, Add/Delete buttons in the footer and a todo list. This view will be used for viewing, editing, mark as complete, and deleting tasks.
Add role="application" attribute to the `body` element and write following HTML for the Todo View.
Todos
-
-
Each view is assigned a role="region". Within the view, you can have header, footer and any container element having the view-content class which will contain the contents of the view.
In the above view’s content, we have ul[role=list] which contains tasks entered by user. For testing purposes, I added two dummy tasks so you can understand each list item’s (`li[role=listitem]`) structure. Within each list item we have a label element containing a <input type="checkbox"> and a span element containing the text of task. The second element in the list item contains a <input type="text"> element which is initially hidden using attribute aria-hidden="true". Finally the third element is .btn.edit (edit button).
Note: Of course it’s not magic. We will write CSS for all these attributes. Check out ARIA and Progressive Enhancement if you are new to WAI-ARIA.
The purpose of placing the label in the list item is to display each task’s text and input[type=text] (which is initially hidden) will be used to edit that text. Any task can enter edit mode when user tap on .btn.edit (edit button). Similarly, tasks are “marked as completed” when user tap on label.
In the footer we have menu[role=toolbar] containing Add/Delete buttons. Later using CSS for these buttons, we will display a svg icon in background and hide an inner span in it.
Add View
The second and final view in our app will be used to add tasks to the todo list.
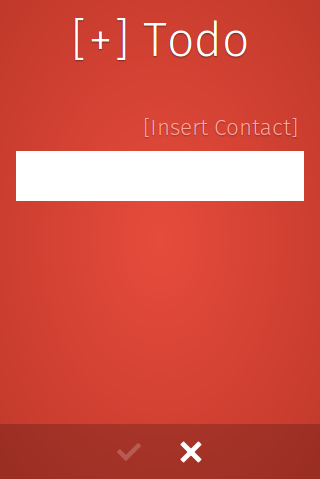
In this view we have a textbox for entering a task’s text, and a insert contact link will be used to add the contact number using Web Activities. Here’s the HTML for Add View.
[+] Todo
Note that the contents in section.view-content is wrapped using div.wrapper so we can limit its max-width and right align menu.options.
Second thing to note here is the aria-owns attribute on form element. This attribute relates to the form with btn-add-done.
Element Styles
Let’s write the CSS for the HTML elements. An explanation is given in comments above each selector.
/* Stretch vertically */
html, body { height: 100%; }

body {
  background: radial-gradient(ellipse at center, rgba(231,76,60,1) 0%,rgba(192,57,43,1) 100%);
  color: #fff;
  font-family: MozTT, sans-serif;

  /* Reset base size */
  font-size: 16px;

  /* Set font size relative to base size */
  /* Check this article on rem usage */
  font-size: 1.4rem;

  font-weight: 300;

  /* Remove spacing */
  margin: 0;
}

h1, h2, h3, h4, h5, h6 { font-weight: 300; }

h1 { font-size: 3rem; }

a {
  color: #FFA49E;
  text-decoration: none;
  text-shadow: 0px 1px 1px rgba(0,0,0,.3);
}
a:hover { color: #fff; }

input, button, select, textarea {
  border-radius: 0;
  box-shadow: none;
}
input[type=text], textarea, select {
  border: none;
  font-family: MozTT, sans-serif;
  font-size: 1.3rem;
  font-weight: 300;
  padding: .7rem .8rem;
}
View Specific Styles
#view-todos > .view-content {
  margin-left: 0;
  margin-right: 0;
}

#view-add > .view-content {
  margin-top: 2rem;
}
#view-add > .view-content > .wrapper {
  overflow: hidden;
  margin: 0 auto;
  max-width: 800px;
  width: 100%;
}
#view-add input[name=task] {
  width: 100%;
}
#view-add .options {
  margin: 0 0 .5rem 0;
  text-align: right;
}
#view-add .options [role=listitem] {
  margin: .5rem 0;
}
#view-add .options a {
  padding: .4rem;
}
Module Styles
View Module
/* All views have region role so selecting them with attribute selector  */
[role=region] {
  background: radial-gradient(ellipse at center, rgba(231,76,60,1) 0%,rgba(192,57,43,1) 100%);

  /* Stretch both vertically/horizontally */
  top: 0; right: 0; bottom: 0; left: 0;

  position: fixed;
  overflow-x: hidden;
}
[role=region] > header {
  margin: .5rem 0 1rem 0;
  text-align: center;
}
[role=region] > header > h1 {
  margin: 0;
  text-shadow: 0px 1px 1px rgba(0,0,0,.4);
}
[role=region] > .view-content {
  margin: 0 1rem 4rem 1rem;
}
[role=region] > footer {
  background: rgba(0,0,0,.2);
  right: 0; bottom: 0; left: 0;
  position: fixed;
  text-align: center;
}
[role=region] > footer > menu[role=toolbar] {
  margin: 0;
  padding: 0;
}
Button Module
.btn {
  border: none;
  width: 3.5rem;
  height: 3.5rem;
}
.btn > span {
  display: none;
}
.btn:disabled {
  opacity: .2;
}
.btn.done {
  background: url(../img/check.svg) no-repeat center center;
}
.btn.add {
  background: url(../img/add.svg) no-repeat center center;
}
.btn.del {
  background: url(../img/del.svg) no-repeat center center;
}
.btn.edit {
  background: url(../img/edit.svg) no-repeat center center;
}
.btn:hover {
  background-color: rgba(255,255,255,.1);
}
Todo List Module
.todo-list > li {
  border-bottom: 1px solid rgba(255,255,255,.1);
  position: relative;
}
.todo-list > li > .btn {
  top: 0; right: 0;
  position: absolute;
  height: 3.9rem;
}
.todo-list label {
  border-bottom: 1px solid rgba(0, 0, 0, 0.1);
  display: block;
  padding: 1rem 2.8rem 1rem 1rem;
}
.todo-list > li:last-child,
.todo-list > li:last-child > label {
  border-bottom: none;
}
.todo-list label > span {
  transition: all .5s;
}

/***
  This selector is interesting. It creates a line-through and
  decrease opacity of text in span when checkbox is checked
***/
.todo-list input[type=checkbox]:checked + span {
  text-decoration: line-through;
  opacity: .4;
}

.todo-list > li > input[type=text] {
  margin: .4rem;
  /* removing input padding and margin from 100% */
  width: calc(100% - 2.3rem);
}
Utility Styles
.reset-list {
  list-style: none;
  margin: 0;
  padding: 0;
}
[aria-hidden=true] {
  display: none !important;
}
Animations
Following are a few animation effects that we will use to animate our views. Although we will use Zepto.js which on run-time generates CSS3 animations using JavaScript, I prefer to write my own animations using CSS3 and make use of it by applying/removing CSS classes on DOM elements.
Zepto is a minimalist JavaScript library for modern browsers with a largely jQuery-compatible API. If you use jQuery, you already know how to use Zepto. ‐ zeptojs.com
Check out the How to use CSS Animations tutorial for understanding CSS3 Animations better.
.slide-up-in {
  animation-name: slide-up-in;
  animation-duration: .6s;
  transform: translateY(0%);
  opacity: 1;
}
@keyframes slide-up-in {
  0% { transform: translateY(30%); opacity: 0; }
  100% { transform: translateY(0%); opacity: 1; }
}

.slide-down-out {
  animation-name: slide-down-out;
  animation-duration: .6s;
  transform: translateY(30%);
  opacity: 0;
}
@keyframes slide-down-out {
  0% { transform: translateY(0%); opacity: 1; }
  100% { transform: translateY(30%); opacity: 0; }
}

.slide-right-in {
  animation-name: slide-right-in;
  animation-duration: .6s;
  transform: translateX(0%);
}
@keyframes slide-right-in {
  0% { transform: translateX(-100%); }
  100% { transform: translateX(0%); }
}

.slide-left-out {
  animation-name: slide-left-out;
  animation-duration: .6s;
  transform: translateX(-100%);
}
@keyframes slide-left-out {
  0% { transform: translateX(0%); }
  100% { transform: translateX(-100%); }
}
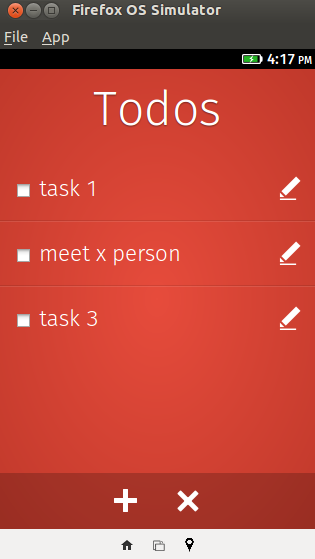
Testing in Firefox OS Simulator
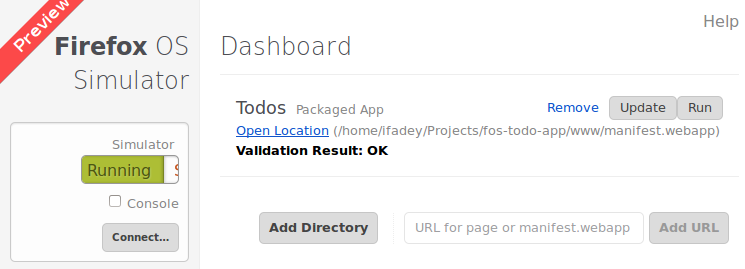
You can pretty easily test the UI we have developed using the Firefox OS Simulator. All you need is a manifest.webapp file in root directory (fos-todo-app/www). Add the following json in it.
{
  "version": "0.1",
  "name": "Todos",
  "description": "Awesome todo app by iFadey",
  "launch_path": "/index.html",
  "icons": {
    "16": "/img/icons/icon-16.png",
    "48": "/img/icons/icon-48.png",
    "128": "/img/icons/icon-128.png"
  },
  "developer": {
    "name": "Fawad Hassan",
    "url": "http://ifadey.com"
  },
  "installs_allowed_from": ["*"],
  "appcache_path": "/cache.manifest",
  "default_locale": "en"
}
Currently I haven’t added an app icon but don’t worry about it. Firefox OS adds a default app icon if it doesn’t find one mentioned in the manifest file. Now open the simulator tab from Tools > Web Developer > Firefox OS Simulator. Then click Add Directory button and select the manifest file from our app directory. This will add our app in the simulator.
End of part 1
Now you have gotten started with the Todo app and have gotten going with a few easy steps. In next part we will add life in our app using JavaScript (Backbone/Zepto). We will create Todo model, collection, and views and for the sake of simplicity, we will only store our todo collection in IndexedDB. We will also make use of Web Activities to inject contact number in text of todo task.
About Fawad Hassan
I am a JavaScripter and I love working on single page apps, Firefox OS, PhoneGap based mobile apps, and Node.js/Express.js backend. Currently I am working for PLUMgrid (SDN related startup) and I am working on HTML5 based GUI of Network Operating System. Other than that I am Mozillian and in my free time I promote Mozilla products.
More articles by Fawad Hassan…
About Robert Nyman [Editor emeritus]
Technical Evangelist & Editor of Mozilla Hacks. Gives talks & blogs about HTML5, JavaScript & the Open Web. Robert is a strong believer in HTML5 and the Open Web and has been working since 1999 with Front End development for the web - in Sweden and in New York City. He regularly also blogs at http://robertnyman.com and loves to travel and meet people.
18 comments