
Update 2013/05/29: I have updated the article to reflect recent changes in the source map specification where the //@ syntax for linking a source map to a script has been deprecated in favor of //# due to problems with Internet Explorer.
This is a tutorial on how to write a compiler which generates JavaScript as its target language, and maintains line and column meta-data in source maps for debugging. Storing line and column coordinates in a source map allows the end-user of the compiler to debug the source code that they wrote, rather than the ugly, generated JavaScript they are not familiar with.
In this tutorial, we will be compiling a small Reverse Polish Notation, or RPN, language to JavaScript. The language is super simple, and is nothing more than simple arithmetic with variable storage and output capabilities. We are keeping the language simple so that we can focus on integrating source maps with the compiler, rather than language implementation details.
Availability
Initial support for source maps in the debugger is available in Firefox 23 (Aurora at time of writing) with more improvements coming in Firefox 24 (Nightly at time of writing). Chrome DevTools also have support for source maps.
Overview of the Source Language
RPN uses postfix notation, meaning that the operator follows its two operands. One of the benefits of RPN is that as long as we limit ourselves to binary operators, we do not need any parentheses, and do not need to worry about operator precedence.
Here is an example program in our source language:
a 5 =;
b 3 =;
c a b + 4 * =;
This is an equivalent program written in a language which uses infix notation for its arithmetic operators:
a = 5;
b = 3;
c = (a + b) * 4;
Our language will support addition, subtraction, multiplication, division, assignment, and printing. The print operator’s first operand is the value to print, the second operand is how many times to print the value and must be greater than or equal to one:
5 1 print;
# Output:
# 5

3 4 print;
# Output:
# 3
# 3
# 3
# 3

4 print;
# Syntax error

n -1 =;
4 n print;
# Runtime error
Lastly, division by zero should throw an error:
5 0 /;
# Runtime error
Getting Setup
We will be writing our compiler on Node.js, using Jison to generate the parser for our language from a grammar, and using the source-map library to help generate source maps.
The first step is to download and install Node.js if you don’t already have it on your system.
After you have installed Node.js, use its package manager npm to create a new project for the compiler:
$ mkdir rpn
$ cd rpn/
$ npm init .
After the last command, npm will prompt you with a bunch of questions. Enter your name and email, answer ./lib/rpn.js for the main module/entry point, and just let npm use the defaults that it supplies for the rest of the questions.
Once you have finished answering the prompts, create the directory layout for the project:
$ mkdir lib
$ touch lib/rpn.js
$ mkdir -p lib/rpn
The public API for the compiler will reside within lib/rpn.js, while the submodules we use to implement various things such as the lexer and abstract syntax tree will live in lib/rpn/*.js.
Next, open up the package.json file and add jison and source-map to the project’s dependencies:
...
"dependencies": {
  "jison": ">=0.4.4",
  "source-map": ">=0.1.22"
},
...
Now we will install a link to our package in Node.js’s globally installed packages directory. This allows us to import our package from the Node.js shell:
$ npm link .
Make sure that everything works by opening the Node.js shell and importing our package:
$ node
> require("rpn")
{}
Writing the Lexer
A lexer (also known as a scanner or tokenizer) breaks the inputted raw source code into a stream of semantic tokens. For example in our case, we would want to break the raw input string "5 3 +;" into something like ["5", "3", "+", ";"].
Because we are using Jison, rather than writing the lexer and parser by hand, our job is much easier. All that is required is to supply a list of rules that describe the types of tokens we are expecting. The left hand side of the rules are regular expressions to match individual tokens, the right hand side are the snippets of code to execute when an instance of the corresponding token type is found. These tokens will be passed on to the parser in the next phase of the compiler.
Create the rules for lexical analysis in lib/rpn/lex.js:
exports.lex = {
  rules: [
    ["\s+",                   "/* Skip whitespace! */"],
    ["#.*\n",                 "/* Skip comments! */"],
    [";",                      "return 'SEMICOLON'"],
    ["\-?[0-9]+(\.[0-9]+)?", "return 'NUMBER';"],
    ["print",                  "return 'PRINT';"],
    ["[a-zA-Z][a-zA-Z0-9_]*",  "return 'VARIABLE';"],
    ["=",                      "return '=';"],
    ["\+",                    "return '+';"],
    ["\-",                    "return '-';"],
    ["\*",                    "return '*';"],
    ["\/",                    "return '/';"],
    ["$",                      "return 'EOF';"]
  ]
};
Writing the Parser
The parser takes the tokens from the lexer one at a time and confirms that the input is a valid program in our source language.
Once again, the task of writing the parser is much easier than it would otherwise be thanks to Jison. Rather than writing the parser ourselves, Jison will programmatically create one for us if we provide a grammar for the language.
If all we cared about was whether the input was a valid program, we would stop here. However, we are also going to compile the input to JavaScript, and to do that we need to create an abstract syntax tree. We build the AST in the code snippets next to each rule.
A typical grammar contains productions with the form:
LeftHandSide → RightHandSide1
             | RightHandSide2
             ...
However, in Jison we are a) writing in JavaScript, and b) also providing code to execute for each rule so that we can create the AST. Therefore, we use the following format:
LeftHandSide: [
  [RightHandSide1, CodeToExecute1],
  [RightHandSide2, CodeToExecute2],
  ...
]
Inside the code snippets, there are a handful of magic variables we have access to:
-
$$: The value of the left hand side of the production. -
$1/$2/$3/etc: The value of the the nth form in the right hand side of the production. -
@1/@2/@3/etc: An object containing the line and column coordinates where the nth form in the right hand side of the production was parsed. -
yytext: The full text of currently matched rule.
Using this information, we can create the grammar in lib/rpn/bnf.js:
exports.bnf = {
  start: [
    ["input EOF", "return $$;"]
  ],
  input: [
    ["",           "$$ = [];"],
    ["line input", "$$ = [$1].concat($2);"]
  ],
  line: [
    ["exp SEMICOLON", "$$ = $1;"]
  ],
  exp: [
    ["NUMBER",           "$$ = new yy.Number(@1.first_line, @1.first_column, yytext);"],
    ["VARIABLE",         "$$ = new yy.Variable(@1.first_line, @1.first_column, yytext);"],
    ["exp exp operator", "$$ = new yy.Expression(@3.first_line, @3.first_column, $1, $2, $3);"]
  ],
  operator: [
    ["PRINT", "$$ = new yy.Operator(@1.first_line, @1.first_column, yytext);"],
    ["=",     "$$ = new yy.Operator(@1.first_line, @1.first_column, yytext);"],
    ["+",     "$$ = new yy.Operator(@1.first_line, @1.first_column, yytext);"],
    ["-",     "$$ = new yy.Operator(@1.first_line, @1.first_column, yytext);"],
    ["*",     "$$ = new yy.Operator(@1.first_line, @1.first_column, yytext);"],
    ["/",     "$$ = new yy.Operator(@1.first_line, @1.first_column, yytext);"]
  ]
};
Implementing the Abstract Syntax Tree
Create the definitions for the abstract syntax tree nodes in lib/rpn/ast.js.
Since we will be maintaining line and column information in all of the AST nodes, we can reuse some code by making a base prototype:
var AstNode = function (line, column) {
  this._line = line;
  this._column = column;
};
The definitions for the rest of the AST nodes are pretty straight forward. Link up the prototype chain, assign relevant attributes, and don’t forget to call AstNode‘s constructor:
exports.Number = function (line, column, numberText) {
  AstNode.call(this, line, column);
  this._value = Number(numberText);
};
exports.Number.prototype = Object.create(AstNode.prototype);

exports.Variable = function (line, column, variableText) {
  AstNode.call(this, line, column);
  this._name = variableText;
};
exports.Variable.prototype = Object.create(AstNode.prototype);

exports.Expression = function (line, column, operand1, operand2, operator) {
  AstNode.call(this, line, column);
  this._left = operand1;
  this._right = operand2;
  this._operator = operator;
};
exports.Expression.prototype = Object.create(AstNode.prototype);

exports.Operator = function (line, column, operatorText) {
  AstNode.call(this, line, column);
  this.symbol = operatorText;
};
exports.Operator.prototype = Object.create(AstNode.prototype);
Compilation
Generated JavaScript
Before we generate JavaScript, we need a plan. There are a couple ways we can structure the outputted JavaScript.
One strategy is to translate the RPN expressions to the equivalent human readable JavaScript expression we would create if we had been writing JavaScript all along. For example, if we were to port this RPN example:
a 8 =;
b 2 =;
c a b 1 - / =;
We might write the following JavaScript:
var a = 8;
var b = 3;
var c = a / (b - 1);
However, this means that we are completely adopting the nuances of JavaScript’s arithmetic. In an earlier example, we saw that a helpful runtime error was thrown when any number was divided by zero. Most languages throw an error when this occurs, however JavaScript does not; instead, the result is Infinity. Therefore, we can’t completely embrace JavaScript’s arithmetic system, and we must generate some code to check for divide-by-zero errors ourselves. Adding this code gets a little tricky if we want to maintain the strategy of generating human readable code.
Another option is treating the JavaScript interpreter as a stack machine of sorts and generating code that pushes and pops values to and from a stack. Furthermore, stack machines are a natural fit for evaluating RPN. In fact, it is such a good fit that RPN “was independently reinvented by F. L. Bauer and E. W. Dijkstra in the early 1960s to reduce computer memory access and utilize the stack to evaluate expressions.”
Generating JavaScript code for the same example above, but utilizing the JavaScript interpreter as a stack machine, might look something like this:
push(8);
push('a');
env[pop()] = pop();
push(2);
push('b');
env[pop()] = pop();
push('a');
push('b');
push(1);
temp = pop();
push(pop() - temp);
temp = pop();
if (temp === 0) throw new Error("Divide by zero");
push(pop() / temp);
push('c');
env[pop()] = pop();
This is the strategy we will follow. The generated code is a bit larger, and we will require a preamble to define push, pop, etc, but compilation becomes much easier. Furthermore, the fact that the generated code isn’t as human readable only highlights the benefits of using source maps!
Creating Source Maps
If we weren’t generating source maps along with our generated JavaScript, we could build the generated code via concatenating strings of code:
code += "push(" + operand1.compile() + " "
  + operator.compile() + " "
  + operand2.compile() + ");n";
However, this doesn’t work when we are creating source maps because we need to maintain line and column information. When we concatenate strings of code, we lose that information.
The source-map library contains SourceNode for exactly this reason. If we add a new method on our base AstNode prototype, we can rewrite our example like this:
var SourceNode = require("source-map").SourceNode;
AstNode.prototype._sn = function (originalFilename, chunk) {
  return new SourceNode(this._line, this._column, originalFilename, chunk);
};

...

code = this._sn("foo.rpn", [code,
                            "push(",
                            operand1.compile(), " ",
                            operator.compile(), " ",
                            operand2.compile(), ");n"]);
Once we have completed building the SourceNode structure for the whole input program, we can generate the compiled source and the source map by calling the SourceNode.prototype.toStringWithSourceMap method. This method returns an object with two properties: code, which is a string containing the generated JavaScript source code; and map, which is the source map.
Implementing Compilation
Now that we have a strategy for generating code, and understand how to maintain line and column information so that we can generate source maps easily, we can add the methods to compile our AST nodes to lib/rpn/ast.js.
To play nice with the global JavaScript environment, we will namespace push, pop, etc, under __rpn.
function push(val) {
  return ["__rpn.push(", val, ");n"];
}

AstNode.prototype.compile = function (data) {
  throw new Error("Not Yet Implemented");
};
AstNode.prototype.compileReference = function (data) {
  return this.compile(data);
};
AstNode.prototype._sn = function (originalFilename, chunk) {
  return new SourceNode(this._line, this._column, originalFilename, chunk);
};

exports.Number.prototype.compile = function (data) {
  return this._sn(data.originalFilename,
                  push(this._value.toString()));
};

exports.Variable.prototype.compileReference = function (data) {
  return this._sn(data.originalFilename,
                  push(["'", this._name, "'"]));
};
exports.Variable.prototype.compile = function (data) {
  return this._sn(data.originalFilename,
                  push(["window.", this._name]));
};

exports.Expression.prototype.compile = function (data) {
  var temp = "__rpn.temp";
  var output = this._sn(data.originalFilename, "");

  switch (this._operator.symbol) {
  case 'print':
    return output
      .add(this._left.compile(data))
      .add(this._right.compile(data))
      .add([temp, " = __rpn.pop();n"])
      .add(["if (", temp, " <= 0) throw new Error('argument must be greater than 0');n"])
      .add(["if (Math.floor(", temp, ") != ", temp,
            ") throw new Error('argument must be an integer');n"])
      .add([this._operator.compile(data), "(__rpn.pop(), ", temp, ");n"]);
  case '=':
    return output
      .add(this._right.compile(data))
      .add(this._left.compileReference(data))
      .add(["window[__rpn.pop()] ", this._operator.compile(data), " __rpn.pop();n"]);
  case '/':
    return output
      .add(this._left.compile(data))
      .add(this._right.compile(data))
      .add([temp, " = __rpn.pop();n"])
      .add(["if (", temp, " === 0) throw new Error('divide by zero error');n"])
      .add(push(["__rpn.pop() ", this._operator.compile(data), " ", temp]));
  default:
    return output
      .add(this._left.compile(data))
      .add(this._right.compile(data))
      .add([temp, " = __rpn.pop();n"])
      .add(push(["__rpn.pop() ", this._operator.compile(data), " ", temp]));
  }
};

exports.Operator.prototype.compile = function (data) {
  if (this.symbol === "print") {
    return this._sn(data.originalFilename,
                    "__rpn.print");
  }
  else {
    return this._sn(data.originalFilename,
                    this.symbol);
  }
};
Gluing it Together
From here we have done all the difficult work, and we can run a victory lap by connecting the modules together with a public API, and by creating a command line script to call the compiler.
The public API resides in lib/rpn.js. It also contains the preamble, to initialize __rpn:
var jison = require("jison");
var sourceMap = require("source-map");
var lex = require("./rpn/lex").lex;
var bnf = require("./rpn/bnf").bnf;

var parser = new jison.Parser({
  lex: lex,
  bnf: bnf
});

parser.yy = require("./rpn/ast");

function getPreamble () {
  return new sourceMap.SourceNode(null, null, null, "")
    .add("var __rpn = {};n")
    .add("__rpn._stack = [];n")
    .add("__rpn.temp = 0;n")

    .add("__rpn.push = function (val) {n")
    .add("  __rpn._stack.push(val);n")
    .add("};n")

    .add("__rpn.pop = function () {n")
    .add("  if (__rpn._stack.length > 0) {n")
    .add("    return __rpn._stack.pop();n")
    .add("  }n")
    .add("  else {n")
    .add("    throw new Error('can\'t pop from empty stack');n")
    .add("  }n")
    .add("};n")

    .add("__rpn.print = function (val, repeat) {n")
    .add("  while (repeat-- > 0) {n")
    .add("    var el = document.createElement('div');n")
    .add("    var txt = document.createTextNode(val);n")
    .add("    el.appendChild(txt);n")
    .add("    document.body.appendChild(el);n")
    .add("  }n")
    .add("};n");
}

exports.compile = function (input, data) {
  var expressions = parser.parse(input.toString());
  var preamble = getPreamble();

  var result = new sourceMap.SourceNode(null, null, null, preamble);
  result.add(expressions.map(function (exp) {
    return exp.compile(data);
  }));

  return result;
};
Create the command line script in bin/rpn.js:
#!/usr/bin/env node
var fs = require("fs");
var rpn = require("rpn");

process.argv.slice(2).forEach(function (file) {
  var input = fs.readFileSync(file);
  var output = rpn.compile(input, {
    originalFilename: file
  }).toStringWithSourceMap({
    file: file.replace(/.[w]+$/, ".js.map")
  });
  var sourceMapFile = file.replace(/.[w]+$/, ".js.map");
  fs.writeFileSync(file.replace(/.[w]+$/, ".js"),
                   output.code + "n//# sourceMappingURL=" + sourceMapFile);
  fs.writeFileSync(sourceMapFile, output.map);
});
Note that our script will automatically add the //# sourceMappingURL comment directive so that the browser's debugger knows where to find the source map.
After you create the script, update your package.json:
...
"bin": {
  "rpn.js": "./bin/rpn.js"
},
...
And link the package again so that the script is installed on your system:
$ npm link .
Seeing Results
Here is an RPN program that we can use to test our compiler. I have saved it in examples/simple-example.rpn:
a 8 =;
b 3 =;
c a b 1 - / =;
c 1 print;
Next, compile the script:
$ cd examples/
$ rpn.js simple-example.rpn
This generates simple-example.js and simple-example.js.map. When we include the JavaScript file in a web page we should see the result of the computation printed on the page:

Great success!
However, we aren't always so lucky, and our arithmetic might have some errors. Consider the following example, examples/with-error.rpn:
a 9 =;
b 3 =;
c a b / =;
c a b c - / =;
c 1 print;
We can compile this script and include the resulting JavaScript in a web page, but this time we won't see any output on the page.
By opening the debugger, setting the pause on exceptions option, and reloading, we can see how daunting debugging without source maps can be:
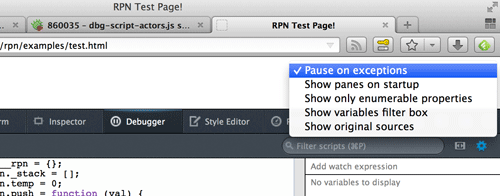

The generated JavaScript is difficult to read, and unfamiliar to anyone who authored the original RPN script. By enabling source maps in the debugger, we can refresh and the exact line where the error ocurred in our original source will be highlighted:


The debugging experience with source maps is orders of magnitude improved, and makes compiling languages to JavaScript a serious possibility.
At the end of the day though, the debugging experience is only as good as the information encoded in the source maps by your compiler. It can be hard to judge the quality of your source maps simply by looking at the set of source location coordinates that they are mapping between, so Tobias Koppers created a tool to let you easily visualize your source maps.
Here is the visualization of one of our source maps:
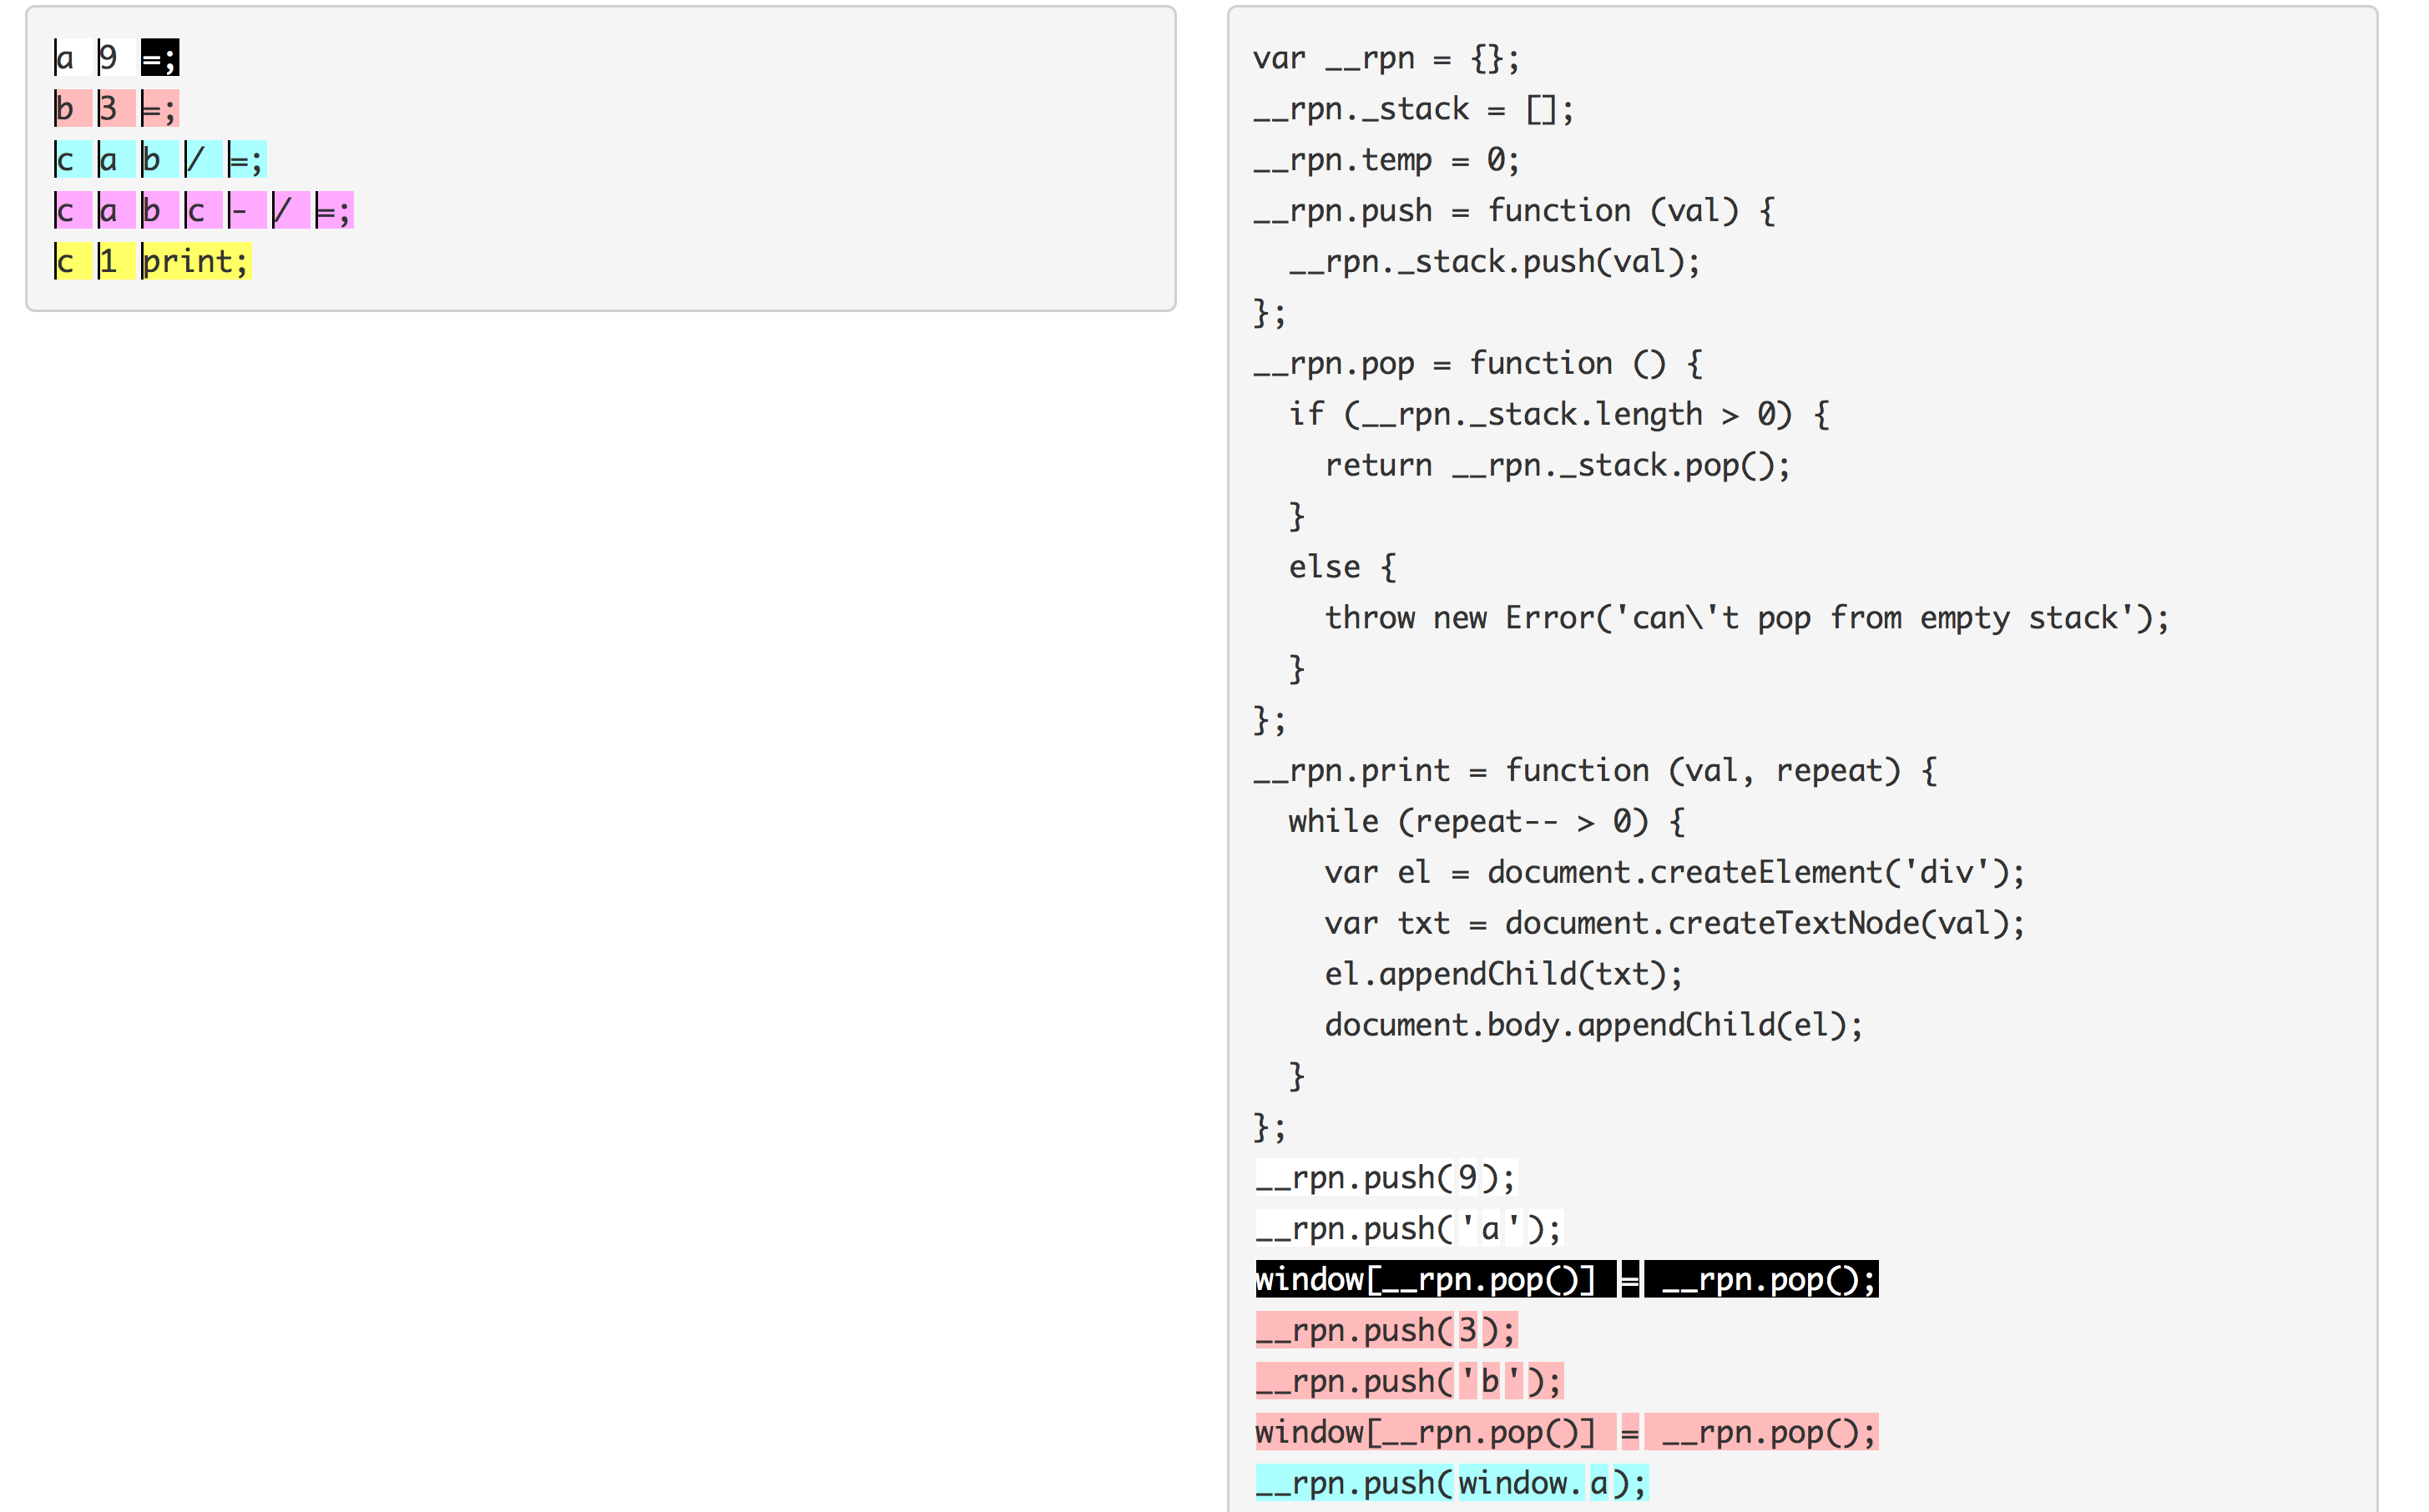
Good luck writing your own compiler that targets JavaScript!
References
-
The
source-maplibrary - The source map specification
- The code used in this tutorial
- Jison
- Reverse Polish Notation at Wikipedia
- Reverse Polish Notation calculator in Bison
About Nick Fitzgerald
I like computing, bicycles, hiphop, books, and pen plotters. My pronouns are he/him.
More articles by Nick Fitzgerald…
About Robert Nyman [Editor emeritus]
Technical Evangelist & Editor of Mozilla Hacks. Gives talks & blogs about HTML5, JavaScript & the Open Web. Robert is a strong believer in HTML5 and the Open Web and has been working since 1999 with Front End development for the web - in Sweden and in New York City. He regularly also blogs at http://robertnyman.com and loves to travel and meet people.
6 comments