
This post is not going to be yet another WebGL tutorial: there already are enough great ones (we list some at the end).
We are just going to introduce the concepts of WebGL, which are basically just the concepts of any general, low-level graphics API (such as OpenGL or Direct3D), to a target audience of Web developers.
What is WebGL?
WebGL is a Web API that allows low-level graphics programming. “Low-level” means that WebGL commands are expressed in terms that map relatively directly to how a GPU (graphics processing unit, i.e. hardware) actually works. That means that WebGL allows you to really tap into the feature set and power of graphics hardware. What native games do with OpenGL or Direct3D, you can probably do with WebGL too.
WebGL is so low-level that it’s not even a “3D” graphics API, properly speaking. Just like your graphics hardware doesn’t really care whether you are doing 2D or 3D graphics, neither does WebGL: 2D and 3D are just two possible usage patterns. When OpenGL 1.0 came out in 1992, it was specifically a 3D API, aiming to expose the features of the 3D graphics hardware of that era. But as graphics hardware evolved towards being more generic and programmable, so did OpenGL. Eventually, OpenGL became so generic that 2D and 3D would be just two possible use cases, while still offering great performance. That was OpenGL 2.0, and WebGL is closely modeled after it.
That’s what we mean when we say that WebGL is a low-level graphics API rather than a 3D API specifically. That is the subject of this article; and that’s what makes WebGL so valuable to learn even if you don’t plan to use it directly. Learning WebGL means learning a little bit of how graphics hardware works. It can help developing an intuition of what’s going to be fast or slow in any graphics API.
The WebGL context and framebuffer
Before we can properly explain anything about the WebGL API, we have to introduce some basic concepts. WebGL is a rendering context for the HTML Canvas element. You start by getting a WebGL context for your canvas:
var gl;
try {
  gl = canvas.getContext("experimental-webgl");
} catch(e) {}
From there, you perform your rendering by calling the WebGL API functions on the gl element obtained there. WebGL is never single-buffered, meaning that the image that you are currently rendering is never the one that is currently displayed in the Canvas element. This ensures that half-rendered frames never show up in the browser’s window. The image being rendered is called the WebGL framebuffer or backbuffer. Talking of framebuffers is made more complicated by the fact that WebGL also allows additional off-screen framebuffers, but let’s ignore that in this article. The image currently being displayed is called the frontbuffer. Of course, the contents of the backbuffer will at some point be copied into the frontbuffer — otherwise WebGL drawing would have no user-visible effect!
But that operation is taken care of automatically by the browser, and in fact, the WebGL programmer has no explicit access to the frontbuffer whatsoever. The key rule here is that the browser may copy the backbuffer into the frontbuffer at any time except during the execution of JavaScript. What this means is that you must perform the entire WebGL rendering of a frame within a single JavaScript callback. As long as you do that, correct rendering is ensured and the browser takes care of the very complex details of multi-buffered compositing for you. You should, in addition, let your WebGL-rendering callback be a requestAnimationFrame callback: if you do so, the browser will also take care of the complex details of animation scheduling for you.
WebGL as a general, low-level graphics API
We haven’t yet described how WebGL is a low-level graphics API where 2D and 3D are just two possible usage patterns. In fact, the very idea that such a general graphics API may exist is non-trivial: it took the industry many years to arrive to such APIs.
WebGL allows to draw either points, or line segments, or triangles. The latter is of course what’s used most of the time, so we will focus entirely on triangles in the rest of this article.
WebGL’s triangle rendering is very general: the application provides a callback, called the pixel shader or fragment shader, that will be called on each pixel of the triangle, and will determine the color in which it should be drawn.
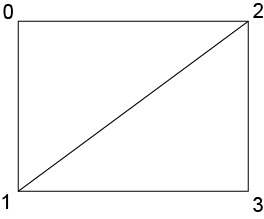
So suppose that you’re coding an old-school 2D game. All what you want is to draw rectangular bitmap images. As WebGL can only draw triangles (more on this below), you decompose your rectange into two triangles as follows,
and your fragment shader, i.e. the program that determines the color of each pixel, is very simple: it will just read one pixel from the bitmap image, and use it as the color for the pixel currently being rendered.
Suppose now that you’re coding a 3D game. You have tesselated your 3D shapes into triangles. Why triangles? Triangles are the most popular 3D drawing primitive because any 3 points in 3D space are the vertices of a triangle. By contrast, you cannot just take any 4 points in 3D space to define a quadrilateral — they would typically fail to lie exactly in the same plane. That’s why WebGL doesn’t care for any other kind of polygons besides triangles.
So your 3D game just needs to be able to render 3D triangles. In 3D, it is a little bit tricky to transform 3D coordinates into actual canvas coordinates — i.e. to determine where in the canvas a given 3D object should end up being drawn. There is no one-size-fits-all formula there: for example, you could want to render fancy underwater or glass refraction effects, that would inevitably require a custom computation for each vertex. So WebGL allows you to provide your own callback, called the vertex shader, that will be called for each vertex of each triangle you will render, and will determine the canvas coordinates at which it should be drawn.
One would naturally expect these canvas coordinates to be 2D coordinates, as the canvas is a 2D surface; but they are actually 3D coordinates, where the Z coordinate is used for depth testing purposes. Two pixels differing only by their Z coordinate correspong to the same pixel on screen, and the Z coordinates are used to determine which one hides the other one. All three axes go from -1.0 to +1.0. It’s important to understand that this is the only coordinate system natively understood by WebGL: any other coordinate system is only understood by your own vertex shader, where you implement the transformation to canvas coordinates.

Once the canvas coordinates of your 3D triangles are known (thanks to your vertex shader), your triangles will be painted, like in the above-discussed 2D example, by your fragment shader. In the case of a 3D game though, your fragment shader will typically be more intricate than in a 2D game, as the effective pixel colors in a 3D game are not as easily determined by static data. Various effects, such as lighting, may play a role in the effective color that a pixel will have on screen. In WebGL, you have to implement all these effects yourself. The good news is that you can: as said above, WebGL lets you specify your own callback, the fragment shader, that determines the effective color of each pixel.
Thus we see how WebGL is a general enough API to encompass the needs of both 2D and 3D applications. By letting you specify arbitrary vertex shaders, it allows implementing arbitrary coordinate transformations, including the complex ones that 3D games need to perform. By accepting arbitrary fragment shaders, it allows implementing arbitrary pixel color computations, including subtle lighting effects as found in 3D games. But the WebGL API isn’t specific to 3D graphics and can be used to implement almost any kind of realtime 2D or 3D graphics — it scales all the way down to 1980s era monochrome bitmap or wireframe games, if that’s what you want. The only thing that’s out of reach of WebGL is the most intensive rendering techniques that require tapping into recently added features of high-end graphics hardware. Even so, the plan is to keep advancing the WebGL feature set as is deemed appropriate to keep the right balance of portability vs features.
The WebGL rendering pipeline
So far we’ve discussed some aspects of how WebGL works, but mostly incidentally. Fortunately, it doesn’t take much more to explain in a systematic way how WebGL rendering proceeds.
The key metaphor here is that of a pipeline. It’s important to understand it because it’s a universal feature of all current graphics hardware, and understanding it will help you instinctively write code that is more hardware-friendly, and thus, runs faster.
GPUs are massively parallel processors, consisting of a large number of computation units designed to work in parallel with each other, and in parallel with the CPU. That is true even in mobile devices. With that in mind, graphics APIs such as WebGL are designed to be inherently friendly to such parallel architectures. On typical work loads, and when correctly used, WebGL allows the GPU to execute graphics commands in parallel with any CPU-side work, i.e. the GPU and the CPU should not have to wait for each other; and WebGL allows the GPU to max out its parallel processing power. It is in order to allow running on the GPU that these shaders are written in a dedicated GPU-friendly language rather than in JavaScript. It is in order to allow the GPU to run many shaders simultaneously that shaders are just callbacks handling one vertex or one pixel each — so that the GPU is free to run shaders on whichever GPU execution unit and in whichever order it pleases.
The following diagram summarizes the WebGL rendering pipeline:

The application sets up its vertex shader and fragment shader, and gives WebGL any data that these shaders will need to read from: vertex data describing the triangles to be drawn, bitmap data (called “textures”) that will be used by the fragment shader. Once this is set up, the rendering starts by executing the vertex shader for each vertex, which determines the canvas coordinates of triangles; the resulting triangles are then rasterized, which means that the list of pixels to be painted is determined; the fragment shader is then executed for each pixel, determining its color; finally, some framebuffer operation determines how this computed color affects the final framebuffer’s pixel color at this location (this final stage is where effects such as depth testing and transparency are implemented).
GPU-side memory vs main memory
Some GPUs, especially on desktop machines, use their own memory that’s separate from main memory. Other GPUs share the same memory as the rest of the system. As a WebGL developer, you can’t know what kind of system you’re running on. But that doesn’t matter, because WebGL forces you to think in terms of dedicated GPU memory.
All what matters from a practical perspective is that:
- WebGL rendering data must first be uploaded to special WebGL data structures. Uploading means copying data from general memory to WebGL-specific memory. These special WebGL data structures are called WebGL textures (bitmap images) and WebGL buffers (generic byte arrays).
- Once that data is uploaded, rendering is really fast.
- But uploading that data is generally slow.
In other words, think of the GPU as a really fast machine, but one that’s really far away. As long as that machine can operate independently, it’s very efficient. But communicating with it from the outside takes very long. So you want to do most of the communication ahead of time, so that most of the rendering can happen independently and fast.
Not all GPUs are actually so isolated from the rest of the system — but WebGL forces you to think in these terms so that your code will run efficiently no matter what particular GPU architecture a given client uses. WebGL data structures abstract the possibility of dedicated GPU memory.
Some things that make graphics slow
Finally, we can draw from what was said above a few general ideas about what can make graphics slow. This is by no means an exhaustive list, but it does cover some of the most usual causes of slowness. The idea is that such knowledge is useful to any programmer ever touching graphics code — regardless of whether they use WebGL. In this sense, learning some concepts around WebGL is useful for much more than just WebGL programming.
Using the CPU for graphics is slow
There is a reason why GPUs are found in all current client systems, and why they are so different from CPUs. To do fast graphics, you really need the parallel processing power of the GPU. Unfortunately, automatically using the GPU in a browser engine is a difficult task. Browser vendors do their best to use the GPU where appropriate, but it’s a hard problem. By using WebGL, you take ownership of this problem for your content.
Having the GPU and the CPU wait for each other is slow
The GPU is designed to be able to run in parallel with the CPU, independently. Inadvertently causing the GPU and CPU to wait for each other is a common cause of slowness. A typical example is reading back the contents of a WebGL framebuffer (the WebGL readPixels function). This may require the CPU to wait for the GPU to finish any queued rendering, and may then also require the GPU to wait for the CPU to have received the data. So as far as you can, think of the WebGL framebuffer as a write-only medium.
Sending data to the GPU may be slow
As mentioned above, GPU memory is abstracted by WebGL data structures such as textures. Such data is best uploaded once to WebGL and then used many times. Uploading new data too frequently is a typical cause of slowness: the uploading is slow by itself, and if you upload data right before rendering with it, the GPU has to wait for the data before it can proceed with rendering — so you’re effectively gating your rendering speed on slow memory transfers.
Small rendering operations are slow
GPUs are intended to be used to draw large batches of triangles at once. If you have 10,000 triangles to draw, doing it in one single operation (as WebGL allows) will be much faster than doing 10,000 separate draw operations of one triangle each. Think of a GPU as a very fast machine with a very long warm-up time. Better warm up once and do a large batch of work, than pay for the warm-up cost many times. Organizing your rendering into large batches does require some thinking, but it’s worth it.
Where to learn WebGL
We intentionally didn’t write a tutorial here because there already exist so many good ones:
Allow me to also mention that talk I gave, as it has some particularly minimal examples.
About Robert Nyman [Editor emeritus]
Technical Evangelist & Editor of Mozilla Hacks. Gives talks & blogs about HTML5, JavaScript & the Open Web. Robert is a strong believer in HTML5 and the Open Web and has been working since 1999 with Front End development for the web - in Sweden and in New York City. He regularly also blogs at http://robertnyman.com and loves to travel and meet people.
11 comments